Kenmore Parts
Start With Your Model Number
Find Parts Fast
Guaranteed Fit
Repair Videos
Need help finding your model number?

Popular Kenmore Parts
$7.70
In Stock
Light Bulb - 40W
Fix Number FIX884734
Manufacturer Part Number 8009
This is a genuine OEM 40-Watt replacement light bulb that is compatible with various types of appliances. It has a frosted glass bulb with a standard metal socket base, making it easy to screw and unscrew by hand to replace. It is designed to tolerate extreme temperatures, which is why it is commonly used to light the inside of refrigerators and ovens. Depending on the appliance and location of the bulb, disconnecting the power is recommended. This bulb is sold individually.
Installation Instructions
Helen from Quincy, MA
lightbulb in refrigerator went out
Removed plastic shield on top of refrigerator. Removed old bulb.. Replaced new bulb. Reinstalled plastic shield. Voila!
Read more...
$2.70
In Stock
Door Catch Kit
Fix Number FIX334230
Manufacturer Part Number 279570
This kit includes two door strikes, and three door catches, to service doors that have one or two catches. The strike is mounted on the body of the dryer, while the catch is mounted on the dryer door. These two parts work together to keep the dryer door shut while in operation. If your appliances lid will not close, or it will not start, it may be time to replace the door catch. If this part is malfunctioning, it should be replaced immediately, as it is not safe to run a dryer with the door not properly closed. This kit also comes with a set of instructions to help with the repair.
Fixes these symptoms
- Door Pops Open
- Door won’t close
- Lid or door won’t close
- See more...
Installation Instructions
jeffrey from Brookhaven, PA
Dryer would run, but not heat
Needed it running quick, so no diagnostics. Ordered one of everything that could fix problem (plus a new door catch). Tipped it onto it's back & popped the bottom cover off. Element, thermal cutoff, thermistor, and fuse. were right in front and held by 2 screws each (don't drop them, don't ask). A little bit tight inside, but no big issue. vacuumed the inside, replaced everything (it was the Heating Element, by the way), slapped the cover on, and put it back in its spot. works like it was new. Yes, I unplugged it first. Remember! Safety Third!
Read more...
$17.19
In Stock
Multi Rib Belt - 92-1/4"
Fix Number FIX346995
Manufacturer Part Number 341241
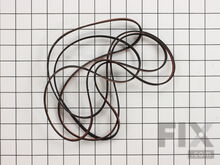
This multi rib belt is an OEM replacement part for a dryer. It attaches to the drum, idler pulley, and motor pulley, and is responsible for spinning the drum. Over time, the belt can become frayed, brittle, and inflexible. If you can hear the motor running, but the drum does not turn, it is likely that the belt is broken. Other symptoms of a broken multi rib belt include unusual noises, failing to start, no heat, a burning smell, and an unresponsive touchpad. Depending on the model, you will find the belt by looking behind the front panel or under the main top of the dryer. This belt is 1/4-inches wide, has a length of 92-1/4-inches, and has four ridges and three groves on the belt. Each belt is sold separately.
Fixes these symptoms
- Drum Not Spinning
- Heat stays on after drum has stopped
- Noisy
- See more...
$19.73
In Stock
Light Bulb
Fix Number FIX12751166
Manufacturer Part Number 316538904
Clear, 120 Volt, 40 Watt.
Installation Instructions
Chris from Lillington, NC
Broken bake element & light bulb
Turned of the power at the fuse box as the oven was hard wired to the electrical source and then removed the old element via the screws at the back of the oven. Disconnected the wires from the element and then reconnected those to the new element. Screwed the element base to the back wall of the oven and then replaced the light bulb.
Read more...
$19.63
In Stock
Dryer Thermal Fuse
Fix Number FIX11741460
Manufacturer Part Number WP3392519
The dryer thermal fuse, also sometimes referred to as the thermal cut off or temperature fuse, is a 2 by 1/2-inch, white, plastic safety mechanism that halts the flow of electricity to the motor circuit when a dryer overheats. If the fuse is missing or broken, your dryer will not start. A thermal fuse fails when the exhaust temperature exceeds the fuse rating, that is when the temperature rises above the temperature that the fuse is intended to manage. This can be caused by the heating element shorting, a regulating thermostat or thermistor failure, or with a partially restricted exhaust vent. The fuse attaches to the blower wheel housing. It must be replaced when there is no longer continuity between the terminals. This is a one-time fuse, meaning it cannot be re-set. The replacement part features two 3/16-inch terminals. While performing this repair, we recommend checking to make sure all vents are cleared and vacuumed. This OEM part is sold individually.
Fixes these symptoms
- Heat stays on after drum has stopped
- Not Heating
- Too hot
- See more...
Installation Instructions
gary from apex, NC
dryer not heating
Checked the heating element and found a break in the heating coil. Decided to change the thermal fuse and the the cycling thermostat because of the age of the dryer.
Read more...
$13.42
In Stock
Roller Support Tri-Ring
Fix Number FIX11755850
Manufacturer Part Number WPW10512946
This small but mighty OEM piece is called a tri-ring and is used to support the drum roller shaft and the idler pulley shaft in your dryer. It helps to provide a tight seal between components by evenly distributing pressure. The part is triangular in shape, and less than an inch in size. Overtime it can become brittle or compressed, which can lead to a noisy tumbling cycle, or your dryer not tumbling at all. The tri-ring itself is simple to replace, simply slip off the damaged one and slip on the new. However, to access the drum roller or idler pulley, you will need to remove the front panel and drum of your dryer. This may require tools like a Phillips screwdriver, a quarter inch nut driver, putty knife, a small flat blade screwdriver, and a pair of needle nose pliers depending on your model. Ensure that the power is disconnected before beginning your repair.
Fixes these symptoms
- Noisy
- See more...
Installation Instructions
JAMES from GREENSBURG, PA
Loud squeaking and squealing
Lint Filter - Removed old lint filter and inserted new lint filter. This is the first time I tried to fix a dryer. A handyman I am not. I found two very useful YouTube videos using basically my model of Kenmore (11067851600). Disassembly/Assembly - here is a difference between Kenmore 29" wide dryers and 27" wide dryers. Mine is 27". My effort was not a smooth as these videos. The bottom front panel's right most clip was quite troublesome. The moisture sensor wire required needle nose pliers to be disconnected and reconnected. The open door sensor was not easy to disconnect. Although with a few special magic words it came apart. The upper front panel was held in place with two T20 Torx screws. I had only had a T15 driver, therefore a trip to Home Depot was required. The first two tri rings were not easily removed, however, on third tri ring it became easier and not damaged. Replacement of tri rings was not troublesome. Support rollers snapped in place easily. However, I did thoroughly clean the housing. It was quite grimy. Actually, while I had the dryer open I cleaned everything including the heating element and electric motor. It now operates quietly. It took me a little over two hours because I am not handy and must take care not to make matters worse plus I thoroughly cleaned everything include scuff marks where the drum rubs. Anyone else probably should have it completed 30-60 minutes easily.
Read more...
Refrigerator Ice Maker Assembly
Fix Number FIX12364147
Manufacturer Part Number 241798231
This is a genuine OEM ice maker assembly for your refrigerator. The ice maker makes eight cubes at a time, by filling the mold with water from the inlet valve, freezing the water until the cubes are formed, and then ejecting them into the storage bucket. This process will repeat until the ice bucket is full. If your device is not making ice cubes, the ice maker assembly may need to be replaced. Please ensure that you disconnect the power and water supply to your fridge before beginning this repair. This kit includes the fill cup, a four-pin wire harness adapter, and tube.
Fixes these symptoms
- Ice maker not making ice
- Ice maker won’t dispense ice
- Leaking
- See more...
Installation Instructions
Benedict from Simsbury, CT
Ice maker stopped making ice
Loosened 2 screws on left side freezer wall. Disconnected wire harness. Took out ice maker. Made sure screws extended far enough out to fit the new ice maker over them. Connected the wire harness. Put ice maker onto the 2 screws. Tightened the screws. Within a few hours we had ice. NOTE: use a mirror or you will fish blindly trying to find and tighten the screws. With the mirror, it was easy.
Read more...
$31.63
In Stock
Refrigerator Door Switch
Fix Number FIX12728638
Manufacturer Part Number W11384469
Door switch turns the light off when you close the door.
Fixes these symptoms
- Light not working
- See more...
Installation Instructions
Marilyn from Dublin, OH
Light switch no longer worked
Turn off and unplug your refrigerator. I used the screwdriver on the left side of the part (where the plug is) and used the putty knife at the same time on the right side to push the spring lock portion of the part in. The part snapped out. I unplugged the left contact from the plug and put it on the new part, then I unplugged the right contact and put it on the new part. I did this so the wires would not go up into the refrigerator and be hard to find. I put the left side of the new part where the plug and contacts are in first then I snapped the right side in place. I plugged the refrigerator back in and it worked perfectly. Just take your time and gently remove and reconnect the new part. The store where I bought my refrigerator wanted $69.95 for a service call plus an hourly charge and part charge. Count on this site for your parts and do it yourself. I ordered the part on Monday, it was delivered on Tuesday around noon and I made the repair that afternoon.
Read more...
$14.37
In Stock
Rear Drum Support Roller Kit
Step 2: removed screws from lent catcher.
Step 3: removed top lid.
Step 4: removed front panel.
Step 5: removed drum.
Step 6: removed plastic washers.
Step 7: removed old wheels.
Step 8: installed new wheels.
Reversed steps to put everything back. Read more...
Fix Number FIX347627
Manufacturer Part Number 349241T
This is a rear drum support roller kit for your dryer. The 2 rollers come with 4 tri-rings, and 1 palnut. We recommend that you replace both rollers at once. This kit stabilizes the drum cylinder, while letting the drum rotate on the support rollers. If you are having problems with your appliance during tumble mode, or if it is too noisy, you will need this kit. To complete this repair you will need a putty knife, Philips screwdriver and a 5/16 nut driver.
Fixes these symptoms
- Marks left on clothes
- Noisy
- See more...
Installation Instructions
Tyrik from KENNESAW, GA
The roller support wheels were worn down and needed replacing.
Step 1: removed power source.Step 2: removed screws from lent catcher.
Step 3: removed top lid.
Step 4: removed front panel.
Step 5: removed drum.
Step 6: removed plastic washers.
Step 7: removed old wheels.
Step 8: installed new wheels.
Reversed steps to put everything back. Read more...
$216.23
In Stock
Ice Maker
Fix Number FIX1993870
Manufacturer Part Number WR30X10093
The ice maker assembly makes ice by filling the tray with water from the inlet valve, freezing it until solid cubes are formed, and then ejecting them into the ice bucket. This process will repeat until the bucket has reached capacity. If your fridge is no longer making ice, the assembly may need to be replaced. This is a genuine OEM replacement that measures 10 inches by 5 inches in size and will make seven crescent shaped pieces of ice each cycle. The kit is mainly made of white plastic, and includes a 4-pin round plug-in connector, a 6-post plug-in connector, tube, and fill cup. Depending on your frequency of use, the ice maker may need to be replaced every three to ten years. Regular wear and tear is the main reason this part may need to be replaced but be mindful of accidental damage.
Fixes these symptoms
- Ice maker dispenses too little ice
- Ice maker dispenses too much ice
- Ice maker not making ice
- See more...
Installation Instructions
marion from raleigh, NC
Ice maker stopped making ice
Super easy. Loosen 2 screws. Disconnect power line. Take out broken part and plug in new part then slide icemaker back in place and tighten 2 screws. Saved me the $89 service call plus whatever they would have overcharged for the part! And no waiting around for repair guy!
Read more...
Appliance Type
- Kenmore Cooktop Parts
- Kenmore Dishwasher Parts
- Kenmore Dryer Parts
- Kenmore Freezer Parts
- Kenmore Laundry Accessories Parts
- Kenmore Microwave Parts
- Kenmore Microwave Oven Combo Parts
- Kenmore Range Parts
- Kenmore Range Hood Parts
- Kenmore Refrigerator Parts
- Kenmore Trash Compactor Parts
- Kenmore Wall Oven Parts
- Kenmore Washer Parts
- Kenmore Washer Dryer Combo Parts
- Kenmore Grill Parts
- Kenmore Air Conditioner Parts
- Kenmore Air Purifier Parts
- Kenmore Dehumidifier Parts
- Kenmore Tent & Awning Parts
- Kenmore Bath & Ventilation Fan Parts
- Kenmore Garage Door Opener Parts
- Kenmore Ice Maker Parts
- Kenmore Food Processor Parts
- Kenmore Popcorn Maker Parts
- Kenmore Warming Drawer Parts
- Kenmore Water Heater Parts
Popular Kenmore Models
- 4317943 Kenmore Refrigerator Model 431.7943 (4317943, 431 7943) Parts
- 10650023211 REFRIGERATOR
- 11061202011
- 59672003016 REFRIGERATOR
- 41781122310 DRYER
- 10651133210 REFRIGERATOR
- 79571033010
- 41741122410 WASHER
- 79681182310 DRYER
- 25368802015
- 10659422801
- 10656532400
- 10651102110
- 25344723100
- 10651103110
- 66513293K114 UNDERCOUNTER DISHWASHER
- 41788042700
- 10651133213 REFRIGERATOR
- 10651123211 REFRIGERATOR
- 79641262610 WASHER