Gasket Kit
- Fix Number:
- FIX10044723
- Manufacturer #:
- E100959
- Manufactured by:
- Craftsman
- Product Description
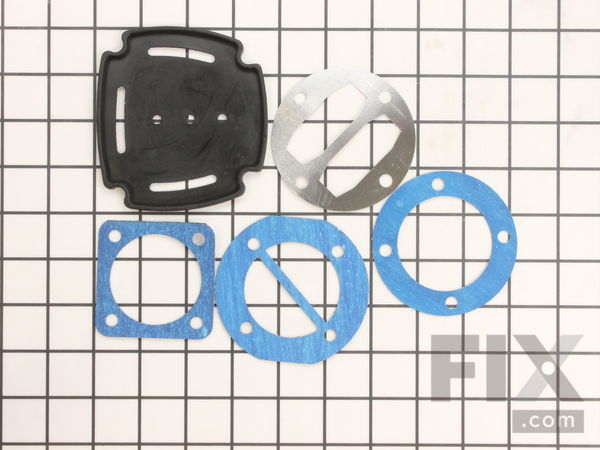
- This is an OEM gasket kit for air compressors. The gaskets contained in this kit are designed to seal the pump assembly. These gaskets form a tight fit between components, allowing it to increase pressure. This kit includes five parts in total. The kit includes an oil crankcase seal rubber gasket, square cylinder to crankcase gasket, and three round gaskets (cylinder to valve plate gasket, the centre gasket, and the valve plate to head gasket). It is normal for these parts to wear over time and need replacement. For this repair you will need a wrench set to disassemble the pump.
- Works with the following brands:
- Craftsman
- Works with the following products
- Compressor
- Fixes the following symptoms
- No compressed air, Air leak
Product Description
This is an OEM gasket kit for air compressors. The gaskets contained in this kit are designed to seal the pump assembly. These gaskets form a tight fit between components, allowing it to increase pressure. This kit includes five parts in total. The kit includes an oil crankcase seal rubber gasket, square cylinder to crankcase gasket, and three round gaskets (cylinder to valve plate gasket, the centre gasket, and the valve plate to head gasket). It is normal for these parts to wear over time and need replacement. For this repair you will need a wrench set to disassemble the pump.
-
Works with the following brands:Craftsman
-
Works with the following products:Compressor
-
Fixes the following symptoms:No compressed air, Air leak
Questions and Answers
Be the first to ask our experts a question about this part!
Related Parts Additional or alternate parts to consider.
Installation Instructions Provided by Fix customers like you.
- < Prev
- 1
- Next >
- Customer:
- Gregory from ORANGE, TX
- Parts Used:
- E100959
- Difficulty Level:
- Very Easy
- Total Repair Time:
- 15 - 30 mins
- Tools:
- Nutdriver, Screw drivers, Wrench set
Running great 95.%
1. Remove two bolts under compressor motor that hold motor to frame. This allows access to the three interior screws that are part of the motor cover.
2. Remove the 6 screws that hold the motor cover. There are 3 on the back and 3 on the front.
3. Loosen t ... Read more he 4 Allen head bolts from the top of the compressor. When removing, make sure that the washers are not lost.
4. Make note of the sequence of gaskets.
5. Clean off old gasket material from head. This is PIA. Use a razor. Make sure you get all of the old gasket material off, else the repair will fail.
6. Inspect reed valves, replace is necessary.
7. Position NEW gasket material and reassemble.
8. Hand tighten Allen Head bolts.
9. Tighten head bolts with torque wrench diagonally to 12 Ft Lbs.
10. Replace compressor cover. It will NOT be necessary to replace all 6 screws, if you anticipate having to do this fix again.
11. Replace the two frame bolts.
12. Done
- < Prev
- 1
- Next >
Model Compatibility
Manufacturer Part Number: E100959
Some of the parts we sell are eligible for mail-in rebates since we can recycle them. We will display any applicable rebates in your shopping cart. To redeem your rebate, contact Customer Service after you have received your part.


