Hotpoint Wall Oven Parts
Find Parts Fast
Guaranteed Fit
Repair Videos


Popular Hotpoint Wall Oven Parts
- Fix Number
- FIX217532
- Manufacturer Part Number
- 40A15
Installation Instructions
Jeffrey from SEATTLE, WA
Bake element replacement
1. Turn of over power at the breaker.2. Remove bake element cover. There's 2 quarter inch nuts.
3. Disconnect old element. For me there was not much play in the wires so when I disconnected the old element I lost the wire in the insulation. If this happened you can remove the central plate cover on the back of the oven and you can easily find the wires again.
4. Connect the replacement element.
5. Screw the bake element cover back in.
6. Turn power back on. Read more...
- Fix Number
- FIX249466
- Manufacturer Part Number
- WB44X5082
Fixes these symptoms
- Element will not heat
- Little to no heat when baking
- Little to no heat when broiling
- See more...
Installation Instructions
Stephen from Davie, FL
Element not fully heating
Removed 4 screws and old element. Installed new one. Simple. Remember to flip the circuit breaker first.
Read more...
- Fix Number
- FIX249424
- Manufacturer Part Number
- WB44X200
Fixes these symptoms
- Element will not heat
- Little to no heat when baking
- Little to no heat when broiling
- See more...
Installation Instructions
greg from incline village, NV
30 year old bake element went south
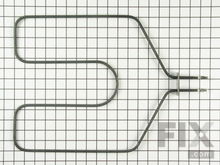
Screws out, new ones in, done. The only thing I'll add which had me concerned was that the element photo shown on the one inch grid didn't show the mounting screws at 3.5" on center which is what my oven had. Fortunately, the picture notwithstanding, the new part was punched at 3.5" so it went right in.
Read more...
- Fix Number
- FIX249411
- Manufacturer Part Number
- WB44X173
Fixes these symptoms
- Element will not heat
- Little to no heat when baking
- Little to no heat when broiling
- See more...
Installation Instructions
Matt from Larkspur, CO
Broil element no longer worked
Turn the power to the stove off first. Make life easy on yourself, remove the door before you start. I removed the 2 screws at the rear of the oven holding the element to the wall first. Then removed the 2 screws holding the element to the top of the oven. Then I pulled the element towards the front to expose the 2 power wires connecting the element. Do not let the wires slip back thru the wall of the oven. Remove the 2 screws and discard them, new ones are provided. Reattach the wires using the stubby to the new element. Reverse the steps to assemble. You can do it!
Read more...
- Fix Number
- FIX243425
- Manufacturer Part Number
- WB2X9154
Fixes these symptoms
- Element will not heat
- Gas igniter glows, but will not light
- Little to no heat when baking
- See more...
Installation Instructions
Steven from Dayton, NV
OVEN WOULD NOT COME AT ALL
I DETERMINED THAT THE OVEN IGNITER WAS NOT WORKING. I OPENED THE PANEL TO THE BOTTOM OF THE OVEN AND WATCHED TO SEE IF IT WAS LIGHTING.... I NOTICED THAT THE IGNITER WAS NOT COMING ON.... SO I WENT ONLINE THE BUY A NEW IGNITER..... FIRST UNPLUG THE OVEN. THEN UNSCREW THE TWO SCREWS HOLDING THE BURNER. UNPLUG THE TWO WIRES. PULL OUT THE BURNER ASSEMBLY. NOW UNSCREW THE TWO SCREWS HOLDING THE IGNITER AND REPLACE WITH NEW ONE. NOW PUT THE BURNER ASSEMBLY BACK IN OVEN JUST LIKE YOU TOOK IT OUT. CUT THE TWO WIRE PLUGS AND USE THE TWO WIRE CAPS THAT COME WITH THE KIT... THERE YOUR ALL DONE. OVEN IS NOW FIXED AND WORKING LIKE NEW.
Read more...
- Fix Number
- FIX249249
- Manufacturer Part Number
- WB44K5013
Fixes these symptoms
- Element will not heat
- Little to no heat when baking
- Oven is too hot
- See more...
Installation Instructions
James from Dumfries, VA
oven not heating up. Bad heating element
Turn power off before you do anything to the appliance. Remove oven door for easier access. With a quarter inch socket unscrew the bolts holding the element in place. Then slowly pull the element out to expose the wires. Once the wires are exposed unplug the wires. Mince removed do everything in reverse Connect wires to new element. Attach element to oven will with the screws. Install the door and turn on power. Turn over on to check that the element is working. If working job is competed.
Read more...
- Fix Number
- FIX249244
- Manufacturer Part Number
- WB44K5009
Fixes these symptoms
- Element will not heat
- Little to no heat when baking
- Little to no heat when broiling
- See more...
Installation Instructions
Mariela from Yorktown heights, NY
many years used ,both element burnec
Simple and easy ad 1,2,3...I fid it myself following steps from these instructions, I was very exited because I try right awsy,works perfect! !! Do it yourself! Remove parts and installing new ones EASY
Read more...
- Fix Number
- FIX236043
- Manufacturer Part Number
- WB21X5301
Fixes these symptoms
- Element will not heat
- Little to no heat when baking
- Oven is too hot
- See more...
Installation Instructions
Timothy from Gurnee, IL
F2 Error - Temp Probe Failed
Watched a U-Tube video and it went just like the video. Clear stove of racks etc. Move stove away from wall, unplug electric, remove access cover on back of stove. Remove old probe. Snap together fitting did not match. Slip new probe wires through insulated access hole. Clip and strip all wires. Wire nut probe wires to range wires with insulated nuts provided. Replace access cover. Slide stove back. The fix went fast. Moving the stove and getting in and out from behind it and cleaning under it (the floor and back/side walls since no one ever moves it to clean there) took far longer than replacing the probe.
Read more...
- Fix Number
- FIX243701
- Manufacturer Part Number
- WB2X9719
Fixes these symptoms
- Element will not heat
- See more...
Installation Instructions
Sally from Swanton, OH
Electric heating element brackets broken & upper elements brackets broken
After watching the how to video I decided I could make the repair without waiting for my busy husband to make the repair. The repair went extremely well and I was delighted that my oven heated much more quickly. I ordered the part and to my surprise it arrived a day later. I installed it on Good Friday and prepared my Easter dinner with no problem on Easter Sunday! Thank you for the video, without it I would not have attempted the repair on my own.
Read more...
- Fix Number
- FIX1481046
- Manufacturer Part Number
- WB20T10024
Fixes these symptoms
- Will not program
- See more...
Appliance Type
Related Pages
Popular Hotpoint Wall Oven Models
- RK746GP1 Built-in, Electric
- RK747G*J3 Electric Built-in
- RK38G*J4 Electric
- RK767G*J4 Electric Built-in
- RK747G*J5 Electric Built-in
- RJ742G*T7 Electric Built-in
- RK767G*J3 Electric Built-in
- RJ742G*J5 Electric
- RK747G*D2 Electric Built-in
- RK767G*D1 Electric Built-in Double Oven
- RK767G*D2 Electric Built-in
- RK777G*D2 Electric Built-in
- RK736GP4BG Built-in, Electric
- RK747G*J1 Electric Built-in
- RJ742G*J3 Electric Built-in
- RK736GP1 Built-in, Electric, Wall
- RK777G*J3 Electric Built-in
- RK767G*T7 Electric
- RK747G*D1 Electric
- RGJ616GEH3 Gas


