


Models
>
WT1101CW
WT1101CW ((ABWEEHD)) LG Washer
Jump to:
Find Part by Name
Keep searches simple, eg. "belt" or "pump".
Keep searches simple, eg. "belt" or "pump".

In Stock

$30.01
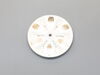
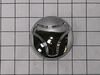
This part is known as a pulsator cap or washplate cap, and is designed for your LG washer. It fits over the washplate mounting bolt and prevents clothes from getting caught on the washplate during a w...
In Stock

$197.69
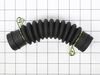
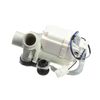
This drain pump is for washers. Drain pump removes water from the washer during the drain portion of the cycle. Unplug the washer before installing this part. Wear work gloves to protect your hands.
In Stock

This clutch housing assembly with mode shifter, or washer drive shaft and shifter assembly, is made for your washer. It connects the appliance wash plate to the motor so the washer can shift the drive...
In Stock

In Stock

In Stock

$126.23
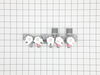
This is an authentic LG water inlet valve for a top-load washer. It is designed to control the flow of water into the washer. If your washer is filling slowly, making loud noises, overflowing, or stop...
In Stock

In Stock

In Stock

On Order

$21.35
This part is the replacement fabric softener cap for your washer. It is also known as the washer dispenser drawer insert. It is made of blue plastic and is approximately 4 1/4 inches by 2 1/4 inches. ...
In Stock

In Stock
Questions and Answers
We're sorry, but our Q&A experts are temporarily unavailable.
Please check back later if you still haven't found the answer you need.
Common Problems and Symptoms for WT1101CW
Viewing 5 of 5Leaking
Fixed by these parts
How to fix it
Will not agitate
Fixed by these parts

How to fix it
Will not drain
Fixed by these parts
How to fix it
Lid or door won’t close
Fixed by these parts

How to fix it
No hot or cold water
Fixed by these parts
How to fix it
Keep searches simple. Use keywords, e.g. "leaking", "pump", "broken" or "fit".
- Customer:
- Jesus from El Paso, TX
- Parts Used:
- 5859EA1004P
- Difficulty Level:
- Very Easy
- Total Repair Time:
- 15 - 30 mins
- Tools:
- Socket set, Wrench set
It did not drain water, cycle stops at rinse+spin.
1-Take water off manually. 2- Take machine to back yard. 3- lay machine 45 degrees. 4- Located water bump, (rear left side). 5-removed drain black hoses with hand. 6-removed 3 screws from bump frame. 7-Taker off all unit and marked down cable position at plug. 8- installed new pump. 9- Reverse all steps. Note: I did not use new cable su
... Read more
pplied with the new bump, I did not want to mess around on mother board connections, I kept old wire harness which are only two cables blue and gray. It took me less than 30 minutes.
Read less
Was this instruction helpful to you?
Thank you for voting!
- Customer:
- Flora from MIAMI, FL
- Parts Used:
- AJU75152601
- Difficulty Level:
- Very Easy
- Total Repair Time:
- 30 - 60 mins
- Tools:
- Screw drivers, Wrench (Adjustable)
Water continued leaking into washer after the end of cycle through the water inlet valve.
Did the repair Myself. Saved $ 400.00 in the process.
Was this instruction helpful to you?
Thank you for voting!
- Customer:
- John from SAN JOSE, CA
- Parts Used:
- MEF62462103
- Difficulty Level:
- Very Easy
- Total Repair Time:
- 15 - 30 mins
- Tools:
- Screw drivers
The right side hinge that holds the washer top door broke and needed to be replaced.
Popped out the plastic "doors" that cover the metal actuators. Removed the metal actuators on both right and left sides of the door then unscrewed (3 screws each actuator) them from door frame. Slid the actuators out to enable the door to be removed. Unscrewed 2 screws on the top front of the washer which enabled me to angle the top of
... Read more
the washer to expose the screws that hold the plastic hinges. Unscrewed the hinges (2 screws each) and replaced both of the hinges (I figured I'd do both of them now so I don't have to do it again for another 15 years). Put everything back together and all works like new.
Read less
Was this instruction helpful to you?
Thank you for voting!