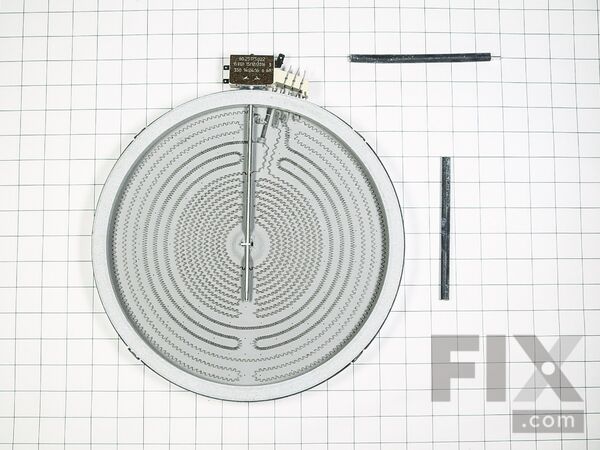
Part Location Diagram of W10823719 Whirlpool ELMNT-SURF
See part 23 in the diagram
( Grid squares measure 1x1 inch )

ELMNT-SURF

Rated by 2 customers 

?

A Bit Difficult 

15 - 30 mins 

Ratings submitted by customers like you who bought this part.

?
$252.02
In Stock
Fix Number:
FIX11764922
Manufacturer #:
W10823719
Manufactured by:
Whirlpool

Product Description

Questions and Answers

We're sorry, but our Q&A experts are temporarily unavailable.
Please check back later if you still haven't found the answer you need.

Installation Instructions Provided by Fix customers like you.

Average Repair Rating: 3.4 / 5.0, 2 reviews.
  • 1
Sort by:
Sorry, we couldn't find any existing installation instruction that matched.
Customer:
James F from Cotuit, MA
Parts Used:
W10823719, W10823692
Difficulty Level:
A Bit Difficult
Total Repair Time:
15 - 30 mins
Tools:
Nutdriver, Pliers
middle radiant element of in both elements quit working
The replacement was really easy once you are able to get the top off the range. Unplug the power source after pulling the unit from the counter space. there are 3 screws on each side holding the top in place. remove the screws and lift the top so you can unplug the elements from their harness. this was a bit difficult as the top is heavy and awkward. used the bock of wood to hold the top high enough to unplug the elements. I then turned the top upside down on the counter. before removing the old element I unplugged each wire on the unit and plugged each one onto the new element to be sure they were in the right position. Then remove the screws and brackets holding the old element in place. Secured the new elements turned the top back up plugged the elements in aligned the top in place secured with screws plugged in the power cord and put unit back in place on counter. the only difficult part I found was trying to hold the top up to unplug the elements and plug them back in that is wre the block of wood came in handy, it supported the weight of the top while connecting the elements.
1 of 2 people found this instruction helpful.
Was this instruction helpful to you?
Thank you for voting!
Customer:
Richard from Boyertown, PA
Parts Used:
W10823719
Difficulty Level:
A Bit Difficult
Total Repair Time:
15 - 30 mins
Tools:
Nutdriver, Screw drivers
Only one of the settings on my triple element was working.
I ordered the part number 74011844 replacement. The web page said that it was the replacement part for model serial numbers higher (Or newer) than my unit's. However; the parts help number confirmed that the part would work on my my oven's range top. When the part arrived I shut off power at the breaker then removed the two front screws holding the glass top to the base, and then unplugged the two connectors in the rear marking each for correct reassembly. I then removed the glass cook top to a work area and turned it over to remove the old element. I took photos of the blades and colored wire connections in the original block to make sure my replacement's blades would be properly inserted to each blade terminal.. However, the replacement element had a different block with blade terminals arranged differently and not marked identically. I called Customer Service to make sure the part was right and to ask for some connection help before I proceeded further. I was assured that this is the correct replacement part bu there was not one there who could advise me on the terminal configuration. I decided on my own to proceed by first attaching wires with blades that matched the old block's markings. After that I deduced the other connections by fit and my assessment of where each should be connected. In reassembling I had to move the location of the strain relief as there was interference at the connector block on the replacement part at the prior elements location for the strain relief. After I satisfied myself that everything looked right I reassembled the cooktop matching the rear connectors as I had marked them and replacing the two front hold down screws. I restored power at the breaker, turned the element on and it worked! This repair would have been a lot easier if a chart would have been included showing where the blade terminals should be inserted o the new-different block on the element.
0 of 1 people found this instruction helpful.
Was this instruction helpful to you?
Thank you for voting!
  • 1

Model Compatibility

This part works with the following models:
Fix Number: FIX11764922
Manufacturer Part Number: W10823719
Brand
Model Number
Description
Kenmore
22-98002
Range - Kenmore Range/Stove/Oven Model 22-.98002 (2298002, 22 98002) Parts
Kenmore
22-98009
Range - Kenmore Range/Stove/Oven Model 22-.98009 (2298009, 22 98009) Parts
Kenmore
62260002600
Range
Kenmore
62260003600
Range
Kenmore
62260008600
Range
Kenmore
62260009600
Range
Kenmore
62960002600
Range
Kenmore
62960002601
Range
Kenmore
62960002606
Range
Kenmore
62960003600
Range
Kenmore
62960008600
Range
Kenmore
62960008601
Range
Kenmore
62960008606
Range
Kenmore
62960009600
Range
Kenmore
62960009601
Range
Kenmore
62960009606
Range
Kenmore
66598002700
Range
Kenmore
66598002701
Range
Kenmore
66598003700
Range
Kenmore
66598003701
Range
Kenmore
66598009700
Range
Kenmore
66598009701
Range
Jenn-Air
JER8895BAS10
Range - FREE STANDING ELECTRIC RANGE
Jenn-Air
JER8895BAS11
Range - FREE STANDING ELECTRIC RANGE
Jenn-Air
JER8895BAS12
Range - 30" ELECTRIC RANGE
Maytag
MEP5775BAB
Range - Slide-in, Electric
Maytag
MEP5775BAB19
Range - 30" DROP-IN ELECTRIC RANGE
Maytag
MEP5775BAF
Range - Slide-in, Electric
Maytag
MEP5775BAF19
Range - 30" DROP-IN ELECTRIC RANGE
Maytag
MER6775BAB
Range - Freestanding, Electric