


Models
>
62260008600
62260008600 Kenmore Range
Jump to:
Find Part by Name
Keep searches simple, eg. "belt" or "pump".
Keep searches simple, eg. "belt" or "pump".

$39.63
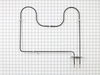
The bake element found in the bottom of your oven provides most of the heat when cooking your food. If your oven is not coming up to temperature, heats unevenly, or is not heating at all, there may be...
In Stock
Order now and your part arrives by Jul 23
 – Part Number: W11665456")
$24.00
This part includes one range leveling leg, sourced directly from the original manufacturer. The leveling leg is what supports the range and ensures it is sitting level, stable, and at the proper heigh...
In Stock
Order now and your part arrives by Jul 23

$21.82
This is a screw and it is made for multiple appliances in your home. This model is called a sheet metal screw because it has sharp points, and the threads are closer together. This screw is designed t...
In Stock
Order now and your part arrives by Jul 23

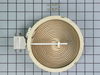
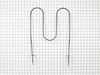
This 6 Inch 1200-watt radiant surface element with limiter is located under the main cooktop. When the element is turned on, it will heat up and provide heat to the cooking area on top of the range. I...
In Stock
Order now and your part arrives by Jul 23

$7.60
This is a replacement screw and washer for your oven/range. It is a Phillips-head screw approximately half an inch long, and the washer is approximately 1 inch in diameter. The screw attaches the oven...
In Stock
Order now and your part arrives by Jul 23

In Stock
Order now and your part arrives by Jul 23

This is an oven rack for your range. It is a stable surface for your cookware to sit when baking and broiling. It measures to be roughly 23 inches wide and 16 inches long. It is made of durable metal ...
No Longer Available

In Stock
Order now and your part arrives by Jul 23

In Stock
Order now and your part arrives by Jul 23

$27.83
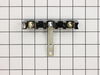
It provides a way of connecting individual electrical wires and offers protection of the device from electrical surges (voltages and/or currents).
In Stock
Order now and your part arrives by Jul 23

$114.45
The interior oven door glass is the innermost heat resistant piece of glass that faces in your oven. The see-through glass measures approximately 20 5/8” x 13 1/8”. If the glass is cracked it should b...
In Stock
Order now and your part arrives by Jul 23

In Stock
Order now and your part arrives by Jul 23
Common Problems and Symptoms for 62260008600
Viewing 8 of 8Element will not heat
Fixed by these parts
How to fix it
Little to no heat when baking
Fixed by these parts
How to fix it
Little to no heat when broiling
Fixed by these parts
How to fix it
Oven not heating evenly
Fixed by these parts
How to fix it
Will Not Start
Fixed by these parts
How to fix it
Door won’t close
Fixed by these parts
How to fix it
Oven is too hot
Fixed by these parts
How to fix it
Touchpad does not respond
Fixed by these parts
How to fix it


")


Keep searches simple. Use keywords, e.g. "leaking", "pump", "broken" or "fit".
- Customer:
- Mark from Loxahatchee, FL
- Parts Used:
- W10823711
- Difficulty Level:
- Really Easy
- Total Repair Time:
- 15 - 30 mins
- Tools:
- Nutdriver, Screw drivers
Right rear burner went bad
Turned the breaker off, I removed 2 screws securing the range top to the range, opened the top and secured it in the up position, Removed the 2 screws securing the element ,one at a time I swapped the quick connectors from the old element to the new and repeated the process in reverse. I save over $100.00 in labor, plus most companies get
... Read more
you for a trip charge. It was easy!!
Read less
Was this instruction helpful to you?
Thank you for voting!
- Customer:
- Gregory from Cary, NC
- Parts Used:
- W10823711
- Difficulty Level:
- Really Easy
- Total Repair Time:
- 15 - 30 mins
- Tools:
- Screw drivers
Hot Burner Light always on
Thermal switch is integral to element and can not be changed, must replace entire element.
Turn off power. Removed front two screws above oven door jamb and lifted the top. Removed the bracket that holds the element against the glass top and removed the element. Moved brackets from old element to new one, aligning to same numer ... Read more ical position and then moved wiring to new element. Slide new element under bracket and reinstalled single screw. Replaced top and screwed down. Turn on power and test .
Turn off power. Removed front two screws above oven door jamb and lifted the top. Removed the bracket that holds the element against the glass top and removed the element. Moved brackets from old element to new one, aligning to same numer ... Read more ical position and then moved wiring to new element. Slide new element under bracket and reinstalled single screw. Replaced top and screwed down. Turn on power and test .
Read less
Was this instruction helpful to you?
Thank you for voting!
- Customer:
- Todd from San Antonio, TX
- Parts Used:
- W10201551
- Difficulty Level:
- Easy
- Total Repair Time:
- 15 - 30 mins
- Tools:
- Pliers, Screw drivers
Upper broiler element (of upper over) burnt out
This particular model has a bracket that holds the element close to the oven ceiling, so I had to unscrew that as well as the element mounting screws on the back oven wall. The hardest part (not that hard) was the connectors were really tightly clamped to the element terminal. I had to use pliers to help wiggle them off the tips. Recom
... Read more
mend doing this very gently yet firmly - I was worried about ruining the connectors or the wires to the oven. The element was deader than dead and actually fell apart in three places once it was detached. The new replacement element arrived a couple days later. Putting it in was a breeze, although the oven is quite dark and I needed Mrs. Handyman to hold a flashlight so I could get the screws in. Oven works fine now.
Read less
Was this instruction helpful to you?
Thank you for voting!