Igniter - Horizontal Mount
- Fix Number:
- FIX11744545
- Manufacturer #:
- WP7432P136-60
- Manufactured by:
- Whirlpool
- Product Description
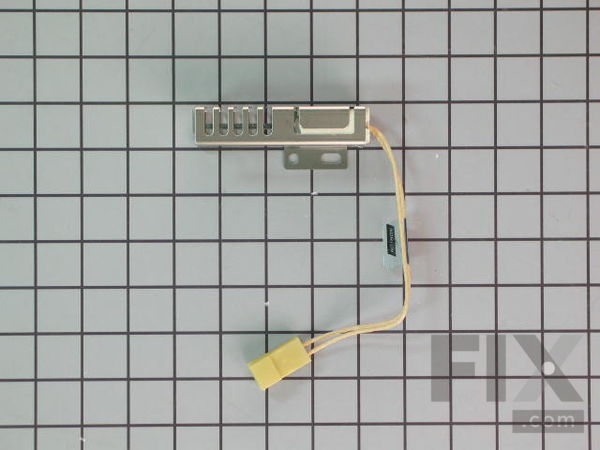
- This is an OEM part sourced directly from the manufacturer. This horizontal mount igniter is designed for use with ranges, it ignites the gas to light the oven burner. This igniter can be used as a bake igniter or a broil igniter. This ignition circuit draws current and it flows through the ignitor, which heats it up and causes it to glow. The warmer the ignitor gets the more current it draws, when it reaches a certain temperature the ignitor will create a spark and light. If you notice that the element on your igniter is glowing but there is no spark to light the gas this is an indication your igniter is weak and needs replacing. When replacing do not tough the element in the center of the igniter, it is extremely fragile. Before starting this repair unplug your appliance and shut off the gas supply.
- Works with the following brands:
- Amana, Maytag, Jenn-Air, KitchenAid
- Works with the following products
- Range
- Fixes the following symptoms
- Little to no heat when baking, Will Not Start, Gas igniter glows, but will not light
- Part# WP7432P136-60 replaces these:
- AP6011349, 31991701, 32009801, 74008064, 7432P131-60, 7432P136-60, WP7432P136-60VP
Product Description
This is an OEM part sourced directly from the manufacturer. This horizontal mount igniter is designed for use with ranges, it ignites the gas to light the oven burner. This igniter can be used as a bake igniter or a broil igniter. This ignition circuit draws current and it flows through the ignitor, which heats it up and causes it to glow. The warmer the ignitor gets the more current it draws, when it reaches a certain temperature the ignitor will create a spark and light. If you notice that the element on your igniter is glowing but there is no spark to light the gas this is an indication your igniter is weak and needs replacing. When replacing do not tough the element in the center of the igniter, it is extremely fragile. Before starting this repair unplug your appliance and shut off the gas supply.
-
Works with the following brands:Amana, Maytag, Jenn-Air, KitchenAid
-
Works with the following products:Range
-
Fixes the following symptoms:Little to no heat when baking, Will Not Start, Gas igniter glows, but will not light
-
Part# WP7432P136-60 replaces these:AP6011349, 31991701, 32009801, 74008064, 7432P131-60, 7432P136-60 ... Show more , WP7432P136-60VP Show less
Questions and Answers
Be the first to ask our experts a question about this part!
Related Parts Additional or alternate parts to consider.
Installation Instructions Provided by Fix customers like you.
- < Prev
- 1
- Next >
- Customer:
- Paul from Arlington, MA
- Parts Used:
- WP7432P136-60
- Difficulty Level:
- Easy
- Total Repair Time:
- 30 - 60 mins
- Tools:
- Screw drivers, Wrench (Adjustable)
First I shut of the gas supply pipe to the range in my basement, then turned on a top burner to make sure the gas was off. Then the range was unplugged from the outlet, lower storage drawer removed, and all racks taken out of the oven.
REMEMBER....MAKE SURE THE GAS IS OFF AND THE RANGE UNPLUGGED FROM THE ELECTICAL SUPPLY!!!!!
For me the hardest part was maneuvering the range out from the wall to get access to the rear panel, as I was working alone. My stove was connected to the gas supply pipe (with another valve) by a flexible metal hose about 18" long, which allows the range to be moved enough to access to it's rear. There is a small panel (about 6" square) located at the center, near the bottom with four vents on it. Remove the two screws at the top and slide it out. Inside you will see the wires and connection from the oven igniter to the electrical supply. Go ahead and unplug it.
To get to the igniter from the oven you have to first remove the bottom cover by taking out two screws located at the rear on either side, and lifting it out. You will see the igniter attached with 2 Phillips head screws on the right side of the burner. Make sure you have a Phillips head driver of the right size with a snug fit as I found the screws to be extremely tight. With the igniter removed you can easily remove it from the oven side, install the new part and slide it's plug through the back. Go around to the rear and plug it in to the electrical supply.
Before you button things up, re-open the gas supply to the range and check for any leaks. If all is good, plug in the range and turn on the oven. The igniter will heat up and glow a bright cherry red and when the burner has been preheated the automatic supply valve will turn on and the gas will ignite (mine takes 35 seconds). Hopefully you problem will be solved.
I shut down the gas and electricity again and cleaned all the dirt and accumulated grunge from the exposed area before closing the rear panel and maneuvering the range back in place. Be careful not to kink or pinch the flexible connection. When done, reopen the gas, check for leaks and if all is good plug the range in again.
Tools needed:
To remove the, oven bottom, igniter, and rear panel you will need a properly sized Phillips head screwdriver. I also used an adjustable crescent wrench to shut off the gas supply, which you would also need should you choose to disconnect the gas line to the range. A plug in work light and battery powered flexible stalk work light were very useful also.
- Customer:
- Irvin from STEWARTSTOWN, PA
- Parts Used:
- WP7432P136-60
- Difficulty Level:
- Very Easy
- Total Repair Time:
- 30 - 60 mins
- Customer:
- Norris from Glenn Dale, MD
- Parts Used:
- WP7432P136-60, 74007498
- Difficulty Level:
- Very Easy
- Total Repair Time:
- 30 - 60 mins
- Tools:
- Screw drivers
- Customer:
- Bruce from Roosevelt, MN
- Parts Used:
- WP7432P136-60
- Difficulty Level:
- Really Easy
- Total Repair Time:
- 15 - 30 mins
- Tools:
- Screw drivers
- Customer:
- lori from harcourt, IA
- Parts Used:
- WP7432P136-60
- Difficulty Level:
- Very Easy
- Total Repair Time:
- 30 - 60 mins
- Tools:
- Screw drivers
- Customer:
- Ken from Cedar Rapids, IA
- Parts Used:
- WP7432P136-60
- Difficulty Level:
- Very Easy
- Total Repair Time:
- 15 - 30 mins
- Tools:
- Screw drivers
- Customer:
- michael from phillipsburg, NJ
- Parts Used:
- WP7432P136-60
- Difficulty Level:
- Very Easy
- Total Repair Time:
- 30 - 60 mins
- Tools:
- Screw drivers
- Customer:
- Andrew from Troy, NY
- Parts Used:
- WP7432P136-60
- Difficulty Level:
- Really Easy
- Total Repair Time:
- 15 - 30 mins
- Tools:
- Screw drivers
- Customer:
- David from North Ridgeville, OH
- Parts Used:
- WP7432P136-60
- Difficulty Level:
- Really Easy
- Total Repair Time:
- 15 - 30 mins
- Tools:
- Screw drivers
- < Prev
- 1
- Next >
- < Prev
- 1
- Next >
Model Compatibility
Manufacturer Part Number: WP7432P136-60
Some of the parts we sell are eligible for mail-in rebates since we can recycle them. We will display any applicable rebates in your shopping cart. To redeem your rebate, contact Customer Service after you have received your part.


