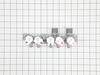
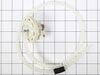
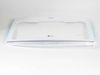
This is an authentic LG water inlet valve for a top-load washer. It is designed to control the flow of water into the washer. If your washer is filling slowly, making loud noises, overflowing, or stop...
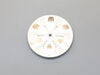
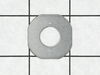
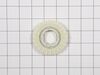
This is a pulsator assembly, also known as an agitator, for your washing machine. This pulsator sits at the bottom of your washer and is what is used as the main driving force to wash your clothes. If...
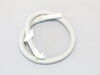
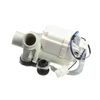
This drain pump helps your LG or Kenmore washer get rid of water after each cycle. If your washer isn’t draining, leaves water in the tub, or makes strange noises, replacing the pump could fix it. It’...
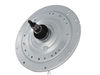
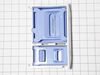
This clutch housing assembly with mode shifter, or washer drive shaft and shifter assembly, is made for your washer. It connects the appliance wash plate to the motor so the washer can shift the drive...
Ask our experts a question about this part and we'll get back to you as soon as possible!
4 questions answered by our experts.
< Prev
1
Next >
Sort by:
Search filter:
Clear Filter
Your search term must have 3 or more characters.
Keep searches simple. Use keywords, e.g. "leaking", "pump", "broken" or "fit".
Sorry, we couldn't find any existing answers that matched. Try using some different or simpler keywords, or submit your new question by using the "Ask a Question" button above!
Ray
April 10, 2022
The washer fills with very little hot water regardless of the setting. Actually, the water is cold even when the temperature setting is on hot. If a new water inlet valve is needed, tell me how to remove the cover over the valve.
For model number WT1501CW
Hello Ray, Thank you for your inquiry. First, check your fill hoses to make sure the hot water hose going to the water inlet valve is turned on all the way and not kinked or clogged. You can test the water inlet valve itself with a multimeter to see if it is working. To access the valve, remove the fill hoses from the back with a pair of pliers, using a towel to catch excess water. Use a Philips head screw driver to remove the screws from the back of the control panel, then you can lift it up and tilt it forward. We hope this helps and if you need help placing an order, customer service is open 7 days a week. Please feel free to give us a call. We look forward to hearing from you!
I keep getting a IE light on my lg top load. My filters are clean and have good water pressure. My questions are, should I replace the mother board, switch assembly sensor or my washer water inlet valve. I feel like it’s a sensor or something electrical as is seams to be dispensing plenty of water.
Thanks in advance for your response
For model number WT1501CW
Hello Caleb, thank you for contacting us. An IE error code indicates that the washer was unable to fill with water. We recommend you check the water supply lines for clogging. If the lines are not blocked, you may need to replace the water inlet valve, part number FIX12374721, to fix the issue. We hope this information helps!
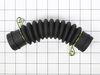
Hi Daphne, thank you for contacting us. We have found some relevant instructions regarding the removal of the friction damper. These may not be of the same model, but will help you to remove it. You may need to follow these steps:
1. Use a screwdriver to open the access panels
2. Pull out the little panels inside of both sides and set them aside
3. Remove all the screws from the dampening unit on both sides.
4. Pry the unit away so that the pin comes out and the whole friction damper comes out of the compartment.
5. Replace them with a new hinge damper.
6. Follow the same procedure backward to install them.
We hope this information helps!
Was this helpful?
Thank you for voting!
Mike
September 21, 2025
How to replace water inlet valve
For model number WT1501CW
Hello Mike, thank you for reaching out. To replace the water inlet valve, first unplug the washer and turn off the water supply. Disconnect the water hoses from the back. Remove the screws securing the top rear panel, and lift it off. The water inlet valve, where the hoses attach, will be visible inside. Disconnect the electrical connectors and remove the mounting screws holding the valve. Use pliers to loosen the clamps and detach the internal hoses. Install the new valve, reconnect the hoses and wires, and secure it in place. Reinstall the top rear panel, reconnect the water hoses, turn on the water supply, and check for leaks. Finally, plug the washer back in and run a short cycle to ensure proper filling and operation. We hope this information is useful!
Was this helpful?
Thank you for voting!
Ask a Question
Ask our experts a question on this part and we'll respond as soon as we can.
1-Take water off manually. 2- Take machine to back yard. 3- lay machine 45 degrees. 4- Located water bump, (rear left side). 5-removed drain black hoses with hand. 6-removed 3 screws from bump frame. 7-Taker off all unit and marked down cable position at plug. 8- installed new pump. 9- Reverse all steps. Note: I did not use new cable su
... Read morepplied with the new bump, I did not want to mess around on mother board connections, I kept old wire harness which are only two cables blue and gray. It took me less than 30 minutes.
Popped out the plastic "doors" that cover the metal actuators. Removed the metal actuators on both right and left sides of the door then unscrewed (3 screws each actuator) them from door frame. Slid the actuators out to enable the door to be removed. Unscrewed 2 screws on the top front of the washer which enabled me to angle the top of
... Read more the washer to expose the screws that hold the plastic hinges. Unscrewed the hinges (2 screws each) and replaced both of the hinges (I figured I'd do both of them now so I don't have to do it again for another 15 years). Put everything back together and all works like new.