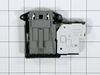
This is a drain pump motor assembly for washers. This OEM part is responsible for removing water from the washer during the drain part of the cycle. When this part is clogged, damaged or defective it ...
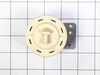
The hot water valve is found at the back of your washer and controls the flow of hot water into the machine. If the valve is defective, the washer may leak, overfill, fill slowly, or not fill with wat...
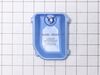
If your washer isn’t dispensing detergent or fabric softener properly, this replacement container assembly may be the fix you need. Designed to hold liquid cleaning agents and release them at the righ...
This water inlet valve controls cold water flow for the bleach dispenser and prewash cycles. It has one standard hose inlet and three angled outlets—two to the right, one to the left. Designed for sel...
This washer hose with bellows, also known as a dispenser hose, is a genuine OEM replacement part for your washer. Replacing this part can be helpful if your washer is leaking. The dispenser hose conne...
This flexible gasket seals the door on your LG or Kenmore front-load washer to keep water from leaking during cycles. If you’re seeing puddles, smelling mildew, or noticing moisture around the door, r...
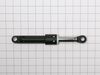
Keep your washer steady and quiet with this replacement friction damper assembly. It helps absorb vibrations and stabilize the drum, especially during fast spin cycles. If your machine is shaking or m...
Ask our experts a question about this part and we'll get back to you as soon as possible!
1 question answered by our experts.
< Prev
1
Next >
Sort by:
Search filter:
Clear Filter
Your search term must have 3 or more characters.
Keep searches simple. Use keywords, e.g. "leaking", "pump", "broken" or "fit".
Sorry, we couldn't find any existing answers that matched. Try using some different or simpler keywords, or submit your new question by using the "Ask a Question" button above!
Gordon
January 9, 2023
LG washer. We disconnected the washer, both power and hot & cold water to do some work to the utility room. We moved the washer out of the utility room and back in by sliding it on the floor. Nothing else was done to the machine. We reconnected the unit again with new hoses. Now the unit will not fill with water. It sounds like it is operating but no water is flowing. We tested the hoses by running water into a bucket and have excellent flow on both the hot and cold sides.
For model number WM3170CW
Hello Gordon, thank you for contacting us. We would recommend testing the water valves, part number FIX3527427 (hot), and part number FIX3527452 (cold), for continuity using a multimeter. The issue can also be related to a faulty water pressure switch, part number FIX3529317. Customer service is available 7 days a week if you require assistance placing an order. Thanks again for reaching out!
Removed the top of the washer by removing the 4 back screws and 2 small brackets. Then I removed the front panel, this was actually the hardest part, 2 screws and 8 tabs that you pop out carefully from the top of the panel. I only disconnected the power button and was able to rest the panel on top of the washer. The rest of the washer cam
... Read moree apart quickly just moving down the front of the washer and removing the door, latch, tub gasket, drain cover. Removing the pump was just a mater of disconnecting the drain hoses, and one clip under the drain assembly. 3 screws attach the drain to assembly to the pump and only 2 wires that are clearly marked. Reassembly is just going back through in reverse order of disassenbly. The best thing about this is that it all comes apart with a standard phillips screwdriver.
Thank you for the very helpful YouTube video. After watching the video, I was able to diagnose the problem, buy the part from your website, and complete the repair. This is my personal machine - I am not a professional repairman.
Pull washer away from wall. Unplug cord and remove drain hose from receptacle. Remove 4 screws holding panel to rear of washer. Squeeze and slide back hose clamps on each end of drain hose and loosen center clamp with screwdriver. Remove old hose. Reinstall new hose in reverse order using existing clamps. Re-install back panel.