


Models
>
WPDH8850J0MG
WPDH8850J0MG General Electric Washer
Jump to:
Find Part by Name
Keep searches simple, eg. "belt" or "pump".
Diagrams for WPDH8850J0MG
Viewing 4 of 4


Manuals & Guides for WPDH8850J0MG
Click to downloadKeep searches simple, eg. "belt" or "pump".

$208.58
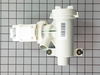
This pump helps expel water from the washing machine and is activated after the spin speed is maintained for a specific period of time. This pump has sound isolation mounting washers and a filter.
In Stock
Order now and your part arrives by Apr 6

$88.41
The main drive belt is designed to work with the motor pulley and spin the drum until it comes up to speed.
NOTE: Per factory measures 48.4" at rest & 51.2" when working.
In Stock
Order now and your part arrives by Apr 6

This part is used to turn the drive belt with the help of the motor or transmission.
No Longer Available

$201.50
This door lock assembly helps keep your washer door securely closed during operation. It’s a genuine replacement part for select front-load models and may resolve issues like unresponsive controls, er...
In Stock
Order now and your part arrives by Apr 6

In Stock
Order now and your part arrives by Apr 6

This part is the replacement door plunger or door strike for your washer. It is made of white plastic and is approximately 2 inches by 1.5 inches. The door strike attaches to the washer door and activ...
No Longer Available

In Stock
Order now and your part arrives by Apr 6


In Stock
Order now and your part arrives by Apr 6


In Stock
Order now and your part arrives by Apr 6

Questions and Answers
We're sorry, but our Q&A experts are temporarily unavailable.
Please check back later if you still haven't found the answer you need.
Common Problems and Symptoms for WPDH8850J0MG
Viewing 6 of 6Will not drain
Fixed by these parts
How to fix it
Leaking
Fixed by these parts


How to fix it
Will not agitate
Fixed by these parts


How to fix it
Burning smell
Fixed by these parts
How to fix it
Lid or door won’t close
Fixed by these parts


How to fix it
Will Not Start
Fixed by these parts
How to fix it


Keep searches simple. Use keywords, e.g. "leaking", "pump", "broken" or "fit".
- Customer:
- BRETT from CLINTON, CT
- Parts Used:
- WH08X10024, WH07X10016
- Difficulty Level:
- A Bit Difficult
- Total Repair Time:
- 30 - 60 mins
- Tools:
- Nutdriver, Screw drivers, Socket set
Rear Tub Pulley became loose and deformed pulley shaft
Ordered new Parts. Removed old/worn parts. Found that the "hammering" from a loose pulley had worn and deformed the edges of the shaft where the flats are to accept new pulley.
Gently filed the flats with the flat surface of the file and filed the hump on the shaft that the "hammering" created. Take extreme caution to not file surfa ... Read more ces too much, because new pulley will be loose and the next step is to replace the drum shaft.($$$$) Pulley did not fit 100% (Had some slop) but that was from material being worn away from "hammering" effect. Torqued with Torque wrench and added green 609 loctite compound - this is meant to help adhere and take up some loose fit in assemblies. - Drawback to Loctite is most have to be heated to 300 to 400 degrees to remove, or pulley will need to be cut off and ruined, I further repair/removal of pulley is necessary. This is an Easy Fix/Replacement of parts.... The hard part is filing the drum shaft surfaces to accept the new pulley, and getting the belt back on - Belt is tight but needs to be stretched on like putting a bike chain back on.
Washer now spins and sounds like a dream!
- Good Luck!
Read less
Was this instruction helpful to you?
Thank you for voting!
- Customer:
- Trent from Shreveport, LA
- Parts Used:
- WH23X10028
- Difficulty Level:
- Really Easy
- Total Repair Time:
- Less than 15 mins
- Tools:
- Pliers, Screw drivers
Washing machine would cease functioning at the spin cycle and would not drain.
Remove the front coverfrom the machine. This is done by removing the 3 screws at the bottom of the panel. The panel then drops down and pulls straight off. The pump is located on the front right wall of the of the machine. You will notice a 2-3 inch diamete threaded cap on the right side of the front wall of the machine. This is the f
... Read more
ront of the pump and access to the filter. Place a large bucket under this cap and slowly loosen the cap. All of the water remaining in the machine will begin to drain (this could be a lot of water. Do not remove the cap completely so that you can quickly stop the flow of water if needed). Once all water is drained from the appliance, Disconnect the two hoses from the pump using a pair of pliers to looses the presure clamps, sliding the clamps back an then pulling off the hoses (be careful of any remaining water in the hoses). Then remove the two screws from the rear base of the pump that secure it to the bottom floor panel of the washer. Slide the pump slightly to the rear to free it from the fittings on the front wall of the machine and the lift the pump up. At this point, firmly pull out the wiring harness plugged into the top right side of the pump. Install the new pump by plugging in the wiring harness and resecuring the pump. Plug in the machine and run on the rinse and spin cycle to test.
Read less
Was this instruction helpful to you?
Thank you for voting!
- Customer:
- John from Farnham, VA
- Parts Used:
- WH23X10028
- Difficulty Level:
- Really Easy
- Total Repair Time:
- Less than 15 mins
- Tools:
- Pliers, Screw drivers
pump would not pump water out of washer
I took the two drain hoses off with the pliers then only two screws that holds the pump. After that the two hot wires which are black and white. But remember to unplug you're washer since the pump is not grounded you don't want to risk being shocked. Hope thi helps. Plus i saved around 250.00 by repairing myself.
Was this instruction helpful to you?
Thank you for voting!