


Models
>
498610
498610 LG Washer Dryer Combo
Jump to:
Find Part by Name
Keep searches simple, eg. "belt" or "pump".
Keep searches simple, eg. "belt" or "pump".

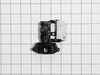
$59.43
This is a drain pump motor assembly for washers. This OEM part is responsible for removing water from the washer during the drain part of the cycle. When this part is clogged, damaged or defective it ...
In Stock
Order now and your part arrives by Jul 30

$36.42
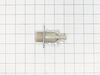
The hot water valve is found at the back of your washer and controls the flow of hot water into the machine. If the valve is defective, the washer may leak, overfill, fill slowly, or not fill with wat...
In Stock
Order now and your part arrives by Jul 30

$72.17
The door lock assembly is a genuine OEM part for your washing machine. This part informs the washer that the door is closed and locked in place, which allows the machine to start its cycle. If you are...
In Stock
Order now and your part arrives by Jul 30

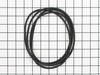
$56.24
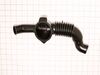
This hose has bellows to allow for flexibility during the wash and spin cycles.
In Stock
Order now and your part arrives by Jul 30

$25.10
This rubber tub seal fits between the front and rear halves of the washing machine’s outer tub to prevent water leaks. It helps maintain proper washing performance and may need replacement if you noti...
In Stock
Order now and your part arrives by Jul 30

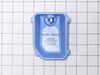
$25.10
If your washer isn’t dispensing detergent or fabric softener properly, this replacement container assembly may be the fix you need. Designed to hold liquid cleaning agents and release them at the righ...
In Stock
Order now and your part arrives by Jul 30

On Order

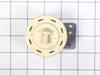
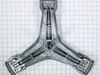
$251.10
This rear drum support, also known as a spider or spinner support, is a critical structural component in select washing machines. Featuring a triangular design with three metal arms, it securely holds...
In Stock
Order now and your part arrives by Jul 30

$25.10
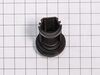
This replacement pump filter, also known as a filter assembly, is a genuine OEM part for your washer or washer/dryer combo. Before beginning this repair, turn off the power and water supply to your wa...
In Stock
Order now and your part arrives by Jul 30

$21.82
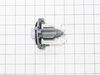
The door boot seal clamp, also referred to as an outer door gasket clamp, holds the door boot in place in a front-loading washer. If your washer is leaking from the door and there are no signs of dama...
On Order

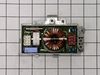
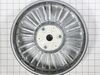
$251.10
This rotor assembly is a manufacturer-approved replacement part for your washing machine. The rotor is an important part to rotate the tub during the wash cycle. It can need replacing if the magnets o...
On Order

Common Problems and Symptoms for 498610
Viewing 18 of 18Will not drain
Fixed by these parts

How to fix it
Leaking
Fixed by these parts
How to fix it
Draining Issues
Fixed by these parts
How to fix it
Will Not Start
Fixed by these parts
How to fix it
Lid or door won’t close
Fixed by these parts
How to fix it
Water Filling Issues
Fixed by these parts
How to fix it
Locking Issues
Fixed by these parts
How to fix it
Does not dispense fabric softener or detergent
Fixed by these parts
How to fix it
Engine runs but does not pump water
Fixed by these parts
How to fix it
No hot or cold water
Fixed by these parts
How to fix it
Burning smell
Fixed by these parts
How to fix it
Spinning Issues
Fixed by these parts
How to fix it
Will not agitate
Fixed by these parts
How to fix it
Noisy
Fixed by these parts
How to fix it
Not draining
Fixed by these parts
How to fix it
Shaking and Moving
Fixed by these parts
How to fix it
Noisy and Marks Left on Clothes
Fixed by these parts
How to fix it
Spins slowly
Fixed by these parts
How to fix it


Keep searches simple. Use keywords, e.g. "leaking", "pump", "broken" or "fit".
- Customer:
- Jorge from Apple Valley, CA
- Parts Used:
- 4681EA2001T
- Difficulty Level:
- Easy
- Total Repair Time:
- 1- 2 hours
- Tools:
- Screw drivers
Washing maching wouldn't drain
Removed the top of the washer by removing the 4 back screws and 2 small brackets. Then I removed the front panel, this was actually the hardest part, 2 screws and 8 tabs that you pop out carefully from the top of the panel. I only disconnected the power button and was able to rest the panel on top of the washer. The rest of the washer cam
... Read more
e apart quickly just moving down the front of the washer and removing the door, latch, tub gasket, drain cover. Removing the pump was just a mater of disconnecting the drain hoses, and one clip under the drain assembly. 3 screws attach the drain to assembly to the pump and only 2 wires that are clearly marked. Reassembly is just going back through in reverse order of disassenbly. The best thing about this is that it all comes apart with a standard phillips screwdriver.
Read less
Was this instruction helpful to you?
Thank you for voting!
- Customer:
- Michael from RALEIGH, NC
- Parts Used:
- 4681EA2001T
- Difficulty Level:
- Really Easy
- Total Repair Time:
- 30 - 60 mins
- Tools:
- Pliers, Screw drivers
noisy operation, sometimes did not drain, gave OE code
Thank you for the very helpful YouTube video. After watching the video, I was able to diagnose the problem, buy the part from your website, and complete the repair. This is my personal machine - I am not a professional repairman.
Was this instruction helpful to you?
Thank you for voting!
- Customer:
- Leslie from STOWE, VT
- Parts Used:
- 4738ER1002A
- Difficulty Level:
- Easy
- Total Repair Time:
- 30 - 60 mins
- Tools:
- Screw drivers
leaking tub-to-pump drain hose
Pull washer away from wall. Unplug cord and remove drain hose from receptacle. Remove 4 screws holding panel to rear of washer. Squeeze and slide back hose clamps on each end of drain hose and loosen center clamp with screwdriver. Remove old hose. Reinstall new hose in reverse order using existing clamps. Re-install back panel.
Was this instruction helpful to you?
Thank you for voting!