


Models
>
GC900QPPB2
GC900QPPB2 Whirlpool Trash Compactor
Jump to:
Find Part by Name
Keep searches simple, eg. "belt" or "pump".
Diagrams for GC900QPPB2
Viewing 6 of 6


Manuals & Guides for GC900QPPB2
Click to downloadKeep searches simple, eg. "belt" or "pump".

In Stock
Order now and your part arrives by Jul 30

$79.09
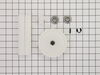
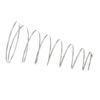
This is a genuine OEM drive gear kit for your trash compactor. It includes the drive gear, pin spring, a retaining clip which is also known as a c-ring, ram stop, and the ram cam. The ram is used to c...
On Order


In Stock
Order now and your part arrives by Jul 30

$24.15
This 18 ml bottle of white appliance touch-up paint is used to cover scratches or marks on your appliance. The white touch-up paint can be used on refrigerators, microwaves, ranges, clothes dryers, an...
In Stock
Order now and your part arrives by Jul 30

This trash compactor bag carrier with easy grip handles is 15 inches in length. The carrier makes it easy to retrieve full bags of trash from your specific appliance. This is a reusable carrier. When ...
On Order

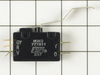
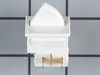
This is an OEM part sourced directly from the manufacturer. This is a top limit and directional switch that is designed for use with trash compactors. This switch will interrupt the current that flows...
In Stock
Order now and your part arrives by Jul 30

Plastic compactor bags. 50% post-consumer recycled plastic 3 millimeters thick to protect from tearing. Slip-N-Grip design prevents the bag from slipping into the compactor. Fits 15" rectangular compactors.
In Stock
Order now and your part arrives by Jul 30

In Stock
Order now and your part arrives by Jul 30

$17.44
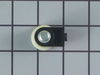
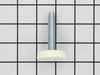
This is a genuine OEM replacement part. This bearing roller is commonly used in the assembly of trash compactors, it allows you to easily slide the container out of the appliance. If the drawer become...
In Stock
Order now and your part arrives by Jul 30

Special Order

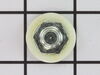
This is a genuine OEM replacement part. This is a power nut and it is commonly used in the assembly of trash compactors. This power nut is part of the ram assembly that compacts your trash, it attache...
In Stock
Order now and your part arrives by Jul 30
Common Problems and Symptoms for GC900QPPB2
Viewing 7 of 7Compactor ram gets stuck
Fixed by these parts

How to fix it
Doesn’t stop at end of compacting cycle
Fixed by these parts
How to fix it
Drawer is hard to open and or close
Fixed by these parts
How to fix it
Noisy
Fixed by these parts
How to fix it
Won’t start
Fixed by these parts
How to fix it
Light not working
Fixed by these parts
How to fix it
Shaking and Moving
Fixed by these parts
How to fix it

Keep searches simple. Use keywords, e.g. "leaking", "pump", "broken" or "fit".
Compactor stuck in lower position
Moved the compactor out from under cabinet and unplugged the powercable.Laid compactor over on its side Removed the top (4 screws) and base plate (3 screws) as well as the coverplate for the motor(3 screws)Found that large drive was broken in half. Used two screwdrivers to start split ring then pliers to pull it off the rest of the way.
... Read more
r />Removed the drive gear and the washer.
Used a nail to drive out the pin for the smaller drive gear kit. Removed and replaced with new, used new pin to lock it on to the shaft. Changed out the bearings and washers on one powerscrew, put chain back on. Then was then a simple matter to put the new gear back on the chain then slide the whole thing back on the drive shaft. Replace the washer then slip the split ring back in place and seat it home with the pliers. Greased chain, gear drive and powerscrew. Put all covers back on with the screws. Pushed button it worked.
Used a nail to drive out the pin for the smaller drive gear kit. Removed and replaced with new, used new pin to lock it on to the shaft. Changed out the bearings and washers on one powerscrew, put chain back on. Then was then a simple matter to put the new gear back on the chain then slide the whole thing back on the drive shaft. Replace the washer then slip the split ring back in place and seat it home with the pliers. Greased chain, gear drive and powerscrew. Put all covers back on with the screws. Pushed button it worked.
Read less
Was this instruction helpful to you?
Thank you for voting!
- Customer:
- Scott from Indianapolis, IN
- Parts Used:
- WP777811
- Difficulty Level:
- Easy
- Total Repair Time:
- 15 - 30 mins
- Tools:
- Nutdriver, Screw drivers
Trash Compactor ram wouldn't lower
I pulled the trash compactor out from under the counter.
I took out the four screws that kept the top cover in place to expose the ram.
The gear shafts were turning but the ram would not lower, at first I though the ram drive bolts were stripped and it wouldn't engage the shaft. Then I realized there was a mechanical ... Read more directional\limit switch at the top that controlled the power and direction the gear shafts were turning, this switch was broken.
Just had to take off the front plate that was held on by a number of screws and replace the switch that was held on by two more screws. It had five wires attached to it, the new switch was clearly labeled as to which color wire went where.
Read less
Was this instruction helpful to you?
Thank you for voting!
- Customer:
- Keith from Keller, TX
- Parts Used:
- WP777811
- Difficulty Level:
- Easy
- Total Repair Time:
- 15 - 30 mins
- Tools:
- Screw drivers, Socket set
Compactor motor kept running after cycle ran, making alot of noise and unit jumping around.
Pulled the Compactor from underneath cabinet, unplugged power. Removed the top plate off compactor to expose the crush piston. Removed the front control panel by removing two phillips screws, wiring and directional (limit) switch is now exposed. Removed the two screws securing switch, removed wiring one wire at a time and replaced on new
... Read more
switch in same position. Replaced switch in same manner as removed, and followed reverse of above to re-assemble. Plugged back in and tested, problem resolved works like new. Only took possibly 30" to repair and saved an expensive service call.
Read less
Was this instruction helpful to you?
Thank you for voting!