


Models
>
GM-B268NSNP
GM-B268NSNP LG Refrigerator
Jump to:
Find Part by Name
Keep searches simple, eg. "belt" or "pump".
Keep searches simple, eg. "belt" or "pump".

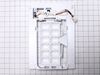
This front plate assembly, often called a mullion or flipper, fits select LG and Kenmore French-door refrigerators. It helps seal the gap between the doors to prevent air leaks and maintain proper tem...
In Stock
Order now and your part arrives by Mar 22

$229.95
This ice maker assembly is for refrigerators. This Ice maker assembly contains the complete ice maker and housing. The assembly may include multiple parts; refer to your parts diagram for a complete ...
In Stock
Order now and your part arrives by Mar 22

$23.05
This is a manufacturer-approved refrigerator door closure for your refrigerator. It is made of white plastic and measures approximately 3 inches by 2 inches. If your old closure is damaged, your refri...
Special Order

$107.95
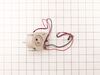
This 13-volt evaporator fan motor helps circulate air over the refrigerator coils. These coils will then convert the heat into cool air, which is then circulated from the freezer section to the fresh ...
In Stock
Order now and your part arrives by Mar 22

$56.05
If the glass shelf above your fridge?s crisper drawers is cracked or missing, this replacement is a quick fix. Made from strong tempered glass, it gives you a sturdy spot to store food and lets you se...
In Stock
Order now and your part arrives by Mar 22


$127.95
This water inlet valve controls the flow of water to the refrigerator?s ice maker and dispenser. It helps ensure consistent water delivery and replaces faulty valves that may cause leaks or stop dispe...
In Stock
Order now and your part arrives by Mar 22

Special Order

In Stock
Order now and your part arrives by Mar 22

Special Order

In Stock
Order now and your part arrives by Mar 22

In Stock
Order now and your part arrives by Mar 22
Questions and Answers
We're sorry, but our Q&A experts are temporarily unavailable.
Please check back later if you still haven't found the answer you need.
Common Problems and Symptoms for GM-B268NSNP
Viewing 6 of 6Door won’t open or close
Fixed by these parts


How to fix it
Ice maker not making ice
Fixed by these parts
How to fix it
Door Sweating
Fixed by these parts
How to fix it
Noisy
Fixed by these parts
How to fix it
Fridge too warm
Fixed by these parts
How to fix it
Ice maker won’t dispense ice
Fixed by these parts
How to fix it


Keep searches simple. Use keywords, e.g. "leaking", "pump", "broken" or "fit".
- Customer:
- Tiziana from WARWICK, NY
- Parts Used:
- AGU75188619
- Difficulty Level:
- Really Easy
- Total Repair Time:
- Less than 15 mins
- Tools:
- Nutdriver
My nephew accidentally forced the door closed last year, which resulted in the door having to be re closed manually folding back the flap. Ugh!
Unscered 2 screws, unplug electrical connection under the screws, slide her flap into grooves, realign screw holes , and rescrew in. Done.
Was this instruction helpful to you?
Thank you for voting!
- Customer:
- Maurice from SEATTLE, WA
- Parts Used:
- AGU75188619
- Difficulty Level:
- Really Easy
- Total Repair Time:
- Less than 15 mins
- Tools:
- Screw drivers
Broken Door Mullion Spring
Had to buy the entire door mullion because the spring broke, wasn't happy. Got the new part very quickly and it was a new replacement part number. Somewhat tentative. Took it out of the box and looked it over. No spring! Groan! Thought I got the wrong part. Flipped the bottom hinge and it snapped open, no need for a spring! Two screws, di
... Read more
sconnect the wire harness, throw away the old, get new, connect the wire harness, connect hinges, put in two screws! Super easy. Watch the video for some pointers along the way.
Read less
Was this instruction helpful to you?
Thank you for voting!
- Customer:
- John from WEST ROCKPORT, ME
- Parts Used:
- AEQ72909603
- Difficulty Level:
- Very Easy
- Total Repair Time:
- Less than 15 mins
- Tools:
- Screw drivers
needed to replace broken ice maker
Take out 2 screws and unplug unit before removing. Plug-in new unit and screw in 2 screws. That's it.
Was this instruction helpful to you?
Thank you for voting!