


Models
>
GM819FSFH
GM819FSFH (AST2LGG) LG Refrigerator
Jump to:
Find Part by Name
Keep searches simple, eg. "belt" or "pump".
Diagrams for GM819FSFH
Viewing 1 of 1
Keep searches simple, eg. "belt" or "pump".

$24.10
If the light inside your fridge is not coming on, or if it is staying on continuously, there may be an issue with your door switch. When the door to your fridge is closed, the button on the switch is...
In Stock
Order now and your part arrives by Mar 26

$14.65
This refrigerator door hinge bushing is a durable white plastic component that provides a smooth pivot point for the hinge pin, helping keep the door properly aligned and sealed. It is commonly used t...
In Stock
Order now and your part arrives by Mar 26

$229.95
This ice maker assembly is for refrigerators. This Ice maker assembly contains the complete ice maker and housing. The assembly may include multiple parts; refer to your parts diagram for a complete ...
In Stock
Order now and your part arrives by Mar 26

This plastic cover is a genuine OEM replacement part for your refrigerator. This part serves as the frame the glass shelf above your refrigerator crisper. To replace this part, remove the glass shelf...
Special Order

In Stock
Order now and your part arrives by Mar 26


This bin is white in color with a clear front insert.
No Longer Available

In Stock
Order now and your part arrives by Mar 26

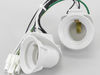
This part is a replacement light socket for your refrigerator. This model is white in color, and it has two sockets that will fit two separate light bulbs. The light socket connects to the power sourc...
No Longer Available


In Stock
Order now and your part arrives by Mar 26

Special Order
Questions and Answers
We're sorry, but our Q&A experts are temporarily unavailable.
Please check back later if you still haven't found the answer you need.
Common Problems and Symptoms for GM819FSFH
Viewing 10 of 10Light not working
Fixed by these parts

How to fix it
Door won’t open or close
Fixed by these parts

How to fix it
Ice maker not making ice
Fixed by these parts
How to fix it
Fridge too warm
Fixed by these parts

How to fix it
Will Not Start
Fixed by these parts
How to fix it
Ice maker won’t dispense ice
Fixed by these parts
How to fix it
Clicking sound
Fixed by these parts
How to fix it
Leaking
Fixed by these parts

How to fix it
Freezer not defrosting
Fixed by these parts
How to fix it
Fridge and Freezer are too warm
Fixed by these parts
How to fix it
Keep searches simple. Use keywords, e.g. "leaking", "pump", "broken" or "fit".
- Customer:
- Debbie from Waltham, MA
- Parts Used:
- 6600JB1010A
- Difficulty Level:
- A Bit Difficult
- Total Repair Time:
- 30 - 60 mins
- Tools:
- Pliers, Screw drivers
Remove and replace light switch
Video makes it look easy. Kenmore refrigerator does not have "groove" along the right hand side of switch that allows for pushing down on release. Used a thin screwdriver to get under to push while holding switch edge with pliers. Kept slipping. Tape sides to avoid scratching inside of refrigerator.
Was this instruction helpful to you?
Thank you for voting!
- Customer:
- Jerry from CORSICANA, TX
- Parts Used:
- 4984JJ3003A
- Difficulty Level:
- Really Easy
- Total Repair Time:
- 30 - 60 mins
- Tools:
- Screw drivers, Socket set
old bushing worn and broken
removed the upper freezer door to access screws to remove lower door.
laid bottom door on its side, removed bad bushing, put new bushing in, put bottom door back on refridge, put upper door back on fridge. Door worked easy as when new. good closure of door and story..Happy customer, and wife even happier.....thank you....
laid bottom door on its side, removed bad bushing, put new bushing in, put bottom door back on refridge, put upper door back on fridge. Door worked easy as when new. good closure of door and story..Happy customer, and wife even happier.....thank you....
Was this instruction helpful to you?
Thank you for voting!
- Customer:
- John from WEST ROCKPORT, ME
- Parts Used:
- AEQ72909603
- Difficulty Level:
- Very Easy
- Total Repair Time:
- Less than 15 mins
- Tools:
- Screw drivers
needed to replace broken ice maker
Take out 2 screws and unplug unit before removing. Plug-in new unit and screw in 2 screws. That's it.
Was this instruction helpful to you?
Thank you for voting!