


Models
>
36358062896
36358062896 Kenmore Refrigerator
Jump to:
Find Part by Name
Keep searches simple, eg. "belt" or "pump".
Manuals & Guides for 36358062896
Click to downloadKeep searches simple, eg. "belt" or "pump".

$229.80
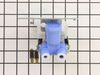
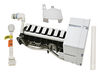
The ice maker assembly makes ice by filling the tray with water from the inlet valve, freezing it until solid cubes are formed, and then ejecting them into the ice bucket. This process will repeat unt...
In Stock
Order now and your part arrives by Jul 26

$65.95
This dual heater kit replaces the single heater. It's redesigned to use two heating elements for a better defrost cycle.
On Order

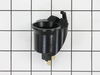
This is a genuine OEM replacement door flap for the ice maker in your refrigerator. This part goes by many different names, including door recess assembly, ice door assembly, dispenser door, ice chute...
In Stock
Order now and your part arrives by Jul 26

$64.95
This valve comes with 1/4" compression inlet.
NOTE: This part comes with new quick connections. To install - cut retaining nuts off of existing plastic water lines and gently push them into new valv...
In Stock
Order now and your part arrives by Jul 26

$52.95
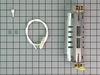
Comes with both cam risers. This hinge kit is suitable for the bottom of either the freezer door or the refrigerator door of some refrigerators.
In Stock
Order now and your part arrives by Jul 26

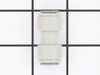
This grommet is found on both the front and back of the fan motor assembly for the condenser and the evaporator in your fridge. It is used to provide a buffer between the fan motor and the mounting br...
In Stock
Order now and your part arrives by Jul 26

Quick connector for plastic water line - 5/16" to 5/16"
In Stock
Order now and your part arrives by Jul 26

$21.95
This 40-Watt light bulb is sold individually.
It is specially designed to withstand extreme temperatures, so this bulb is compatible with a variety of appliance types including refrigerators, ranges,...
In Stock
Order now and your part arrives by Jul 26

$36.42
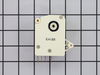
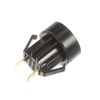
The light switch in your refrigerator is used to turn the light on and off when the fridge door opens or closes. This is considered a closed switch, which means that when the fridge door depresses the...
In Stock
Order now and your part arrives by Jul 26

In Stock
Order now and your part arrives by Jul 26

$53.85
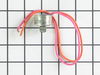
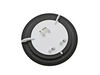
This device acts like a clock. It continually advances and alternates between activating the cooling cycle and the defrost heater.
In Stock
Order now and your part arrives by Jul 26

It is used with those refrigerators that have an ice and water dispenser in the door.
No Longer Available
Common Problems and Symptoms for 36358062896
Viewing 22 of 22Leaking
Fixed by these parts
How to fix it
Fridge too warm
Fixed by these parts
How to fix it
Ice maker not making ice
Fixed by these parts
How to fix it
Freezer section too warm
Fixed by these parts
How to fix it
Light not working
Fixed by these parts

How to fix it
Not dispensing water
Fixed by these parts
How to fix it
Freezer not defrosting
Fixed by these parts
How to fix it
Noisy
Fixed by these parts
How to fix it
Door won’t open or close
Fixed by these parts
How to fix it
Ice maker won’t dispense ice
Fixed by these parts
How to fix it
Door Sweating
Fixed by these parts
How to fix it
Frost buildup
Fixed by these parts
How to fix it
Freezer too cold
Fixed by these parts
How to fix it
Fridge runs too long
Fixed by these parts
How to fix it
Fridge and Freezer are too warm
Fixed by these parts
How to fix it
Too warm
Fixed by these parts
How to fix it
Clicking sound
Fixed by these parts
How to fix it
Ice maker dispenses too little ice
Fixed by these parts
How to fix it
Fridge too cold
Fixed by these parts
How to fix it
Will Not Start
Fixed by these parts
How to fix it
Ice maker dispenses too much ice
Fixed by these parts
How to fix it
Won’t start
Fixed by these parts
How to fix it


Keep searches simple. Use keywords, e.g. "leaking", "pump", "broken" or "fit".
- Customer:
- Stuart from Lynchburg, VA
- Parts Used:
- WR51X10101
- Difficulty Level:
- Easy
- Total Repair Time:
- 15 - 30 mins
- Tools:
- Screw drivers
Defrost Heater blows out, refrigerator frosts up, then stops cooling
Disclaimer - if you aren't confident about doing this repair, call a repair specialist in. Also, take care not to damage the freezer coils as they have refrigerant in them that I'm told is harmful if it leaks. It may also be under pressure. The instructions that follow won't require you to touch the coils. There is no need to unplug the r
... Read more
efrigerator or disconnect the water supply to do this repair. The screw driver you will need is a phillips (the one withe the + head).
1st, take out your frozen food (which, if you need to do this repair may not be frozen) and put it in a cooler or the refrigerator.
2nd, remove the ice cube bucket and dump the ice cubes in the cooler to help keep the frozen food cool. Turn the ice cube maker off.
3rd, remove the freezer shelves.
4th, locate the panel covering the freezer coils. It's a panel at the back of the freezer. It hides the freezer coils and protects them from damage. It's held in place by two screws located at the top left and right corners of the panel.
5th, unscrew the screws holding the panel to the refrigerator.
6th, detach the clip at the top of the panel.
7th, remove the panel. You should see the coils now. The coils will be covered in frost if the defroster heater has failed. If the coils are not covered in frost, there may be another reason for the refrigerator failing to cool.
8th, even if the coils are covered in frost, you should also inspect the defroster heater at the bottom, underneath the coils. The business end of it is a long tube running horizontally between two wires. If it's black like a badly burned out light bulb, then it's failed. If the bulb appears fine, you may have a different reason for your refrigerator and freezer frosting up. We'll assume that the defroster heater has blown out, and proceed.
9th, place a towel at the bottom of the panel space, to soak up any water that melts and runs down. There is a drain under the coils. It collects water that melts during the defrost cycle, but I'd rather mop up the water instead of relying on the drain.
10th, use hot air blowing from the hair dryer to defrost the coils. Just play the air from the hair dryer over the coils, starting at the top, and working down. The frost will quickly melt and the water will be soaked up by the towels. If you want things to go faster, you can throw hot water on the coils to melt them faster, but that produces more water to mop up, and makes a big mess. It's also dangerous to have water lying around if you then decide to use the hair dryer to continue defrosting the coils.
11th. MOST IMPORTANT. Don't use your screwdriver or any other sharp object to pick away at the frost on the coils. If you damage the coils the refrigerant could leak out. I'm told that it's dangerous stuff. Furthermore, I expect that you'd have to buy a new refrigerator if you damaged the coils.
12th, once you've defrosted the coils, locate the defroster heater and bracket assembly again. It's held in place by two screws, and has two insulated wires running into it on either side. Unscrew the screws, disconnect the wires and remove the assembly. Throw it away - there are no useful parts in it.
13th, install the new defroster heater and bracket assembly by connecting the wires to it, mounting it back into its place, and rescrewing the screws.
14th, put the panel back in place, replace the clip, and screw the panel back in place.
15th, turn the ice cube maker back on and replace the ice cube bucket and shelves. Put your food back into the freezer.
16th, use the freezer and refrigerator as normal. If the defroster heater fails again (I'm on my third one in less than six years), you'll notice frost building up on the panel at the back of the freezer before your freezer and refrigerator stops cooling. The frost build up is your signal to defrost the freezer and buy another defroster heater and bracket assembly. I don't know why this part is so weak, and don't know any fix except to keep replacing it.
Read less
Was this instruction helpful to you?
Thank you for voting!
- Customer:
- anthony from thornton, CO
- Parts Used:
- WR57X10051
- Difficulty Level:
- Really Easy
- Total Repair Time:
- 15 - 30 mins
- Tools:
- Screw drivers, Wrench (Adjustable)
Cracked housing on the vaave
1. Turn off water supply, and electrical ( unplug it) to fridge.
2. Remove water line to valve. Watch for water to pour out of the line. Have a towel handy.
3. Remove the cardboard cover on the bottom of the fridge.
4. Remove the screws that hold the valve in place.
5. Remove the valve, be careful the waterlines ar ... Read more e still attached.
6. Place a towel under valve to catch any water that leaks out from water lines.
7. Remove electrical lines, make sure to mark which went where. One is for the ice, and one is for the water. Make sure the power is off, there is 120 volts present at those connections.
- now my waterlines attached using a compression type fitting. The new valve I got used just a push in type of attachment. But, easy enough I just removed the pieces for the compression and the waterlines pushed right in and worked fine.
- the mounting harness for the valve was alittle different but the parts I need were in the right location and she fit in fine.
8. Attach water lines. They are different sizes so you can't get those mixed up.
9. Attach electrical lines.
- the new valve came with adaptors for my electrical connection. Just snapped them on and kept on going.
10. turn on watersupply for fridge. Plug it back in.
11. Test for leaks, and proper operation. ie. When you push the water does the water valve open?
12. Unplug fridge
13. Now is a good time to clean out any dust or dirt that has accumallated in under around your fridge.
14. reassemble, valve, then cover. move fridge back into place.
15. Plug fridge back in.
16. Take a clean glass.
17. Fill with water from the front.
18. Take full glass of water and go watch tv. You've earned it, and saved yourself probably $100.00 in labor costs. Good Job.
Read less
Was this instruction helpful to you?
Thank you for voting!
- Customer:
- Adrian from Louisville, KY
- Parts Used:
- WR9X489
- Difficulty Level:
- Really Easy
- Total Repair Time:
- 1- 2 hours
- Tools:
- Nutdriver
Refrigerator temp was warm
Per the trouble shooting guide on the home page of the website. I suspected the defrost timer was bad because ice had heavily accumulated on the back wall of the freezer compartment and the temperature inside the refrigerator was warm. First, I removed all the freezer racks. Then removed the (4) screws on the back wall in the freezer c
... Read more
ompartment. I then removed the ben from the ice maker to allow more room. Once I saw all the ice, I unplugged the refrigerator, and used a hair dryer to defrost ( it took about an hour to get it all). Once the ice was all gone, I then moved into the refrigerator compartment and removed the top shelve. This allowed me more room and access to the defrost timer which was behind the back panel. I used the trouble shooting guide to test the old timer prior to removing the new one from the package, (just in case I needed to send it back). Through this test I determined that the timer was bad, it wasn't the heating element or the t-stat. It was very easy to access, I removed the two knobs and lifted up the panel. I located the defrost timer and removed the screws as directed. I replaced the timer just as I had removed it, plugging in the electrical terminals per the removal process. I then reversed the order and put the panel and top shelve back on. Once all complete, I then moved back into the freezer compartment and replace the back panel and then the ice ben. I plugged it in and haven't had a problem since. This site has saved me a tremendous amount of money, a service contractor quoted us $300, to determine the problem. I ordered the part and it was sitting on our door stoop the next morning.
Read less
Was this instruction helpful to you?
Thank you for voting!