


Models
>
TPX24BIBAWW
TPX24BIBAWW General Electric Refrigerator
Jump to:
Find Part by Name
Keep searches simple, eg. "belt" or "pump".
Diagrams for TPX24BIBAWW
Viewing 7 of 7


Keep searches simple, eg. "belt" or "pump".

$64.95
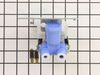
This valve comes with 1/4" compression inlet.
NOTE: This part comes with new quick connections. To install - cut retaining nuts off of existing plastic water lines and gently push them into new valv...
In Stock
Order now and your part arrives by Jul 23

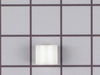
This grommet is found on both the front and back of the fan motor assembly for the condenser and the evaporator in your fridge. It is used to provide a buffer between the fan motor and the mounting br...
In Stock
Order now and your part arrives by Jul 23

$21.95
This 40-Watt light bulb is sold individually.
It is specially designed to withstand extreme temperatures, so this bulb is compatible with a variety of appliance types including refrigerators, ranges,...
In Stock
Order now and your part arrives by Jul 23

Special Order

$287.27
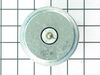
This part comes with 3 round pin connection terminals.
This fan motor circulates the air through the refrigerator grille and cools the compressor and condenser coils. It also helps to evaporate extra...
In Stock
Order now and your part arrives by Jul 23

In Stock
Order now and your part arrives by Jul 23

In Stock
Order now and your part arrives by Jul 23


The front part of this pan is not included. Must order separately.
No Longer Available

In Stock
Order now and your part arrives by Jul 23

In Stock
Order now and your part arrives by Jul 23
Common Problems and Symptoms for TPX24BIBAWW
Viewing 9 of 9Leaking
Fixed by these parts
How to fix it
Ice maker not making ice
Fixed by these parts
How to fix it
Noisy
Fixed by these parts
How to fix it
Not dispensing water
Fixed by these parts
How to fix it
Fridge too warm
Fixed by these parts
How to fix it
Freezer section too warm
Fixed by these parts
How to fix it
Ice maker won’t dispense ice
Fixed by these parts
How to fix it
Clicking sound
Fixed by these parts
How to fix it
Door won’t open or close
Fixed by these parts
How to fix it


Keep searches simple. Use keywords, e.g. "leaking", "pump", "broken" or "fit".
- Customer:
- anthony from thornton, CO
- Parts Used:
- WR57X10051
- Difficulty Level:
- Really Easy
- Total Repair Time:
- 15 - 30 mins
- Tools:
- Screw drivers, Wrench (Adjustable)
Cracked housing on the vaave
1. Turn off water supply, and electrical ( unplug it) to fridge.
2. Remove water line to valve. Watch for water to pour out of the line. Have a towel handy.
3. Remove the cardboard cover on the bottom of the fridge.
4. Remove the screws that hold the valve in place.
5. Remove the valve, be careful the waterlines ar ... Read more e still attached.
6. Place a towel under valve to catch any water that leaks out from water lines.
7. Remove electrical lines, make sure to mark which went where. One is for the ice, and one is for the water. Make sure the power is off, there is 120 volts present at those connections.
- now my waterlines attached using a compression type fitting. The new valve I got used just a push in type of attachment. But, easy enough I just removed the pieces for the compression and the waterlines pushed right in and worked fine.
- the mounting harness for the valve was alittle different but the parts I need were in the right location and she fit in fine.
8. Attach water lines. They are different sizes so you can't get those mixed up.
9. Attach electrical lines.
- the new valve came with adaptors for my electrical connection. Just snapped them on and kept on going.
10. turn on watersupply for fridge. Plug it back in.
11. Test for leaks, and proper operation. ie. When you push the water does the water valve open?
12. Unplug fridge
13. Now is a good time to clean out any dust or dirt that has accumallated in under around your fridge.
14. reassemble, valve, then cover. move fridge back into place.
15. Plug fridge back in.
16. Take a clean glass.
17. Fill with water from the front.
18. Take full glass of water and go watch tv. You've earned it, and saved yourself probably $100.00 in labor costs. Good Job.
Read less
Was this instruction helpful to you?
Thank you for voting!
- Customer:
- Kimberly from Grandy, NC
- Parts Used:
- WR60X187
- Difficulty Level:
- Really Easy
- Total Repair Time:
- 15 - 30 mins
- Tools:
- Screw drivers
Panel hot to touch between freezer & refrigerator. Motor hot, fan not rotating.
Unplugged refrigerator, removed three screws to take out part, disconnected the wires and removed bad unit. Removed fan blade from old unit and attached to the new unit. Attached wires, placed the new motor back in. Plugged it back in, within 20 minutes panel between freezer and refrigerator was cool to touch.
Was this instruction helpful to you?
Thank you for voting!
- Customer:
- Theresa from Rochester, MI
- Parts Used:
- WR57X10051
- Difficulty Level:
- Easy
- Total Repair Time:
- 30 - 60 mins
- Tools:
- Pliers, Screw drivers, Wrench (Adjustable)
low flowing water (not just a drip) from refrigerator ice maker
The icemaker's valve is easy to inspect and test. First, gently pull the refrigerator away from the wall, and unplug it. Turn off the water supply to the icemaker by closing the shut-off valve in the copper waterline leading to the valve. Use a screwdriver or nutdriver to remove the rear lower access panel from the refrigerator's back.
... Read more
r />
Next, remove the fill tubing from the water valve. Use a wrench to loosen the flare nut on the brass fitting on the inlet side of the valve (above). Place a container or towel under the valve to catch the small amount of water that will spill from the valve and tubing.
Now use a screwdriver or a nutdriver to remove the screw holding the valve's mounting bracket to the refrigerator cabinet. Pull the valve out of the compartment and remove the tube (or tubes if both water dispenser & ice maker) on the valve's outlet. If plastic tubes don't come out with pliers and assuming there is enough extra tubing, then cut the plastic tubing with a even straight cut edge razor. Then, remove the solenoid's electrical contacts.
Push the plastic water and ice tubes int he appropriate holes in the new valve outlet, reconnect solenoids and remount new water valve.
Before installing the back panel on the refrigerator cabinet, test run the icemaker. Look for leaks, and tighten any leaky connections. If necessary, use Teflon tape or a similar product to ensure tight connections. Discard the first ice cubes that are produced because they are likely to have sediment in them.
Read less
Was this instruction helpful to you?
Thank you for voting!