


Models
>
KDRS505XSS03
KDRS505XSS03 KitchenAid Range
Jump to:
Find Part by Name
Keep searches simple, eg. "belt" or "pump".
Diagrams for KDRS505XSS03
Viewing 8 of 8


 Diagram and Parts List for KitchenAid Range")

Manuals & Guides for KDRS505XSS03
Click to downloadInstall
Installation Instructions
(9.06MB)
Manual
Owner's Manuals
(6.23MB)
Specs
Product Specifications Sheet
(0.71MB)
Keep searches simple, eg. "belt" or "pump".
 – Part Number: W11665456")
$24.00
This part includes one range leveling leg, sourced directly from the original manufacturer. The leveling leg is what supports the range and ensures it is sitting level, stable, and at the proper heigh...
In Stock
Order now and your part arrives by Jul 31

$21.82
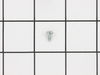
This is a screw and it is made for multiple appliances in your home. This model is called a sheet metal screw because it has sharp points, and the threads are closer together. This screw is designed t...
In Stock
Order now and your part arrives by Jul 31

$7.60
This is a multi-use screw and can be used on a variety of appliances. The measurements of the screw are: 8/18 x 3/8. *Please note: the screw is sold individually. Refer to the manual provided by the m...
In Stock
Order now and your part arrives by Jul 31

$24.15
This 18 ml bottle of white appliance touch-up paint is used to cover scratches or marks on your appliance. The white touch-up paint can be used on refrigerators, microwaves, ranges, clothes dryers, an...
In Stock
Order now and your part arrives by Jul 31

In Stock
Order now and your part arrives by Jul 31

$27.83
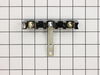
It provides a way of connecting individual electrical wires and offers protection of the device from electrical surges (voltages and/or currents).
In Stock
Order now and your part arrives by Jul 31

$67.93
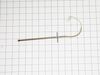
The light socket on your electric range connects the power source to the light bulb. If your oven light is malfunctioning, you may need to replace the light socket. The light socket is located in the ...
In Stock
Order now and your part arrives by Jul 31

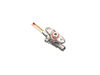
This surface burner gas valve is designed to regulate the flow of gas to the burner, ensuring safe and efficient combustion. Rated for 16,000 BTU burners, it is typically used in the left front and ri...
In Stock
Order now and your part arrives by Jul 31

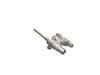
This gas valve is a key component in managing the gas supply to individual burners on your cooktop or range. It allows for smooth adjustment of flame intensity and helps maintain safe operation. If yo...
In Stock
Order now and your part arrives by Jul 31

In Stock
Order now and your part arrives by Jul 31

In Stock
Order now and your part arrives by Jul 31

In Stock
Order now and your part arrives by Jul 31
Common Problems and Symptoms for KDRS505XSS03
Viewing 6 of 6Will Not Start
Fixed by these parts
How to fix it
Little to no heat when baking
Fixed by these parts
How to fix it
Element will not heat
Fixed by these parts
How to fix it
Gas igniter glows, but will not light
Fixed by these parts
How to fix it
Touchpad does not respond
Fixed by these parts
How to fix it
Oven not heating evenly
Fixed by these parts
How to fix it


")

Keep searches simple. Use keywords, e.g. "leaking", "pump", "broken" or "fit".
- Customer:
- Steve from Tracy, CA
- Parts Used:
- WPW10206288
- Difficulty Level:
- Easy
- Total Repair Time:
- Less than 15 mins
- Tools:
- Screw drivers
Burner valve was seized
Lock the oven/stove controls by holding the START button for five seconds. This shuts off gas to the valve. Remove the knobs from the front of the stove using philips screwdriver. Undo the six screws that hold on the front bezel and remove to find the valve. Unscrew the top bracket using philps screwdriver. disconnect the valve using
... Read more
a wrench (I think it was 12mm). Compare the valve to the new one. Installation is reverse. Press the START button for five seconds to unlock the oven/stove. Test fire the burner. Cook a batch of chili.
Read less
Was this instruction helpful to you?
Thank you for voting!
- Customer:
- Joseph from Decatur, GA
- Parts Used:
- WPW10245259
- Difficulty Level:
- Easy
- Total Repair Time:
- 30 - 60 mins
- Tools:
- Nutdriver, Screw drivers, Socket set, Wrench set
Burned terminal block and filter board
Removed and replaced above named parts, rewired.Be sure to tighten all nuts that secure wires. I believe this is what caused the problem.
Was this instruction helpful to you?
Thank you for voting!
- Customer:
- Edmund from Emporium, PA
- Parts Used:
- W11594027
- Difficulty Level:
- Easy
- Total Repair Time:
- 15 - 30 mins
- Tools:
- Pliers, Screw drivers
Socket Light had a bad thread
Socket Lite come with clips attached to the outside
of the housing. After you unhook the 3 lead wires
that are attached to the unit. All you have to do is push in on the clips and release the unit. Then you
snap in the new unit. Attach the 3 wire leads, put a
oven bulb in the socket end, and the install the light cove ... Read more r
of the housing. After you unhook the 3 lead wires
that are attached to the unit. All you have to do is push in on the clips and release the unit. Then you
snap in the new unit. Attach the 3 wire leads, put a
oven bulb in the socket end, and the install the light cove ... Read more r
Read less
Was this instruction helpful to you?
Thank you for voting!