


Models
>
KFGD500ESS11
KFGD500ESS11 KitchenAid Range
Jump to:
Find Part by Name
Keep searches simple, eg. "belt" or "pump".
Diagrams for KFGD500ESS11
Viewing 8 of 8


 Diagram and Parts List for KitchenAid Range")

Keep searches simple, eg. "belt" or "pump".

$19.75
This is a genuine OEM 40-Watt replacement light bulb that is compatible with various types of appliances. It has a frosted glass bulb with a standard metal socket base, making it easy to screw and uns...
In Stock
Order now and your part arrives by Jul 30
 – Part Number: W11665456")
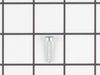
$24.00
This part includes one range leveling leg, sourced directly from the original manufacturer. The leveling leg is what supports the range and ensures it is sitting level, stable, and at the proper heigh...
In Stock
Order now and your part arrives by Jul 30

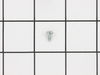
$6.51
This is a genuine OEM Torx screw that measures 7-18 and 3/4-inch. The screw is sold individually and can be used in a variety of appliances. The star shaped head allows the screw to have more torque a...
In Stock
Order now and your part arrives by Jul 30

In Stock
Order now and your part arrives by Jul 30

$21.82
This is a screw and it is made for multiple appliances in your home. This model is called a sheet metal screw because it has sharp points, and the threads are closer together. This screw is designed t...
In Stock
Order now and your part arrives by Jul 30

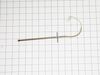
$71.11
This oven igniter helps start the bake burner by heating up and lighting the gas. It’s compatible with several major brands and can fix issues like no heat, uneven cooking, or a burner that won’t ligh...
In Stock
Order now and your part arrives by Jul 30

$7.60
This is a multi-use screw and can be used on a variety of appliances. The measurements of the screw are: 8/18 x 3/8. *Please note: the screw is sold individually. Refer to the manual provided by the m...
In Stock
Order now and your part arrives by Jul 30

$7.60
This is a multi-use screw mostly used in dryers. It has a diameter of #10, length of one inch, and thread size of 16. Remember to follow safety practices and instructions provided in the manufacturer ...
In Stock
Order now and your part arrives by Jul 30

In Stock
Order now and your part arrives by Jul 30

In Stock
Order now and your part arrives by Jul 30

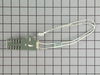
$67.93
The light socket on your electric range connects the power source to the light bulb. If your oven light is malfunctioning, you may need to replace the light socket. The light socket is located in the ...
In Stock
Order now and your part arrives by Jul 30

In Stock
Order now and your part arrives by Jul 30
Common Problems and Symptoms for KFGD500ESS11
Viewing 5 of 5Little to no heat when baking
Fixed by these parts
How to fix it
Will Not Start
Fixed by these parts
How to fix it
Gas igniter glows, but will not light
Fixed by these parts
How to fix it
Element will not heat
Fixed by these parts
How to fix it
Door won’t close
Fixed by these parts
How to fix it


")
Keep searches simple. Use keywords, e.g. "leaking", "pump", "broken" or "fit".
- Customer:
- David from Temple Terrace, FL
- Parts Used:
- W11596211
- Difficulty Level:
- A Bit Difficult
- Total Repair Time:
- 1- 2 hours
- Tools:
- Nutdriver, Pliers, Screw drivers
Ignitor was bad on upper oven
First I removed the lower tray and all parts covering the ignitor on the upper oven. 2. Then I removed the screws holding down the ignitor and flame distributor. 3. I then had to pull out the oven from the wall and remove the back panel to expose the wires connecting the ignitor. This required the removal of about six screws but they
... Read more
were fairly easy to get to. 4. I disconnected the ignitor from the back panel then went around to the front of the oven and pulled out the ignitor and all of the attached parts. 5. Here's the tricky part. The screws holding the ignitor in place had fused from the heat and then the threads stripped when I tried to remove them. I had to use a dremel tool and cutting wheel to carefully cut the screws off and then went to buy some replacement screws from the hardware store. 6. I replaced them with a nut and a bolt, to hopefully avoid the same problem for later replacement if necessary. 7. I then replaced everything the same way it came out and all is working like new!
Read less
Was this instruction helpful to you?
Thank you for voting!
- Customer:
- Edmund from Emporium, PA
- Parts Used:
- W11594027
- Difficulty Level:
- Easy
- Total Repair Time:
- 15 - 30 mins
- Tools:
- Pliers, Screw drivers
Socket Light had a bad thread
Socket Lite come with clips attached to the outside
of the housing. After you unhook the 3 lead wires
that are attached to the unit. All you have to do is push in on the clips and release the unit. Then you
snap in the new unit. Attach the 3 wire leads, put a
oven bulb in the socket end, and the install the light cove ... Read more r
of the housing. After you unhook the 3 lead wires
that are attached to the unit. All you have to do is push in on the clips and release the unit. Then you
snap in the new unit. Attach the 3 wire leads, put a
oven bulb in the socket end, and the install the light cove ... Read more r
Read less
Was this instruction helpful to you?
Thank you for voting!
- Customer:
- Timothy from Elkhorn, WI
- Parts Used:
- W11596211
- Difficulty Level:
- Easy
- Total Repair Time:
- 15 - 30 mins
- Tools:
- Screw drivers
Oven would not heat
Lifted door off hinges; removed lower oven spill plate; unmounted bake igniter from heat shield; pulled stove away from wall; removed rear access panels (4 screws); unplugged bake igniter; installed new part; vacuumed behind stove and mopped floor (this took more time than installing the part); oven is back in cookie baking mode!
Was this instruction helpful to you?
Thank you for voting!