


Models
>
LDE8426ADE
LDE8426ADE International Dryer
Jump to:
Find Part by Name
Keep searches simple, eg. "belt" or "pump".
Diagrams for LDE8426ADE
Viewing 9 of 9


Keep searches simple, eg. "belt" or "pump".

$22.91
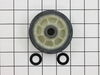
This OEM drum support roller kit contains the parts needed to replace one roller on your dryer. This kit includes one drum roller and two bearings. Most dryers use two drum rollers, and it is recommen...
In Stock
Order now and your part arrives by Aug 2

$27.28
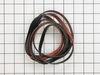
This is a single OEM dryer drum belt. It measures 100 inches in length, 3/8 of an inch wide and has five ribs and four grooves. Keep in mind that this rubber drum belt will stretch over time, so if yo...
In Stock
Order now and your part arrives by Aug 2

$13.07
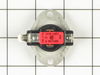
This part is located on the front bulkhead of the dryer and helps the drum to rotate smoothly and quietly. If you notice a screeching or metal-on-metal noise while your appliance is operating, you may...
In Stock
Order now and your part arrives by Aug 2

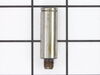
The roller shaft is also known as a support roller shaft or a drum roller axle. It is a part in your dryer that the drum rollers spin on, helping your dryer to tumble. If your appliance is noisy while...
No Longer Available

$21.82
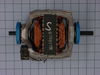
The blower wheel is responsible for blowing heat into the dryer drum, and out of the exhaust vent. If you notice that your dryer is taking too long to dry or is make unusually loud noises, it may be t...
In Stock
Order now and your part arrives by Aug 2

$6.51
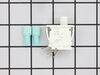
Sometimes referred to as a retaining clip, the retaining ring is used to hold the drum support roller onto the shaft in your dryer. The clip may need to be replaced if you find that your dryer is nois...
In Stock
Order now and your part arrives by Aug 2

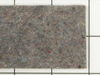
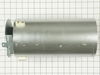
If the lint filter in your dryer has become damaged or missing, this is a genuine OEM replacement part. The filter is used to trap lint and debris from entering the dryer vents, where it could be a fi...
No Longer Available

$27.83
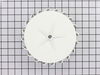
This timer dial skirt is just over three inches in diameter. It is white in color and is made entirely of plastic. This skirt has a gray indicator triangle.
In Stock
Order now and your part arrives by Aug 2

$13.07
This roller shaft washer is just under an inch in diameter and is used for some of Whirlpool's brands of clothes dryers.Sold individually.
In Stock
Order now and your part arrives by Aug 2

$13.07
This idler pulley shaft washer is used with many clothes dryers. It is less than an inch long, and it is black in color.
In Stock
Order now and your part arrives by Aug 2

In Stock
Order now and your part arrives by Aug 2

$16.35
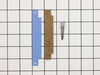
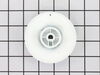
This part is used to help the belt to rotate the drum. It is white and made of plastic with a metallic bearing in the center.
In Stock
Order now and your part arrives by Aug 2
Common Problems and Symptoms for LDE8426ADE
Viewing 12 of 12Noisy
Fixed by these parts
How to fix it
Door won’t close
Fixed by these parts
How to fix it
Drum Not Spinning
Fixed by these parts
How to fix it
Marks left on clothes
Fixed by these parts
How to fix it
Too hot
Fixed by these parts

How to fix it
Won’t Start
Fixed by these parts
How to fix it
Not Heating
Fixed by these parts
How to fix it
Timer Not Working
Fixed by these parts
How to fix it
Door Pops Open
Fixed by these parts
How to fix it
Touchpad does not respond
Fixed by these parts
How to fix it
Door latch failure
Fixed by these parts
How to fix it
Running With Door Open
Fixed by these parts
How to fix it


Keep searches simple. Use keywords, e.g. "leaking", "pump", "broken" or "fit".
- Customer:
- Stephen from Lafayette, IN
- Parts Used:
- Y303836
- Difficulty Level:
- Really Easy
- Total Repair Time:
- 1- 2 hours
- Tools:
- Nutdriver, Pliers, Screw drivers
The blower fan (nylon) stripped off the motor shaft (steel)
Removed the front cover (screws on bottom 0f face)...removed blower cover....spring pliers to remove and install blower fan. the rest of the time was spent cleaning the inside of the shell as well as the vent. Reassembled and dryer runs better than it has for many years.
Was this instruction helpful to you?
Thank you for voting!
- Customer:
- gerald from park city, MT
- Parts Used:
- WP6-3129480, WP33001443, WP312535, 12001541, WP9703438
- Difficulty Level:
- Easy
- Total Repair Time:
- 1- 2 hours
- Tools:
- Pliers, Screw drivers, Socket set, Wrench set
dryer squeeking
removed front panel,lifted top, removed drum and drive belt,remove old rollers and acc and instlled new and reinstalled dryer parts.
Was this instruction helpful to you?
Thank you for voting!
Belt broke on old machine.
1. Removed front of machine (2 screws at the bottom).
2. Removed 4 screws from inside the dryer, to take off the blower housing.
3. Removed 4 screws and took out the large metal piece which supports the drum at the front. Removed the drum.
4. Replaced the two rollers that support the drum in the rear. Cleaned the pins they ... Read more run on, and oiled very lightly. Also replaced the idler roller. I was surpirsed to see that these rollers use plain bearings, not ball bearings.
5. On the front support piece, drilled out the rivets for the glides, and replaced the worn out glides with new parts. Applied a little glue (3M weatherstrip adhesive) to the cork pieces, to glue them to the metal. Attached the plastic pieces over the cork pieces, and riveted in place using rivets that came with the glide kits.
6. Replaced front and rear felt seals. This was not as tricky as I expected it to be. They were held in by metal tabs. Glued the ends where they came together.
7. Replaced the felt blower seal. Glued to the blower housing.
8. Reinstalled the drum, installed new belt, which came with good instructions (luckily).
9. Reassembled front support piece and the front of the cabinet.
I also cleaned the lint from the cabinet and from the vent hose.
In general, the job went without a hitch, and the machine probably has quite a few years left, despite the fact that it's 18 years old. This gives me a good feeling.
I'd say this would be challenging, though, for someone who is not pretty experienced with machinery repair. Also, the cost of the parts was significant enough that it would not have been unreasonable to have opted for a new machine.
Read less
Was this instruction helpful to you?
Thank you for voting!