


Models
>
GU2200XTSS2
GU2200XTSS2 Whirlpool Dishwasher
Jump to:
Find Part by Name
Keep searches simple, eg. "belt" or "pump".
Diagrams for GU2200XTSS2
Viewing 11 of 11


 Diagram and Parts List for Whirlpool Dishwasher")


Manuals & Guides for GU2200XTSS2
Click to downloadInstall
Installation Instructions
(15.15MB)
Install
Installation Instructions
(3.57MB)
Manual
Owner's Manuals
(5.48MB)
Keep searches simple, eg. "belt" or "pump".

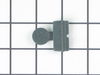
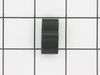
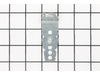
This is a single rack track stop clip used to prevent the upper dish rack from sliding all the way out of the dishwasher. It is made of gray plastic and can wear with time. This is an easy repair that...
In Stock
Order now and your part arrives by Aug 1

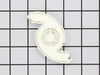
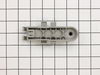
The wheel mount for the upper rack of your dishwasher ensures that the top rack easily slides along the track when pulling it in and out. If a wheel or the mount becomes damaged, your top rack will no...
In Stock
Order now and your part arrives by Aug 1

$47.14
This is a manufacturer-approved heating element and 2 washers. If the dishes in your dishwasher are not drying or the water in the dishwasher is not getting hot, it may be due to a failed heating elem...
In Stock
Order now and your part arrives by Aug 1

$15.26
The mounting bracket is used to secure the top part of your dishwasher to the underside of your counter or cabinet. If you have solid surface counters (granite, quartz, etc.) you will likely need to s...
In Stock
Order now and your part arrives by Aug 1

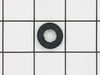
This black rubber gasket is a genuine OEM replacement part for your dishwasher door. The gasket helps to provide a tight seal between the door and the tub, preventing water from leaking while the appl...
In Stock
Order now and your part arrives by Aug 1

$35.34
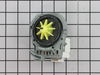
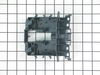
If your dishwasher is not cleaning your dishes properly, is not draining, or is noisy while operating, there may be an issue with your chopper assembly. The chopper is used to mince up food particles ...
In Stock
Order now and your part arrives by Aug 1

$55.18
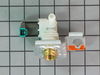
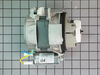
This water inlet valve controls the flow of water into the dishwasher, ensuring the right amount is delivered for each cycle. It helps prevent leaks, overfilling, and poor cleaning performance. Common...
In Stock
Order now and your part arrives by Aug 1

$27.83
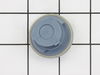
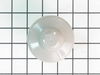
This part includes one OEM rinse aid cap (also known as a dispenser cap), and its purpose is to cover the rinse aid dispenser located on the dishwasher door. Please note that this manufacturer-approve...
In Stock
Order now and your part arrives by Aug 1

$33.20
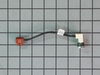
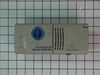
This part is used as a safety device to protect the dishwasher circuit from overload. If the temperature gets to high it will shut off the electrical current to the heating unit in the appliance. Als...
In Stock
Order now and your part arrives by Aug 1

$63.68
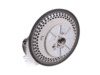
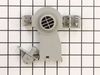
If there is still water left in your dishwasher after it has finished running, there may be an issue with your drain pump. The pump is designed to remove water from the tub, and if that is not happeni...
In Stock
Order now and your part arrives by Aug 1

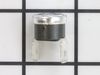
The friction sleeve, sometimes called a friction pad, is made of a flexible black plastic and measures a bit over one inch in length. It is designed to reduce the friction between the hinge and the do...
In Stock
Order now and your part arrives by Aug 1

$27.28
This is also called the 3rd-level spinner. This part works like a little spray arm at the top of your dishwasher.
In Stock
Order now and your part arrives by Aug 1
Common Problems and Symptoms for GU2200XTSS2
Viewing 10 of 10Not cleaning dishes properly
Fixed by these parts
How to fix it
Leaking
Fixed by these parts
How to fix it
Not drying dishes properly
Fixed by these parts
How to fix it
Will Not Start
Fixed by these parts

How to fix it
Not draining
Fixed by these parts
How to fix it
Noisy
Fixed by these parts
How to fix it
Door latch failure
Fixed by these parts
How to fix it
Will not dispense detergent
Fixed by these parts
How to fix it
Will not fill with water
Fixed by these parts
How to fix it
Door won’t close
Fixed by these parts
How to fix it


Keep searches simple. Use keywords, e.g. "leaking", "pump", "broken" or "fit".
- Customer:
- Jason from Todd, NC
- Parts Used:
- WP8268743
- Difficulty Level:
- Easy
- Total Repair Time:
- Less than 15 mins
- Tools:
- Screw drivers
Worn dishrack wheel mount
This wheel mount broke from normal use and made the upper dish rack disconnect from the sliding arm that extends it outside the dishwasher body so that you can fill it. The part was delivered quickly and was easy to install using just a screwdriver to loosen the retainer clip on the end of the extension slide. Once the retainer clip was r
... Read more
emoved, the new part was slid into place and clipped onto the rack. The install was complete.
Read less
Was this instruction helpful to you?
Thank you for voting!
- Customer:
- Andrew from Alexandria, VA
- Parts Used:
- WPW10348269
- Difficulty Level:
- Easy
- Total Repair Time:
- Less than 15 mins
- Tools:
- Screw drivers
dishwasher not draining after wash cycle
Caviat: The actual repair is less than 15 minutes, but I spent a lot of time playing with it before I figured out it was that easy and fast. You don't need to remove the dishwasher from the counter to do this. And it will probably help to look at the new part closely so you can understand where the retainer clip is to press it and release
... Read more
the old pump.
First remove the water from the dishwasher pan that would not drain with a wet/dry vac. Otherwise the water will all drain on the floor when you remove the pump. Then remove the two screws on the kickplate on the front of the unit below the door. Remove the kickplate/maintainence access cover. The drain pump is on the right about 8 inches in. Using two hands you grasp the drain pump with your right hand and use the left hand to push the retaining clip down. Then the drain pump will rotate 1/4 turn counterclockwise and can be removed without pulling the dishwasher out. There is likely to be some water leak out that was traped in the pump housing that you can not reach with the vac. Disconnect the wire. Connect the wire to the new pump, put it in place and 1/4 turn clockwise to install it. Replace the kickplate and you're done.
First remove the water from the dishwasher pan that would not drain with a wet/dry vac. Otherwise the water will all drain on the floor when you remove the pump. Then remove the two screws on the kickplate on the front of the unit below the door. Remove the kickplate/maintainence access cover. The drain pump is on the right about 8 inches in. Using two hands you grasp the drain pump with your right hand and use the left hand to push the retaining clip down. Then the drain pump will rotate 1/4 turn counterclockwise and can be removed without pulling the dishwasher out. There is likely to be some water leak out that was traped in the pump housing that you can not reach with the vac. Disconnect the wire. Connect the wire to the new pump, put it in place and 1/4 turn clockwise to install it. Replace the kickplate and you're done.
Read less
Was this instruction helpful to you?
Thank you for voting!
- Customer:
- Elizabeth from San Francisco, CA
- Parts Used:
- WP8268743
- Difficulty Level:
- Really Easy
- Total Repair Time:
- Less than 15 mins
The wheel mount had broken so that the wheel was disconnected from the mount on the upper rack, making the rack unstable.
I had to fiddle with the mount a bit to get it on the rack properly. Then I pulled back slightly on the inner part of the end piece of the track while also pulling the top of the piece back and released the inner tip of the piece, allowing the end piece to be removed. I placed the new wheel in the track and replaced the end piece.
... Read more
Super easy and a small fraction of what a repairman had told me the part would cost.
... Read more
Super easy and a small fraction of what a repairman had told me the part would cost.
Read less
Was this instruction helpful to you?
Thank you for voting!