


Models
>
GSD1000-04
GSD1000-04 Hotpoint Dishwasher
Jump to:
Find Part by Name
Keep searches simple, eg. "belt" or "pump".
Keep searches simple, eg. "belt" or "pump".

$31.05
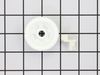
This wheel is located on the front lower rack. It includes the axle. Sold individually.
In Stock
Order now and your part arrives by Jul 30

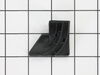
The corner tub baffle is made of black plastic, and is used to prevent water from leaking out of the dishwasher while it is operating. This genuine OEM part is for the lower right-hand side of your di...
In Stock
Order now and your part arrives by Jul 30

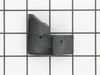
This is a genuine OEM corner tub baffle for the lower left-hand side of your dishwasher. It is made of black plastic, and is used to prevent water from leaking out of the dishwasher while it is operat...
In Stock
Order now and your part arrives by Jul 30
 – Part Number: WD28X265")
In Stock
Order now and your part arrives by Jul 30

$50.36
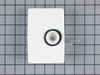
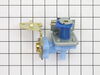
This water inlet valve is specially designed for those dishwashers that fit under the counter from 1974 To Present. The valve should be located behind the lower kickplate panel in either the right or ...
Special Order

$56.24
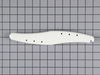
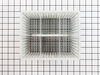
Water is forced through this spray arm by the unit's pump and motor assembly. The force of the water propels the spray arms, spraying water and detergent onto the dishes on the dishrack. This spray ar...
In Stock
Order now and your part arrives by Jul 30

On Order

This telescoping power tower comes in three sections.
No Longer Available

$20.72
Water that fills your dishwasher lifts this float, and when it reaches a certain level, it acts as a trigger for the float switch. The float triggers the float switch to shut off, thereby shutting off...
In Stock
Order now and your part arrives by Jul 30

Special Order

This dishwasher spray arm is for the bottom of your dishwasher. Water is forced through this spray arm by the unit's pump and motor assembly. The force of the water propels the spray arms, spraying wa...
No Longer Available

Special Order
Common Problems and Symptoms for GSD1000-04
Viewing 6 of 6Leaking
Fixed by these parts
How to fix it
Not cleaning dishes properly
Fixed by these parts
How to fix it
Will not fill with water
Fixed by these parts
How to fix it
Not draining
Fixed by these parts
How to fix it
Will not dispense detergent
Fixed by these parts
How to fix it
Door won’t close
Fixed by these parts
How to fix it


")
Keep searches simple. Use keywords, e.g. "leaking", "pump", "broken" or "fit".
- Customer:
- Julie from Maumee, OH
- Parts Used:
- WD12X271
- Difficulty Level:
- Really Easy
- Total Repair Time:
- Less than 15 mins
Wheel broken off bottom rack
Open the tiny plastic package in inserted the wheel onto the "axle". Opened the dishwasher, pulled out the bottom rack and snapped the wheel onto the rack. Done!
Was this instruction helpful to you?
Thank you for voting!
- Customer:
- Lloyd from The Villages, FL
- Parts Used:
- WD12X271
- Difficulty Level:
- Really Easy
- Total Repair Time:
- Less than 15 mins
Rollers fell off lower rack of dishwasher.
First removed four old wheels. then attached four new wheels to lower rack by pressing into slots.
Was this instruction helpful to you?
Thank you for voting!
- Customer:
- Don from Mount Vernon, IL
- Parts Used:
- WD15X93
- Difficulty Level:
- Easy
- Total Repair Time:
- 30 - 60 mins
- Tools:
- Nutdriver, Screw drivers, Wrench set
Insufficient fill water, dishes not getting clean (valve diaphram had ruptured)
1. Remove lower cover skirt.
2. Shut of water at undersink valve.
3. Unplug power cord or turn off circuit breaker.
4. Disconnect water supply line from fill valve.
5. Unplug the electrical connector from the valve.
6. Remove the 2 valve mounting bracket screws.
7. With loose valve in hand, rotate to g ... Read more ain access to allow release of outlet hose clamp for hose removal.
8. Remove brass fitting from old valve and install on new valve. Use teflon tape on the pipe threads only.
Install new valve by reversing the procedure.
Read less
Was this instruction helpful to you?
Thank you for voting!