


Models
>
GSD4112Z02AA
GSD4112Z02AA General Electric Dishwasher
Jump to:
Find Part by Name
Keep searches simple, eg. "belt" or "pump".
Diagrams for GSD4112Z02AA
Viewing 3 of 3


Keep searches simple, eg. "belt" or "pump".

$147.07
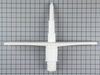
This is a manufacturer-approved lower dish rack with six wheels and supports. The lower dish rack is where dishes are placed in the bottom portion of the dishwasher to be cleaned during the wash cycle...
In Stock
Order now and your part arrives by Apr 2

In Stock
Order now and your part arrives by Apr 2

$141.31
This upper dishrack assembly holds dishes and cups in the top section of the dishwasher. It includes the rack and wheels for smooth sliding. Replace it if the original is damaged or not holding items ...
In Stock
Order now and your part arrives by Apr 2

In Stock
Order now and your part arrives by Apr 2

$15.26
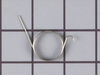
The hinge link on your dishwasher connects the spring to the dishwasher door hinge. If the hinge link becomes cracked or damaged, you may not be able to shut or lock your dishwasher door properly. In ...
In Stock
Order now and your part arrives by Apr 2

$202.13
This dishwasher pump and motor kit is a comprehensive replacement solution for various models manufactured since 1970. The redesigned assembly includes a built-in drain solenoid, streamlining installa...
In Stock
Order now and your part arrives by Apr 2

$35.34
This genuine OEM dishwasher door seal gasket prevents water from leaking out of the dishwasher. If your washer is leaking from the door, check for wear on the gasket, and to ensure it is properly fitt...
In Stock
Order now and your part arrives by Apr 2


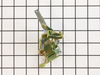
This part helps stop your dishwasher from leaking. This kit includes the impeller, seal, blade, filter, skidder and skidder holder.
No Longer Available

$28.91
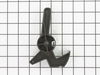
This is the replacement detergent cup release arm for your dishwasher. It is made of black plastic and is sold individually. The detergent cup release arm is found on the inside of the dishwasher door...
In Stock
Order now and your part arrives by Apr 2

In Stock
Order now and your part arrives by Apr 2

In Stock
Order now and your part arrives by Apr 2
Questions and Answers
We're sorry, but our Q&A experts are temporarily unavailable.
Please check back later if you still haven't found the answer you need.
Common Problems and Symptoms for GSD4112Z02AA
Viewing 10 of 10Not draining
Fixed by these parts


How to fix it
Leaking
Fixed by these parts


How to fix it
Not cleaning dishes properly
Fixed by these parts

How to fix it
Door latch failure
Fixed by these parts

How to fix it
Will not dispense detergent
Fixed by these parts
How to fix it
Will Not Start
Fixed by these parts

How to fix it
Door won’t close
Fixed by these parts

How to fix it
Noisy
Fixed by these parts

How to fix it
Not drying dishes properly
Fixed by these parts
How to fix it
Will not fill with water
Fixed by these parts
How to fix it


Keep searches simple. Use keywords, e.g. "leaking", "pump", "broken" or "fit".
- Customer:
- Dan from Minnetonka, MN
- Parts Used:
- WD24X10018
- Difficulty Level:
- Really Easy
- Total Repair Time:
- Less than 15 mins
- Tools:
- Nutdriver
Dishwasher wouldn't fully drain
I removed the four screws holding the screen and molded plastic cage inside the rear of the dishwasher to expose the check valve assembly. I then unscrewed the piston and nut assembly with my hand and replaced it with the new one. I found that the rubber cone shaped valve on the old piston and nut assembly was entirely disintegrated. T
... Read more
his easy repair solved the problem.
Read less
Was this instruction helpful to you?
Thank you for voting!
- Customer:
- michael from Bloomington, IN
- Parts Used:
- WD28X31819
- Difficulty Level:
- Really Easy
- Total Repair Time:
- More than 2 hours
lower dishrack rusted
replaced rack, no repairs required
Was this instruction helpful to you?
Thank you for voting!
- Customer:
- Barbara from Salinas, CA
- Parts Used:
- WD28X31818, WD28X31819
- Difficulty Level:
- Really Easy
- Total Repair Time:
- Less than 15 mins
Racks had rusted and needed replacement
The bottom rack was a breeze since it wasn't attached to anything. The more difficult task was removing the plastic rail guard for the top rack. With some elbow grease and ingenuity, I finally figured out that it must be tilted prior to being popped out of its socket. Follow the same procedure after replacing the rack.
Was this instruction helpful to you?
Thank you for voting!