


Models
>
RFS511SW2A
RFS511SW2A
Jump to:
Find Part by Name
Keep searches simple, eg. "belt" or "pump".
Models for RFS511SW2A
Click on the best match to narrow your results.
Keep searches simple, eg. "belt" or "pump".


$20.95
This is an authentic OEM replacement part. This screw is commonly used in the assembly of refrigerators, microwaves, ice makers, ranges, and smokers. Due to varied uses we recommend you refer to model...
In Stock
Order now and your part arrives by Mar 26

Special Order

In Stock
Order now and your part arrives by Mar 26

In Stock
Order now and your part arrives by Mar 26

Special Order


In Stock
Order now and your part arrives by Mar 26

Special Order

In Stock
Order now and your part arrives by Mar 26

Special Order

In Stock
Order now and your part arrives by Mar 26
Common Problems and Symptoms for RFS511SW2A
Viewing 1 of 1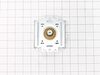
Keep searches simple. Use keywords, e.g. "leaking", "pump", "broken" or "fit".
- Customer:
- Sandra from coto de caza, CA
- Parts Used:
- W10859575
- Difficulty Level:
- Really Easy
- Total Repair Time:
- 15 - 30 mins
- Tools:
- Screw drivers
loud buzzing noise
The repair went well...I am so glad that I read this info before buying a new microwave....it saved me lots of money. I did have a repair man come and look at it and he told me to buy a new one but it cost alot of money when it wasn't necessary. I did the repair and I was very proud of myself.
Three men watched a woman fix this and ... Read more it was no problem...they were impressed also....
Three men watched a woman fix this and ... Read more it was no problem...they were impressed also....
Read less
Was this instruction helpful to you?
Thank you for voting!
- Customer:
- Joseph from WILTON, NH
- Parts Used:
- 6324W1A001L
- Difficulty Level:
- A Bit Difficult
- Total Repair Time:
- 1- 2 hours
- Tools:
- Screw drivers
Magnitron failed
Over the stove microwave installed in top cabinet row.
1. Unplug device.
2. Two people to remove from wall/cabinet (remove two, large, top mounting screws and rotate entire microwave down and off the wall mount). Should be some wood spacers between top of device and bottom of cabinet.
3. Remove screws from sheet metal cover ... Read more .
4. Remove one screw holding blowers in place and rotate out of the way, in order to gain access to 2 of 5 screws that hold the magnetron in place.
5. Unplug magnetron and remove the 5 screws.
6. Drop in new magnetron and re-assemble microwave in reverse order (steps 5-3).
7. Two people restore micro to wall/cabinet. Replace wood spacers, re-install two, large mounting screws (finger-tight). Test device. Secure the two large screws.
Read less
Was this instruction helpful to you?
Thank you for voting!
- Customer:
- Theodore from SPOKANE, WA
- Parts Used:
- W10859575
- Difficulty Level:
- Very Easy
- Total Repair Time:
- Less than 15 mins
- Tools:
- Screw drivers, Socket set, Wrench set
Microwave slowly stopped heating food
Initially we started looking to buy a replacement microwave to replace our 13+ year old built-in microwave. It was a real pain finding a replacement to fit the exact dimensions. So I thought I'd try to find an old KitchenAid microwave. However, I was pleasantly surprised when this site came up on my search. Their website allows me to inpu
... Read more
t the problems and then it showed two possible parts that needed to be replaced. I emailed tech support and asked them which part I needed. They responded very quickly and said I needed to replace the magnetron. I watched a couple YouTube videos and then pulled my microwave apart. It was incredibly easy to pull the outer cover off. The magnetron had 5 screws that needed to be removed and one electrical plug. Took me maybe 10 min to complete the entire repair. It was one of the easiest repairs I've done and so thankful for this site They saved me a ton of money from not buying a new microwave and we now have our microwave working again. In hindsight, I wouldn't hesitate. I'd order the Part now and get it fixed.
Read less
Was this instruction helpful to you?
Thank you for voting!