Some of the parts we sell are eligible for mail-in rebates since we can recycle them. We will display any applicable rebates in your shopping cart. To redeem your rebate, contact Customer Service after you have received your part.
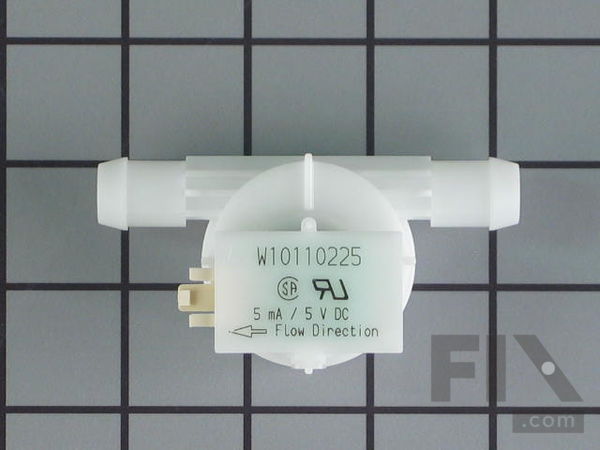
Flowmeter
$105.05
In Stock
- Fix Number:
- FIX11748313
- Manufacturer #:
- WPW10110225
- Manufactured by:
- Whirlpool
- Product Description
- This part continually measures the amount of water entering the tub. It will make adjustments if too much or too little water is present.
- Works with the following brands:
- Kenmore, Whirlpool, Maytag, KitchenAid
- Works with the following products
- Washer
- Fixes the following symptoms
- Leaking, Will not drain, No hot or cold water, Will Not Start
- Part# WPW10110225 replaces these:
- AP6015043, 8181696, W10110225
Part Number Cross Reference
Product Description
This part continually measures the amount of water entering the tub. It will make adjustments if too much or too little water is present.
-
Works with the following brands:Kenmore, Whirlpool, Maytag, KitchenAid
-
Works with the following products:Washer
-
Fixes the following symptoms:Leaking, Will not drain, No hot or cold water, Will Not Start
-
Part# WPW10110225 replaces these:AP6015043, 8181696, W10110225
Videos For installing this part.
Replacing your Flowmeter

Questions and Answers
We're sorry, but our Q&A experts are temporarily unavailable.
Please check back later if you still haven't found the answer you need.
Related Parts Additional or alternate parts to consider.
Installation Instructions Provided by Fix customers like you.
- < Prev
- 1
- Next >
Sort by:
Search filter:
Clear Filter
Your search term must have 3 or more characters.
Keep searches simple. Use keywords, e.g. "leaking", "pump", "broken" or "fit".
Sorry, we couldn't find any existing installation instruction that matched.
- Customer:
- William from Kings Park, NY
- Parts Used:
- WPW10110225
- Difficulty Level:
- Really Easy
- Total Repair Time:
- 15 - 30 mins
- Tools:
- Pliers, Screw drivers
Washer displayed the F-H error code & stopped,
Remove the top of the washer using only 3 screws. The part can be seen at the top near the rear. remove the electric plug; then use pliers to loosen the two hose clamps & then remove the part. Assembly is the reverse. I ordered the part in the afternoon & received it less than 24 hours later; with only the cheapest shipping & not overnigh
... Read more
t. I am extremely pleased & will tell my handy friends where to go to get appliance parts & much needed troubleshooting help. Thank you, you are the best.
Read less
5 of 5 people
found this instruction helpful.
Was this instruction helpful to you?
Thank you for voting!
- Customer:
- James from Jackson, TN
- Parts Used:
- WPW10110225
- Difficulty Level:
- Easy
- Total Repair Time:
- 15 - 30 mins
- Tools:
- Nutdriver, Screw drivers
Washer was given a FH error code. This code indicates a low water flow to the washer.
Remove the washer top by removing the three screws on the back of the washer, I used a small socket wrench and a 1/4" socket as I couldn't pull the unit out to use a screwdriver.Remove the top of the washer by pushing the top section to the back of the unit. Remove the wiring from the flowmeter using a small screwdriver to release the cl
... Read more
ip holding the plug to the old unit. Use pliers to compress and push back the spring clips that secure the flowmeter to the water inlet hose.Remove and the old unit and install the new unit. Replace the spring clips and the wing plug. I ran a load of laundry before putting the top back on to check for leaks. Put the top back on and replace the screws and your done.
Read less
2 of 2 people
found this instruction helpful.
Was this instruction helpful to you?
Thank you for voting!
- Customer:
- anthony from exeter, CA
- Parts Used:
- WPW10514214, WPW10110225, WP8181694
- Difficulty Level:
- Easy
- Total Repair Time:
- 30 - 60 mins
- Tools:
- Pliers, Screw drivers, Socket set, Wrench (Adjustable)
H/F Flashing Intermittintly1-6 Mins Into Wash Cycle
Googled problem- was directed to this site where I down loaded parts drawing for my washer. After reading different peoples trials for fixing this problem, I came to the conclusion that it could be 1-4 possible parts that was making the washer fault out with h/f flashing. Option 1- order the 4 possible parts and pay about 150 be bucks
... Read more
with the understanding that if one of these parts did not fix it, then I was going to just buy a new washer. Option 2- call a service man to come out and fix it with the understanding that I was going to pay at least 150 bucks to find out what was the problem but most likely would then have to wait for part to come in then pay again for the part to be installed. Possibly a 1-2 week time period to be without a washer. I am not knocking personel that service appliances but I just dont like to wait. I went for option 1. Received the 4 parts the next day. All of parts locations were easily accessed and installation of all parts was complete in less than an hour. While installing, I did determine that the flowmeter was actually the part that had gone bad. I went ahead and installed a new water inlet solenoid valve and water level switch. I also opened the drain pump parts catcher and cleaned it. . . . . . . Much to my suprise I found a quarter, nickle, 5/16 nut. Put the washer back together and did a couple of test loads. Washer worked just like the first day I got it. I was lucky this time. . . . . . . . . . . . . . . .
Read less
1 person
found this instruction helpful.
Was this instruction helpful to you?
Thank you for voting!
- Customer:
- bryan from Topeka, KS
- Parts Used:
- WPW10110225
- Difficulty Level:
- Very Easy
- Total Repair Time:
- Less than 15 mins
- Tools:
- Nutdriver, Pliers
Unit throwing H F code during wash fill cycle
Possible problems: 1) Clogged inlet valves; clogged or worn flow meter, bad connection from flow valve to control board. Inlet valves were fine and connector fins on plug to control board were tightened so this fix is to replace the flow meter. Tools needed: 7MM nutdrive and pliers 1) Unplug washer and turn off water supply. 2)Use 7MM
... Read more
nutdriver to remove three screws holding lid (along top of back) and slide lid toward back of unit and lift off. 3) Use pliers to move hose clamps from flow meter and remove sensor connector. 4) Remove old flow meter and install new making sure to align to correct flow arrow pointing away from back of the unit. 5) Connect sensor connector and hose clamps. 6)Reinstall lid and plug in unit and turn on water supply. 7) Run cycle to assure fix. If error continues check inlet control valve screens and water lines for debris, also control board connections (use small flat screwdriver to squeeze pins and add dielectric grease to combat corrosion). Check valves and control board contactors before replacing the very expensive control board.
Read less
0 of 1 people
found this instruction helpful.
Was this instruction helpful to you?
Thank you for voting!
- Customer:
- James from Louisville, KY
- Parts Used:
- WPW10110225, WP8182862
- Difficulty Level:
- Easy
- Total Repair Time:
- 30 - 60 mins
- Tools:
- Nutdriver, Pliers, Screw drivers
Getting an intermittant "HF" error code on display.
Replaced the water intake valve. 1) Removed the top panel of the washer (screws) which allowed access to the valve assembly. 2) Another screw removed the valve from the washer's side. 3) A spring clamp held the water hose to the valve, and that was removed with pliers.
0 of 1 people
found this instruction helpful.
Was this instruction helpful to you?
Thank you for voting!
- Customer:
- Daniel from Port Charlotte, FL
- Parts Used:
- WPW10110225
- Difficulty Level:
- Really Easy
- Total Repair Time:
- 30 - 60 mins
- Tools:
- Nutdriver, Pliers
Had to beat the rubber hose connections to get them off the old part.
Just like in the video, except for using the hair dryer to loosen the hose connections. I
0 of 1 people
found this instruction helpful.
Was this instruction helpful to you?
Thank you for voting!
- Customer:
- Mark from Peru, KS
- Parts Used:
- WPW10110225
- Difficulty Level:
- Really Easy
- Total Repair Time:
- Less than 15 mins
- Tools:
- Pliers, Screw drivers
H F error code and shutdown
Pulled back cover, 2 spring clamps and an electrical connector. As a seasoned aircraft mechanic, I can assure you this was an easy repair. The part arrived less than 18 hours after ordering. You folks are first rate !!!
0 of 1 people
found this instruction helpful.
Was this instruction helpful to you?
Thank you for voting!
- Customer:
- James from Claremont, NH
- Parts Used:
- WPW10110225
- Difficulty Level:
- Really Easy
- Total Repair Time:
- Less than 15 mins
- Tools:
- Screw drivers, Wrench (Adjustable)
F 20 code
Afterms replacing the flown meter 2 times I finally had read somewhere to check the pressure switch hose and sure enough there was a pin point hole as far as the meter it's really straight forward take 3 screws off back top cover and use pliers to take clamps off
0 of 1 people
found this instruction helpful.
Was this instruction helpful to you?
Thank you for voting!
- < Prev
- 1
- Next >
Model Compatibility
This part works with the following models:
Fix Number: FIX11748313
Manufacturer Part Number: WPW10110225
Manufacturer Part Number: WPW10110225
Brand
Model Number
Description
✖
Mail-In Recycling Rebate


