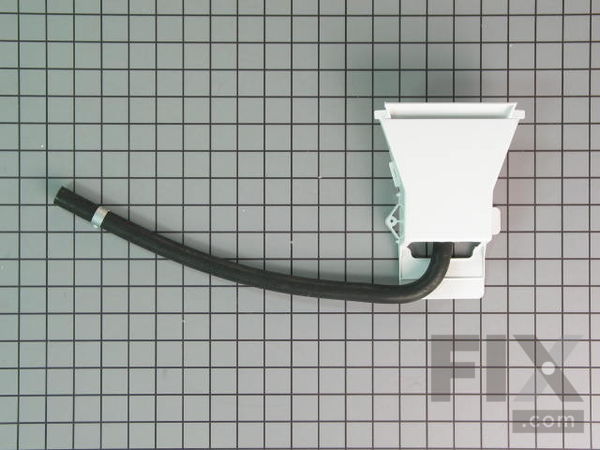
Part Location Diagram of WP22001304 Whirlpool Water Injector Assembly
See part 23 in the diagram
( Grid squares measure 1x1 inch )

Water Injector Assembly

Works With Model LAT9806DAM!

Rated by 2 customers 

?

Really Easy 

30 - 60 mins 

Ratings submitted by customers like you who bought this part.

?
$48.04
In Stock
Fix Number:
FIX11739278
Manufacturer #:
WP22001304
Manufactured by:
Whirlpool
Works With Model LAT9806DAM!

Product Description

The part includes the hose, water injector and clamp.

Questions and Answers

Be the first to ask our experts a question about this part!

Installation Instructions Provided by Fix customers like you.

Average Repair Rating: 3.8 / 5.0, 2 reviews.
  • 1
Sort by:
Sorry, we couldn't find any existing installation instruction that matched.
Customer:
Gregory from Worthington, OH
Parts Used:
WP22001304
Difficulty Level:
Easy
Total Repair Time:
30 - 60 mins
Tools:
Nutdriver, Pliers, Screw drivers
Water injector cracked. Loose and leaking
UNPLUG THE WASHER

Remove two screws on the bottom front of the washer using a Philips screwdriver. They are one on each corner just underneath the lip. You don't need to lift the washer.

Grip the bottom of the front of the washer and slowly pull forward to un-hinge the front from the top. Once the clips at the t op of the front pop you can remove the front and set aside. You our may need a puddy knife or to wiggle the front back and forth to get the front clips to pop.

Using a socket set remove the two bolts that hold down the top. Each bolt is back in the top front corner. I recommend using a socket extension. After a few turns I was able to remove the bolts by hand.

Remove the 4 screws on the back top of the console. Two screws on each side. Pull the the front panel off and towards you. You will see a single screw in the center of the console floor that holds the injector. Remove that screw.

Wiggle off the hose near the front that is for the bleach.
Lift the lid at the front and hinge back. The injector will be near the back at the hinge. Remove the injector by pulling it to the left from the tab.

Use pliers to squeeze the clip holding the hose near the pump and use a slight twisting motion to raise the clamp an inch or two from the pump. Gently pull the hose off the pump and remove the entire ejector assembly.

While the washer is open I suggest wiping and vacuuming the insides.

Installation is the reverse. Be sure the new hose is fully seated on the pump and the hose clamp is again near the end of the hose.

When reinstalling the screw that holds the injector. Be sure to get it in straight. There is a little white tab near the screw that will go into a hole in the lid base. That will help you guide to find the screw hole and that the injector is fully tightened. DO NOT over tighten.

Don't forget to re-attach the bleach hose as well. And re-bolt the lid.

To re attach the front attach it at the top first. Use a hinging motion to make sure the clips attach. You might need a puddy knife. The joint will be tight and flush if the clips engage properly. They may also click in.

Use the screws to re attach the front at the bottom.
0 of 1 people found this instruction helpful.
Was this instruction helpful to you?
Thank you for voting!
Customer:
Michael from Goleta, CA
Parts Used:
WP22001304
Difficulty Level:
Really Easy
Total Repair Time:
15 - 30 mins
Tools:
Pliers, Screw drivers, Socket set, Wrench (Adjustable)
Water Injector Assembly had broken off due to clothes over-load.
Removed rear control panel cover to gain access to the screw holding the water injector assembly in place, and removed screw. Then removed front washer panel in order to gain access to the two bolts securing the top washer panel to the side panels, and lifted top washer panel to gain access to Water Injector Assembly. Removed old one by r emoving one screw from behind the control panel and hose at cold/hot water intake solenoid. Installed the new Water Injector Assembly in reverse order, and reinstalled front washer panel and cover on the back of the control panel.
0 of 1 people found this instruction helpful.
Was this instruction helpful to you?
Thank you for voting!
  • 1

Model Compatibility

This part works with the following models:
Fix Number: FIX11739278
Manufacturer Part Number: WP22001304
Brand
Model Number
Description
Maytag
6329
Washer - MAYTAG AUTOMATIC WASHER
Maytag
6349
Washer - MAYTAG AUTOMATIC WASHER
Maytag
6359
Washer - MAYTAG AUTOMATIC WASHER
Maytag
LAT1916AAE
Washer - Residential
Maytag
LAT1916ABE
Washer - Residential
Maytag
LAT2200AAE
Washer - Residential
Maytag
LAT2300AAE
Washer - Residential
Maytag
LAT2300AWW
Washer - Residential
Maytag
LAT2301AAE
Washer - Residential
Maytag
LAT2500AAE
Washer - Residential
Maytag
LAT2600AAE
Washer - Residential
Maytag
LAT2914AAE
Washer - Residential
Maytag
LAT2914AAL
Washer - Residential
Maytag
LAT2914AAM
Washer - Residential
Maytag
LAT2915AAE
Washer - Residential
Maytag
LAT2915AAM
Washer - Residential
Maytag
LAT2916AAE
Washer - Residential
Maytag
LAT2916AAM
Washer - Residential
Maytag
LAT2916ABE
Washer - Residential
Maytag
LAT3500AAE
Washer - Residential
Maytag
LAT3500AAQ
Washer - Residential
Maytag
LAT3600AAE
Washer - Residential
Maytag
LAT3600AAQ
Washer - Residential
Maytag
LAT3914AAE
Washer - Residential
Maytag
LAT3914AAL
Washer - Residential
Maytag
LAT3914AAM
Washer - Residential
Maytag
LAT4000AAW
Washer - Residential
Maytag
LAT4914AAE
Washer - Residential
Maytag
LAT4914AAL
Washer - Residential
Maytag
LAT4914AAM
Washer - Residential