


Models
>
WWTR1611SW0
WWTR1611SW0 Westinghouse Refrigerator
Jump to:
Find Part by Name
Keep searches simple, eg. "belt" or "pump".
Diagrams for WWTR1611SW0
Viewing 6 of 6


Manuals & Guides for WWTR1611SW0
Click to downloadInstall
Installation Instructions
(0.77MB)
Install
Installation Instructions
(2.44MB)
Specs
Product Specifications Sheet
(0.77MB)
Care
Use and Care Manual
(0.77MB)
Wiring
Wiring Diagram
(0.77MB)
Keep searches simple, eg. "belt" or "pump".

$39.21
This door rack is for the bottom shelf of your refrigerator door, the top and middle shelf racks are sold separately. Please note that these doors racks are sold individually and not part of a kit. Th...
In Stock

$39.82
The door rack, also known as a door shelf retainer bar, is used to hold items stored on the fridge door in place. The rack includes the two ends caps that are necessary for installation, and they come...
In Stock

In Stock

$51.77
The run capacitor is attached to the compressor in your refrigerator and is used to maintain a constant temperature in your freezer. It does this by cycling the compressor on and off. This run capacit...
In Stock

In Stock

In Stock

$7.27
This is a replacement hinge bearing for your refrigerator. The hinge bearing is found on the door hinge, and reduces friction when the door opens and closes. If the bearing is damaged, you may not be ...
In Stock

In Stock

$105.03
This cold control thermostat cycles on and off regularly to keep your refrigerator cold.
In Stock

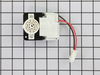
$109.84
This is a blower motor, also known as evaporator fan motor, for a refrigerator. It features a 3-wire connector. The motor powers the fan to circulate air through the fridge to your fresh food compartm...
In Stock

In Stock

In Stock
Questions and Answers
We're sorry, but our Q&A experts are temporarily unavailable.
Please check back later if you still haven't found the answer you need.
Common Problems and Symptoms for WWTR1611SW0
Viewing 14 of 14Fridge too warm
Fixed by these parts


How to fix it
Door won’t open or close
Fixed by these parts


How to fix it
Will Not Start
Fixed by these parts

How to fix it
Won’t start
Fixed by these parts
How to fix it
Light not working
Fixed by these parts


How to fix it
Fridge and Freezer are too warm
Fixed by these parts
How to fix it
Noisy
Fixed by these parts


How to fix it
Freezer section too warm
Fixed by these parts
How to fix it
Too warm
Fixed by these parts
How to fix it
Fridge too cold
Fixed by these parts
How to fix it
Clicking sound
Fixed by these parts
How to fix it
Fridge runs too long
Fixed by these parts
How to fix it
Freezer not defrosting
Fixed by these parts

How to fix it
Leaking
Fixed by these parts

How to fix it


Keep searches simple. Use keywords, e.g. "leaking", "pump", "broken" or "fit".
- Customer:
- Bruce from Alton, IL
- Parts Used:
- 241537103
- Difficulty Level:
- Really Easy
- Total Repair Time:
- Less than 15 mins
- Tools:
- Pliers, Screw drivers
Refrigerator would not run but interior light was on.
I unplugged the refrigerator, then opened the door and removed four screws holding the plastic electrical panel to the interior top of the main refrigerator compartment and noticed the cold control was corroded badly, apparently from moisture in the panel. I ordered a new one from partselect.com. When it arrived the next day, I then pul
... Read more
led off the control knob, unclipped the cold control, unplugged the three wires to the control, then removed the styrofoam insulation blocks holding the thermocouple wire and then removed the thermocouple wire to complete the removal. I then reversed the process to install the new thermostat and control. That is repositioned the thermocouple wire, put the insulation blocks back to hold the wire, then replugged the three electrical wires, clipped the control back and pushed the control knob back on and finally screwed the panel back to the top of the main compartment and plugged the refrigerator electrical cord back in to provide current to the refrigerator. It immediately started up and ran fine. Total time - about 8 minutes.
Read less
Was this instruction helpful to you?
Thank you for voting!
- Customer:
- Roger from TRURO, IA
- Parts Used:
- 242077705
- Difficulty Level:
- Easy
- Total Repair Time:
- 15 - 30 mins
- Tools:
- Nutdriver, Screw drivers
Refrigerator not cooling, Freezer working fine
Frig area was at about 50 degrees and would not get cooler. Freezer was working great.
Empty the freezer and remove the two screws that hold the back panel of the inside of the freezer on. Pull the panel out and you will see the fan that is mounted to the back of the panel. If the fan is not running, disconnect it (quick con ... Read more nector) and check to see if there is voltage coming to it from the connector (should be 120VAC between the two wires). If there is power, and the fan was not working, replace the fan.
Fan just snaps into the holder on the back panel and plugs into the quick connector. Make sure you clear any ice build-up in the hole between the freezer and the frig that the fans blows through. Put it back together and verify the fan runs.
Read less
Was this instruction helpful to you?
Thank you for voting!
- Customer:
- Rebecca from Gautier, MS
- Parts Used:
- 241559801
- Difficulty Level:
- Really Easy
- Total Repair Time:
- Less than 15 mins
Light Socket short
- Unsnapped old light socket from top of Frig
- Disconnected elect wires
- Reconnected elect wires to new light socket
- Snapped new socket in place
- Done in less than 2 min.
- Disconnected elect wires
- Reconnected elect wires to new light socket
- Snapped new socket in place
- Done in less than 2 min.
Was this instruction helpful to you?
Thank you for voting!