


Models
>
ZWW5310RB0
ZWW5310RB0 Whirlpool Washer
Jump to:
Find Part by Name
Keep searches simple, eg. "belt" or "pump".
Diagrams for ZWW5310RB0
Viewing 5 of 5


 Diagram and Parts List for Whirlpool Washer")

Keep searches simple, eg. "belt" or "pump".

$24.15
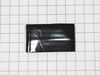
This 18 ml bottle of white appliance touch-up paint is used to cover scratches or marks on your appliance. The white touch-up paint can be used on refrigerators, microwaves, ranges, clothes dryers, an...
In Stock
Order now and your part arrives by Jul 20

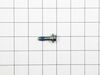
This insert is sold individually. Knob not included. Knob is sold separately.
In Stock
Order now and your part arrives by Jul 20

In Stock
Order now and your part arrives by Jul 20

In Stock
Order now and your part arrives by Jul 20

$86.60
This washplate fits at the bottom of the spin basket in select top-load washers, helping circulate clothes through water for effective cleaning. It’s compatible with Whirlpool, Kenmore, and other bran...
In Stock
Order now and your part arrives by Jul 20

In Stock
Order now and your part arrives by Jul 20

In Stock
Order now and your part arrives by Jul 20

$49.29
This clutch slider kit is part of the washer’s transmission system, helping control the agitator’s speed and direction during wash and spin cycles. It includes the clutch band, slider, and lock ring. ...
In Stock
Order now and your part arrives by Jul 20

In Stock
Order now and your part arrives by Jul 20

$9.79
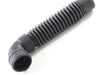
This clamp helps to prevent leaking by holding the end of water hose in place.
In Stock
Order now and your part arrives by Jul 20

In Stock
Order now and your part arrives by Jul 20

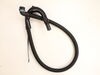
This is the hose that tells your appliance if your tub is at the desired water level.
In Stock
Order now and your part arrives by Jul 20
Common Problems and Symptoms for ZWW5310RB0
Viewing 11 of 11Leaking
Fixed by these parts

How to fix it
Will not agitate
Fixed by these parts


How to fix it
Shaking and Moving
Fixed by these parts
How to fix it
Spinning Issues
Fixed by these parts
How to fix it
Noisy and Marks Left on Clothes
Fixed by these parts
How to fix it
Cycle Not Advancing
Fixed by these parts
How to fix it
Will not drain
Fixed by these parts
How to fix it
Draining Issues
Fixed by these parts
How to fix it
Will Not Start
Fixed by these parts
How to fix it
Timer Not Working
Fixed by these parts
How to fix it
Water Filling Issues
Fixed by these parts
How to fix it


Keep searches simple. Use keywords, e.g. "leaking", "pump", "broken" or "fit".
- Customer:
- Michelle from Richardson, TX
- Parts Used:
- 72017
- Difficulty Level:
- Really Easy
- Total Repair Time:
- Less than 15 mins
Scratches in Surface
This product comes in a bottle with a brush like Liquid Paper. It goes on incredibly easy. A second coat might be needed. I wanted to prevent rust from setting in so I covered the scratches and dings. The paint is a little brighter since my washer is 10 years old but it still looks great.
Was this instruction helpful to you?
Thank you for voting!
- Customer:
- Thomas from MILLBURY, OH
- Parts Used:
- W10752187
- Difficulty Level:
- Easy
- Total Repair Time:
- 30 - 60 mins
- Tools:
- Nutdriver, Pliers, Screw drivers, Socket set
Worn out splines connecting transmission driveshaft to agitator.
DIY'er working on a Maytag Centennial type washing machine should be aware that replacing a a transmission or agitator due to worn out splines is only half a job done well. I originally replaced my transmission due to worn splines, only to discover later that the worn agitator splines caused the new transmission splines to wear out at an
... Read more
accelerated rate. Transmission and Agitator should be replaced together, along with a new Agitator mounting bolt. There are plenty of video's online of how to do this repair so I won't get into that here. Just wanted to drop the above sage advice. Transmissions for these washers aren't cheap.
Read less
Was this instruction helpful to you?
Thank you for voting!
- Customer:
- Larry from HICKORY, NC
- Parts Used:
- WP8536939
- Difficulty Level:
- Very Easy
- Total Repair Time:
- Less than 15 mins
The main knob insert snapped.
Nothing to it. Just remember to put the insert in the knob, NOT on the selector stem. Line up the flat part of the insert with the flat part of the stem and push the knob in place.
Don NOT ram it on the selector stem. When it's seated, don't push any more. That's all there is to it. It works. If the pointer on the knob indicat ... Read more es the selector is lined up correctly, but it isn't, the problem is the selector, not the knob.
Don NOT ram it on the selector stem. When it's seated, don't push any more. That's all there is to it. It works. If the pointer on the knob indicat ... Read more es the selector is lined up correctly, but it isn't, the problem is the selector, not the knob.
Read less
Was this instruction helpful to you?
Thank you for voting!