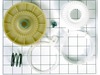
The washer drive pulley kit is also known as a replacement clutch assembly, or a cam kit. The drive pulley is found at the bottom of your washing machine, mounted to the drive shaft. Common symptoms i...
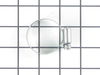
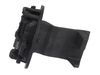
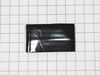
The door strike plays a vital role in your top-load washer’s safety system by securing the lid during each cycle. It works with the latch to prevent the door from opening unexpectedly, helping avoid w...
This 18 ml bottle of white appliance touch-up paint is used to cover scratches or marks on your appliance. The white touch-up paint can be used on refrigerators, microwaves, ranges, clothes dryers, an...
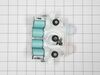
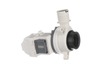
If your washer isn’t filling properly or is leaking near the back, this inlet valve might be the problem. It controls how hot and cold water enter your machine during the wash cycle. With two inlets a...
This washing machine cleaner includes three time-release tablets designed to remove odor-causing residues, grime, and buildup from high-efficiency and top-load washing machines. The tablets work by cl...
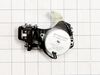
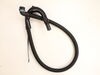
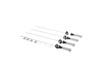
This shift actuator plays a key role in the operation of your washing machine by controlling the transition between spin and agitate modes. It also relays spin speed information to the control board, ...
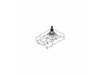
This washplate fits at the bottom of the spin basket in select top-load washers, helping circulate clothes through water for effective cleaning. It’s compatible with Whirlpool, Kenmore, and other bran...
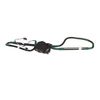
This lid lock assembly for top-load washers includes the solenoid mechanism that engages the locking function during wash and spin cycles. It serves as a direct replacement for older or damaged latche...
Ask our experts a question about this part and we'll get back to you as soon as possible!
1 question answered by our experts.
< Prev
1
Next >
Sort by:
Search filter:
Clear Filter
Your search term must have 3 or more characters.
Keep searches simple. Use keywords, e.g. "leaking", "pump", "broken" or "fit".
Sorry, we couldn't find any existing answers that matched. Try using some different or simpler keywords, or submit your new question by using the "Ask a Question" button above!
Melissa
March 3, 2023
I have already ordered this valve. Can you send me directions on how to get to part and replace it?
For model number WTW5100HW1
Hello Melissa, thank you for contacting us. To replace the water inlet valve, please go through all these steps:
1. Unplug the washer.
2. Shut off the water supply.
3. The inlet valve is often located on the bottom of the appliance, near the front. You can reach the component by removing one or more panels.
4. The water inlet valve uses a mounting plate and screws to secure the valve to a bracket panel or frame; one or more wire connectors will need to be disconnected from the solenoid terminals for the dishwasher.
5. The inlet hoses are usually secured with clamps that will need to be loosened in order to remove the hoses. Inlet valves on dishwashers will often have an elbow fitting that connects the water supply line to the valve.
6. Then, slide the hoses onto the ports and secure them with an appropriate clamp. If the dishwasher uses an elbow fitting to connect the water supply line, you should wrap Teflon tape clockwise around the threads of the elbow before threading it into the valve, and connect the wire connector or connectors to the solenoid terminals, thread the mounting screw or screws to secure the inlet valve to the bracket panel or frame. With the new water inlet valve installed, replace any access panels, control housing, or covers as necessary. Attach the inlet water lines as required. Turn the water supply back on.
7. Plug the power cord back in or restore the power supply, and your appliance should be ready for use.
We hope this information is useful!
Was this helpful?
Thank you for voting!
Ask a Question
Ask our experts a question on this part and we'll respond as soon as we can.
Pushed in on door strike and rotated it counterclockwise, removed broken strike and installed new strike. NOTE: when removing the old strike (turning counterclockwise) it felt like it might break and/or was attached with an screw that I didn't see but it came right out.


 Diagram and Parts List for Whirlpool Washer")