


Models
>
SWFF71WN3050
SWFF71WN3050 Speed Queen Washer
Jump to:
Find Part by Name
Keep searches simple, eg. "belt" or "pump".
Diagrams for SWFF71WN3050
Viewing 19 of 19


Keep searches simple, eg. "belt" or "pump".

In Stock
Order now and your part arrives by Jul 30

$13.07
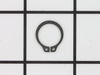
This metal retaining ring is well under an inch long. Use it for your Maytag brand clothes washer or your clothes dryer.
On Order

$7.60
This is a multi-use screw and can be used on a variety of appliances. The measurements of the screw are: 8/18 x 3/8. *Please note: the screw is sold individually. Refer to the manual provided by the m...
In Stock
Order now and your part arrives by Jul 30

$7.60
This hose clamp extends from half an inch to an inch in diameter. It is made entirely of metal and is intended for use with Maytag brand washing machines.
In Stock
Order now and your part arrives by Jul 30

In Stock
Order now and your part arrives by Jul 30

In Stock
Order now and your part arrives by Jul 30

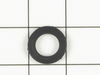
This high pressure inlet hose washer is black. It is an inch in diameter, made of rubber, and used with many washing machines, refrigerators, and dishwashers.
No Longer Available

$19.75
This hose is almost 5 feet long and now comes with the washers for proper installation. It is used to bring water into your washer for the cycles.
Special Order

In Stock
Order now and your part arrives by Jul 30

In Stock
Order now and your part arrives by Jul 30


$21.82
This is a genuine OEM replacement part. This nut is used in a number of appliances. Most often it can be found in the assembly of ranges, air conditioners, cook tops, washers, microwave oven combos, r...
Special Order
Common Problems and Symptoms for SWFF71WN3050
Viewing 6 of 6Noisy
Fixed by these parts

How to fix it
Leaking
Fixed by these parts


How to fix it
Will not agitate
Fixed by these parts
How to fix it
Burning smell
Fixed by these parts
How to fix it
Will not drain
Fixed by these parts
How to fix it
Spins slowly
Fixed by these parts
How to fix it


Keep searches simple. Use keywords, e.g. "leaking", "pump", "broken" or "fit".
- Customer:
- Melody from Silverton, CO
- Parts Used:
- WPW10121334
- Difficulty Level:
- Easy
- Total Repair Time:
- More than 2 hours
- Tools:
- Nutdriver, Screw drivers
belt was cracking and dryer was somewhat noisy
I used your great video for pointers as to what to do. I took off the front, raised the top, vacuumed the whole thing up, that took quite a while. Took out the drum. Did more cleaning. Then took off the old retaining rings with retaining ring pliers, took off the old drum rollers and support. Replaced with new roller supports, washer, rol
... Read more
ler, washer and retaining rings. Then I replaced the belt. Tested it and turned the wrong way and it came off. Replaced and tested it again and I don't know why but it came off. Replaced the belt again, tested fine. Then I replaced the felt pads and glides, they were worn. I ended up asking my husband to help hold the drum so I could get the front back on. Replaced front and door. Tried the dryer. Works great AND very, very little noise. Note: when taking the wiring off the light and the door switch, I took photo's of those places with my cell phone and had them to look at to make sure the wiring was correct.
Read less
Was this instruction helpful to you?
Thank you for voting!
- Customer:
- John from Bel Air, MD
- Parts Used:
- WPW10121334
- Difficulty Level:
- Easy
- Total Repair Time:
- 15 - 30 mins
- Tools:
- Nutdriver, Screw drivers
Clanging of dryer when rolling
Followed video on PartsSelect website, they made it real easy.
Was this instruction helpful to you?
Thank you for voting!