


Models
>
SWTX21QN
SWTX21QN Speed Queen Washer
Jump to:
Find Part by Name
Keep searches simple, eg. "belt" or "pump".
Diagrams for SWTX21QN
Viewing 21 of 21


Keep searches simple, eg. "belt" or "pump".

In Stock
Order now and your part arrives by Apr 11

$13.07
This metal retaining ring is well under an inch long. Use it for your Maytag brand clothes washer or your clothes dryer.
In Stock
Order now and your part arrives by Apr 11

$7.60
This is a multi-use screw and can be used on a variety of appliances. The measurements of the screw are: 8/18 x 3/8. *Please note: the screw is sold individually. Refer to the manual provided by the m...
In Stock
Order now and your part arrives by Apr 11

$7.60
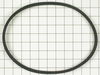
This hose clamp extends from half an inch to an inch in diameter. It is made entirely of metal and is intended for use with Maytag brand washing machines.
In Stock
Order now and your part arrives by Apr 11

This v-style spin and agitate belt is 28-3/4 inches long and half of an inch wide. It is all black in color and made entirely of rubber.
In Stock
Order now and your part arrives by Apr 11

$7.60
Sold individually. NOTE: The color on the screw may not be the same as the image, but will still function the same.
In Stock
Order now and your part arrives by Apr 11

In Stock
Order now and your part arrives by Apr 11

In Stock
Order now and your part arrives by Apr 11

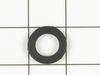
This high pressure inlet hose washer is black. It is an inch in diameter, made of rubber, and used with many washing machines, refrigerators, and dishwashers.
No Longer Available

This washing machine drive bell and seal kit comes with a seal, a plug, a shoulder screw, a drive bell, and some grease.
No Longer Available

In Stock
Order now and your part arrives by Apr 11

Questions and Answers
We're sorry, but our Q&A experts are temporarily unavailable.
Please check back later if you still haven't found the answer you need.
Common Problems and Symptoms for SWTX21QN
Viewing 6 of 6Noisy
Fixed by these parts


How to fix it
Leaking
Fixed by these parts


How to fix it
Will not agitate
Fixed by these parts
How to fix it
Burning smell
Fixed by these parts
How to fix it
Will not drain
Fixed by these parts
How to fix it
Spins slowly
Fixed by these parts
How to fix it


Keep searches simple. Use keywords, e.g. "leaking", "pump", "broken" or "fit".
- Customer:
- John from Roswell, GA
- Parts Used:
- 40016101
- Difficulty Level:
- Easy
- Total Repair Time:
- 15 - 30 mins
- Tools:
- Nutdriver
Leaking water while washer runs
Biggest trick is getting the agitator off. It seems like it is bolted on. I used a piece of braided cotton cord to run under both sides of the agitator and just pulled real hard. It WILL pop off.
Next the old seal will also seem to be attached. The edge is firm but not bolted. A small prybar will help.
Easy repa ... Read more ir to do, but it did not fix my problem. I decided to get a new washer rather than go through further disassembly.
Next the old seal will also seem to be attached. The edge is firm but not bolted. A small prybar will help.
Easy repa ... Read more ir to do, but it did not fix my problem. I decided to get a new washer rather than go through further disassembly.
Read less
Was this instruction helpful to you?
Thank you for voting!
- Customer:
- Kristine from Montgomery, PA
- Parts Used:
- WP27001006
- Difficulty Level:
- Easy
- Total Repair Time:
- 15 - 30 mins
- Tools:
- Screw drivers
Sweaking and then Burning
I had some sweaking and then burning followed. I came to find the belt had burnt and stopped my washer from working. Ordered a belt and replaced. Washer worked for one week. Squeaking and burning again. Belt was still intact, thank goodness. Beleive it is another pulley part for the washer. Might order another part. Overall the fi
... Read more
x was good, but had another issue.
Read less
Was this instruction helpful to you?
Thank you for voting!
- Customer:
- Steven from BONNER, MT
- Parts Used:
- 8530072
- Difficulty Level:
- Really Easy
- Total Repair Time:
- 15 - 30 mins
- Tools:
- Screw drivers
needed the door to swing left instead of swinging right
Remove five screws holding the door hinge to the dryer frame. Remove the plastic cover over the screw holes on the opposite side. Remove the hinge from the door by removing two phillips head screws from the door edge and two phillips head screws from inside the door. Mount the hinge on the opposite side of the door. Attach to door to
... Read more
the opposite side with the five screws you removed previously. Remove and replace the the hinge cover and handle cover by popping out the plastic trim piece on the bottom and loosening the top trim pieces. Hook the replacement covers to the top trim pieces and pop the bottom piece back in. Replace the handle by removing two screws and put the new piece in. Tighten two screws and you're done
Read less
Was this instruction helpful to you?
Thank you for voting!