


Models
>
SWT210WA1124
SWT210WA1124 Speed Queen Washer
Jump to:
Find Part by Name
Keep searches simple, eg. "belt" or "pump".
Diagrams for SWT210WA1124
Viewing 21 of 21


Keep searches simple, eg. "belt" or "pump".

In Stock
Order now and your part arrives by Jul 24

$13.07
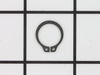
This metal retaining ring is well under an inch long. Use it for your Maytag brand clothes washer or your clothes dryer.
On Order

$7.60
This is a multi-use screw and can be used on a variety of appliances. The measurements of the screw are: 8/18 x 3/8. *Please note: the screw is sold individually. Refer to the manual provided by the m...
In Stock
Order now and your part arrives by Jul 24

$50.36
This v-shaped spin belt helps transfer power from the motor to the transmission to help pump the water in and out of the washer. It also helps runs the spin cycle in the washer.
In Stock
Order now and your part arrives by Jul 24

$7.60
This hose clamp extends from half an inch to an inch in diameter. It is made entirely of metal and is intended for use with Maytag brand washing machines.
In Stock
Order now and your part arrives by Jul 24

$7.60
Sold individually. NOTE: The color on the screw may not be the same as the image, but will still function the same.
In Stock
Order now and your part arrives by Jul 24

In Stock
Order now and your part arrives by Jul 24

$56.24
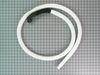
This hose attaches to the pump to help remove the water out of the washer. 7 feet in length.
In Stock
Order now and your part arrives by Jul 24

In Stock
Order now and your part arrives by Jul 24

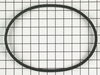
This high pressure inlet hose washer is black. It is an inch in diameter, made of rubber, and used with many washing machines, refrigerators, and dishwashers.
No Longer Available

$66.86
This triangular main tub bearing assembly is five inches long. It is made of metal.
In Stock
Order now and your part arrives by Jul 24

This washing machine drive bell and seal kit comes with a seal, a plug, a shoulder screw, a drive bell, and some grease.
No Longer Available
Common Problems and Symptoms for SWT210WA1124
Viewing 6 of 6Noisy
Fixed by these parts

How to fix it
Leaking
Fixed by these parts


How to fix it
Burning smell
Fixed by these parts
How to fix it
Will not agitate
Fixed by these parts
How to fix it
Will not drain
Fixed by these parts
How to fix it
Spins slowly
Fixed by these parts
How to fix it


Keep searches simple. Use keywords, e.g. "leaking", "pump", "broken" or "fit".
- Customer:
- Bryan from Chicago, IL
- Parts Used:
- WP40053901
- Difficulty Level:
- Easy
- Total Repair Time:
- Less than 15 mins
- Tools:
- Pliers, Socket set
Water leaking on floor from "mysterious place underneath washer"
Water was leaking on the floor during the wash cycle and especially during draining of the washer. I removed the front panel at ground level and watched while draining after a rinse.
I t was obvious that water was spraying from a hole in the rubber end of the hose (the hose is a fused assembly of a plastic section and a rubber ... Read more section).
So, I finished draining, removed the hose (required pliers to squeeze off a hose clamp).
Upon inspecting the hose, it was also apparent that the hole was caused by rubbing against a support bracket for the motor. This should not happen, but it did because the plastic standoff supposed to keep the hose away from the bracket was installed 180 degrees backwards.
So, I simply replaced the hose and turned the bracket around to the correct orientation.
Everything worked as planned and my repair cost was much less than if I had called someone out.
Read less
Was this instruction helpful to you?
Thank you for voting!
- Customer:
- Mark from Cheektowaga, NY
- Parts Used:
- WP27001007
- Difficulty Level:
- Easy
- Total Repair Time:
- 30 - 60 mins
- Tools:
- Screw drivers, Socket set
The spin belt failed due to overloading the washing machine.
Unplugged the washing machine and turned off the water to the machine. Removed the two front covers; unhooked the two front springs; removed the (4) motor mounting bolts; unhooked the two hoses for the water pump; unhooked the wiring harness; removed the belt from the driven pulley; pulled the motor assembly out; removed the (3) screws t
... Read more
o separate the water pump from the motor; removed the belt from the motor pulley; installed new belt and repeated above in reverse to put everything back together; started washing machine and it worked great.
Read less
Was this instruction helpful to you?
Thank you for voting!
- Customer:
- mike from hull, IA
- Parts Used:
- WP40004201P
- Difficulty Level:
- A Bit Difficult
- Total Repair Time:
- More than 2 hours
- Tools:
- Nutdriver, Pliers, Screw drivers, Socket set, Wrench (Adjustable), Wrench set
Bearing went out causing lots of noise.
This is not a bad repair, but give yourself some time. I did not have to take the tranny and motor out, but the inner and outer tub and all related parts had to come out, along with the outer tub base. If you are replacing the tub bearing, you HAVE to order the seal kit. Don't try to skimp like I did, since you will need the seal kit as t
... Read more
his is what causes that bearing to fail in the first place. We forgot how quiet the washer was after I fixed it, and it saved us from buying a new washer since we were ready to say the heck with it and buy a new pair. You might need an 1.5 inch socket to get the big nut off the spindle, but I was able to get with a visegrip and hammer. The nice thing about this repair is even if you screw it up, you won't have water all over the place because of the seal design. I just checked under the washer a few times for the first few weeks and all seems fine.
Read less
Was this instruction helpful to you?
Thank you for voting!