


Models
>
WF306LAW
WF306LAW Samsung Washer
Jump to:
Find Part by Name
Keep searches simple, eg. "belt" or "pump".
Models for WF306LAW
Click on the best match to narrow your results.
Diagrams for WF306LAW
Viewing 15 of 0


Keep searches simple, eg. "belt" or "pump".

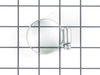
$7.60
This hose clamp extends from half an inch to an inch in diameter. It is made entirely of metal and is intended for use with Maytag brand washing machines.
In Stock
Order now and your part arrives by Mar 30

On Order

In Stock
Order now and your part arrives by Mar 30

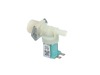
$190.51
This drain pump is designed to remove water from the washer during the drain portion of the cycle. It is recommended to unplug the washer before installation to ensure safety. The Samsung Washer Drain...
Special Order

In Stock
Order now and your part arrives by Mar 30

In Stock
Order now and your part arrives by Mar 30

In Stock
Order now and your part arrives by Mar 30

On Order

In Stock
Order now and your part arrives by Mar 30

$187.39
This door boot (part number DC64-00802A) is for washers. Door boot DC64-00802A forms a seal between the wash tub and the door, preventing leaks. Unplug the washer before installing this part. Wear wor...
In Stock
Order now and your part arrives by Mar 30

On Order

Common Problems and Symptoms for WF306LAW
Viewing 4 of 4Leaking
Fixed by these parts


How to fix it
Will not drain
Fixed by these parts


How to fix it
Lid or door won’t close
Fixed by these parts

How to fix it
Water Filling Issues
Fixed by these parts
How to fix it


Keep searches simple. Use keywords, e.g. "leaking", "pump", "broken" or "fit".
- Customer:
- William from Marion, WI
- Parts Used:
- WP34001284
- Difficulty Level:
- Really Easy
- Total Repair Time:
- Less than 15 mins
- Tools:
- Pliers, Screw drivers
Water was sprating all over the inside of wash machine onto the circuit board.
I took the two screws off the back that holds the top down, lifted it , then pulled it back to remove. After this was removed, there were two more screws holding down the assy-s housing and drawer. First remove drawer where you add the soap and softners. Then I pulled that back and the assy-s housing drawer just snaps onto the housing. I
... Read more
pulled the drawer off, then I took the four hoses that are connected to the back and put on the new one in their respected spot. I snapped it back on and reassembled. You don't need a maytag repair man to do this job.
Read less
Was this instruction helpful to you?
Thank you for voting!
- Customer:
- SCOTT from VERNAL, UT
- Parts Used:
- DC31-00054A
- Difficulty Level:
- Easy
- Total Repair Time:
- 30 - 60 mins
- Tools:
- Pliers, Screw drivers
Code indicating washer was NOT discharging water
Watched the video, procedure was simple and as depicted on the video. Started by using a wet shop Vac to the discharge hose and sucked as much dirty wash water out as possible. Removed the pump,and found the motor did not turn freely. Removed the motor (3 screws) and replaced the motor with new part. Reassembled the washer, everything wor
... Read more
ked as it should. After about 3-4 loads of laundry, the "Not Draining" code / problem returned. Again, sucked out the water with the Shop Vac. Checked the Filter /Cleanout and found it completely packed with MUD. Cleaned that out, and again disassembled the washer. The pump was removed and the remaining muddy gunk was cleaned from the impeller. The 3 drain lines that attached to the pump were inspected for blockage/obstruction and flushed of any muddy residue. Reassembly was quick and easy, and the washer has worked well since. I have no idea how the dirt got into the system with enough dirt to gunk up the system. Recommend keeping more frequent inspections of the cleanout trap.
Read less
Was this instruction helpful to you?
Thank you for voting!
- Customer:
- Arthur from WILLARD, OH
- Parts Used:
- DC64-00519B
- Difficulty Level:
- Easy
- Total Repair Time:
- 15 - 30 mins
- Tools:
- Screw drivers
The washing would stop in mid cycle and the door would be locked.
An initial issue was getting the door to unlock. I tired several things but finally was able to pull the door as if to open it and put something between the door handle and the front of the washer while I ran a washer cycle. There is a way to take the washer top off and reach down inside the unit and pull down on a release, but I did no
... Read more
t try that.
The washer has a rubber boot between the washer frame and the wash tub. There is a metal wire ring that secures the outer edge of the boot to the washer frame. Peel back the outer edge of the boot at the bottom to reveal a metal ring that has its ends connected by a small spring. Use a flat tip screw drive to pry this ring off. Peel back the boot from the washer frame.
Next use a Phillips screw drive to remove the two screws that protrude through the wash frame on the right side of the door.
Reach between the washer tub and the frame and the tub and pull the switch through the opening and the washer tub. You will have to wiggle the switch around to remove it. There are three sets of wires attached to the switch by plugs.
The switch is covered with a plastic protective cover. Remove this. You will have to use a screw driver to release various catches to do this.
Remove the three set of wires. There are catches that secure the wire plugs in place. pry them back with a small screw drive.
Attach the new switch to the sets of wires.
Attach the protective cover to the switch. The wires feed through a small slot toward the bottom of the switch.
Slide the switch through the opening where you removed it. and re-attach it using the two screws.
Put the rubber boot in the channel in the washer frame. Replace the metal ring. This was the most challenging part of the repair for me. I had to play around with this to get it into position. You have to work it around the gasket and stretch out the spring.
By the way, The service was great and exceeded by expectations.
Read less
Was this instruction helpful to you?
Thank you for voting!