


Models
>
WF395BTPASU
WF395BTPASU (A2-0000) Samsung Washer
Jump to:
Find Part by Name
Keep searches simple, eg. "belt" or "pump".
Diagrams for WF395BTPASU
Viewing 7 of 7


Keep searches simple, eg. "belt" or "pump".

On Order

In Stock
Order now and your part arrives by Mar 30

On Order

In Stock
Order now and your part arrives by Mar 30

In Stock
Order now and your part arrives by Mar 30

$55.18
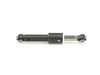
Shipping bolts are installed through the back of the washing machine, and hold the wash tub and basket in place while your washer is being transported. The tub suspension holds the tub correctly in pl...
In Stock
Order now and your part arrives by Mar 30

In Stock
Order now and your part arrives by Mar 30

In Stock
Order now and your part arrives by Mar 30

On Order

In Stock
Order now and your part arrives by Mar 30

$54.12
Washer drain pump DC31-00054D is an original equipment manufacturer (OEM) part that fits some Samsung front-load and top-load washers. The drain pump is used to remove any water from the washer after ...
In Stock
Order now and your part arrives by Mar 30

In Stock
Order now and your part arrives by Mar 30
Questions and Answers
We're sorry, but our Q&A experts are temporarily unavailable.
Please check back later if you still haven't found the answer you need.
Common Problems and Symptoms for WF395BTPASU
Viewing 6 of 6Shaking and Moving
Fixed by these parts

How to fix it
Leaking
Fixed by these parts

How to fix it
Will not drain
Fixed by these parts

How to fix it
Spinning Issues
Fixed by these parts
How to fix it
Lid or door won’t close
Fixed by these parts

How to fix it
Water Filling Issues
Fixed by these parts
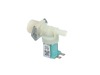
How to fix it


Keep searches simple. Use keywords, e.g. "leaking", "pump", "broken" or "fit".
- Customer:
- Fredric from ROCKMART, GA
- Parts Used:
- DC96-01703B
- Difficulty Level:
- Really Easy
- Total Repair Time:
- 15 - 30 mins
- Tools:
- Pliers, Screw drivers
The water level was lower than normal.
First unplug or turn off thee circuit breaker. Then remove the two screws to the top cover. Slide the cover back about three inches then remove the cover. Next take out the screw to the old sensor. Then unplug the electrical connection by squeezing and the pulling to disengage. Now set the old unit aside. You then grad your eight inch wi
... Read more
re tie and hold the with flat side to the right and just to the right of the screw hole for the bracket is a square hole. Feed to wire tie into the square hole with your left hand then loop down left side of the end of new sensor and back up threw the square hole and tighten with the pliers. Your new sensor will be positioned just like it was mounted to the metal bracket. And pretty ridged. Now connect the vacuum hose and electrical connector.
Read less
Was this instruction helpful to you?
Thank you for voting!
- Customer:
- Samuel from NEEDVILLE, TX
- Parts Used:
- DC60-40137A
- Difficulty Level:
- A Bit Difficult
- Total Repair Time:
- More than 2 hours
- Tools:
- Nutdriver, Screw drivers, Socket set, Wrench set
Washer making noise a snow smoking.
Take pics every step, easier re-assembly. Dismantled washer keeping bolt/screw section removed compartmentalized in a tackle box in the order of removal. Replaced drum support, bearings, seal, old blots. Too much to write but I was able to do it all in about 4 hours once all the parts finally came in.
Was this instruction helpful to you?
Thank you for voting!