The lid latch is a safety feature found in your washer. Its purpose is to stop the machine from spinning when the lid is opened. You may need to replace the lid latch assembly if your washer will not ...
The washer drive pulley kit is also known as a replacement clutch assembly, or a cam kit. The drive pulley is found at the bottom of your washing machine, mounted to the drive shaft. Common symptoms i...
The drive belt works with the pulley in your washer in order to spin the tub. If you notice a burning rubber smell, your washer has become excessively noisy, or it will not spin, it could indicate an ...
If your washer shakes or makes loud noises during a cycle, this suspension rod kit could help. It comes with four rods that keep the tub steady and reduce movement. Easy to install and compatible with...
This 18 ml bottle of white appliance touch-up paint is used to cover scratches or marks on your appliance. The white touch-up paint can be used on refrigerators, microwaves, ranges, clothes dryers, an...
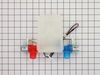
This water inlet valve attaches the water lines to the back of your appliance. The attaching solenoids on the valve open and close according to the desired temperature, or amount of water needed.
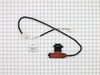
This part is the replacement lid latch or latch assembly for your top-load washer. The lid latch holds your washer door closed, and allows the washer to run its cycle. If the lid latch is damaged, you...
This washing machine cleaner includes three time-release tablets designed to remove odor-causing residues, grime, and buildup from high-efficiency and top-load washing machines. The tablets work by cl...
Ask our experts a question about this part and we'll get back to you as soon as possible!
1 question answered by our experts.
< Prev
1
Next >
Sort by:
Search filter:
Clear Filter
Your search term must have 3 or more characters.
Keep searches simple. Use keywords, e.g. "leaking", "pump", "broken" or "fit".
Sorry, we couldn't find any existing answers that matched. Try using some different or simpler keywords, or submit your new question by using the "Ask a Question" button above!
Matt
January 7, 2023
Clothes were still soaked when done. Changed the lid lock assembly, drive block, and clutch. Now water starts but won't fill basket, just goes out drain hose.
For model number RTW4641BQ1
Hi Matt,
Thank you for your question. If the clothes are still wet after a wash cycle, make sure you are not over-loading the washer. An overloaded washer can reduce the spinning speed of the washer and can cause the load to become unbalanced. This would leave the clothes wet at the end of the cycle. You should also check the drain hose to see if it is blocked or kinked. If it is, water will not drain from the washer. If your washer will now not fill with water, you will need to check the inlet hoses and screens, the water inlet valve, the lid switch, the cycle switches, and the electronic control board. We have included a link that you may reference on how to check these parts. Once you have determined the part you need, please feel free to call customer service. We are open 7 days a week and anyone will be happy to assist you. We look forward to hearing from you!
The instructions that came with the part were worthless. Essentially, unplug, put in new part, plug it back in. I spent a considerable amount of time on the internet and finally found a video showing how to open the top. Unlike other models, it is held down by clamps in the back rather than clips in the front. Once finding this inform
... Read moreation the installation was simple. Remove the clamps and the back of the console, slide the top forward and lift, remove and replace the lock and reassemble. You don't even have to remove the hoses.
Well, first investigated and found loose nut on drive clutch. First take off the two screws with nut drive then cover off using a screwdriver blade to snap off the cover. Then socket ratchet to take off the nut on drive clutch. take off belt by slowly rotating the drive gear. two screws that hold the electronics to the upper drive clutch
... Read moreand put aside, so you can snap off the cover for drive clutch on upper part with screwdriver and off the parts come and install whole unit back as took it apart. Line up the new upper clutch so that is position as was before. (Using parts diagram helps a lot as www. partsselect.com has for you or Maytag.com.) Then put the electronic part board back on and the gear and nut. Make sure it is tight by several attempts to make sure it's snugged up good and then slowly roll belt back on the pulley and motor drive. Put your cover guard back on with two screws and done.


 Diagram and Parts List for Roper Washer")