


Models
>
CA606S
CA606S Maytag Washer
Jump to:
Find Part by Name
Keep searches simple, eg. "belt" or "pump".
Diagrams for CA606S
Viewing 1 of 1
Keep searches simple, eg. "belt" or "pump".

$7.60
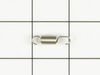
This is a multi-use screw and can be used on a variety of appliances. The measurements of the screw are: 8/18 x 3/8. *Please note: the screw is sold individually. Refer to the manual provided by the m...
In Stock
Order now and your part arrives by Jul 23

$7.60
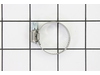
This hose clamp extends from half an inch to an inch in diameter. It is made entirely of metal and is intended for use with Maytag brand washing machines.
In Stock
Order now and your part arrives by Jul 23

In Stock
Order now and your part arrives by Jul 23


$9.85
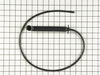
This timer knob spring is almost an inch and a half long, and is not quite an inch in diameter. It is made of metal and is used with the timer knobs of both washers and dryers.
Special Order

This lid switch actuator spring is exactly one inch long. It is made of metal.
In Stock
Order now and your part arrives by Jul 23

In Stock
Order now and your part arrives by Jul 23

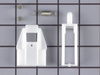
This kit is part of the lid switch mechanism and will stop the spin cycle if the load is unbalanced. When you lift the lid, it resets the plunger and your cycle will resume.
No Longer Available

In Stock
Order now and your part arrives by Jul 23

Special Order

Special Order

In Stock
Order now and your part arrives by Jul 23
Common Problems and Symptoms for CA606S
Viewing 3 of 3Leaking
Fixed by these parts
How to fix it
Will Not Start
Fixed by these parts
How to fix it
Water Filling Issues
Fixed by these parts
How to fix it


Keep searches simple. Use keywords, e.g. "leaking", "pump", "broken" or "fit".
- Customer:
- Michael from Woodside, CA
- Parts Used:
- WP22001619
- Difficulty Level:
- Easy
- Total Repair Time:
- 15 - 30 mins
- Tools:
- Nutdriver, Screw drivers
water kept filling until overflow
removed back of control panel to find that a mouse chewed the air tube. tried to splice it with a barb connector, it did not work. Ordered part received it 2 days later and installed it. I would recommend buying parts from these folks!
Was this instruction helpful to you?
Thank you for voting!
- Customer:
- John from Coal Valley, IL
- Parts Used:
- 204968
- Difficulty Level:
- A Bit Difficult
- Total Repair Time:
- 15 - 30 mins
- Tools:
- Pliers, Screw drivers, Socket set
The plunger was worn down. Washer would shut off during the washing cycle.
I started by unplugging the washing machine from the wall outlet. I then proceded to remove four screws from the top of the control panel. After removing the screws I put two flat head screwdrivers on each side of the lid and applied force to pry the lid from the ball joints holding it in place. This was the part that was the most difficu
... Read more
lt in my opinion. After the lid was off, I removed the bolt that was holding the fuse switch in place and removed that from the slots. Next I unscrewed the two screws on opposite sides of the switch head where it makes the contact with the lid. This allows you to remove the switch assembly out of the unit. Once the assembly was out, I assembled pieced the new parts together by looking at the old parts. Then, I placed the new assembly back in the unit. Be careful when you put in the new assembly that you test the switch and make sure you hear the "Click" from the switch. After that I reversed all the steps and put the unit back together.
Read less
Was this instruction helpful to you?
Thank you for voting!
- Customer:
- Kimberly from GALLUP, NM
- Parts Used:
- WP22001619
- Difficulty Level:
- Really Easy
- Total Repair Time:
- 30 - 60 mins
- Tools:
- Nutdriver, Pliers, Wrench (Adjustable)
Washer wouldn't stop filling with water.
It should have been extremely easy, but it was a little difficult because my laundry room is very small and I had extremely limited space to work in and also had limited lighting. However, after taking many minutes to strategically plan how to maneuver in the tiny space, I was able to loosen the giant clamp on the hose inside the washer
... Read more
and attach the new hose! It worked like a charm! My 25 year old Maytag is working again! The part came in a bag certified as a genuine Whirlpool part and looked exactly like the old one! No complaints! The online installation videos are wonderful!
Read less
Was this instruction helpful to you?
Thank you for voting!