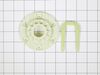
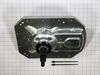
The washer drive pulley kit is also known as a replacement clutch assembly, or a cam kit. The drive pulley is found at the bottom of your washing machine, mounted to the drive shaft. Common symptoms i...
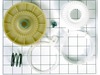
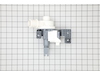
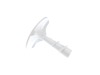
The drive hub connects the basket of your washer to the transmission shaft, which in turn allows the basket to spin. If your washer will not agitate, spins slowly, or is excessively noisy, it may requ...
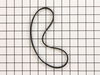
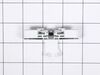
The drive belt works with the pulley in your washer in order to spin the tub. If you notice a burning rubber smell, your washer has become excessively noisy, or it will not spin, it could indicate an ...
This is a multi-use screw and can be used on a variety of appliances. The measurements of the screw are: 8/18 x 3/8. *Please note: the screw is sold individually. Refer to the manual provided by the m...
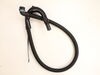
This suspension rod kit is a quick and easy solution to stop your washer from banging or shaking during cycles. It helps stabilize the drum and reduce vibrations, protecting your machine from internal...
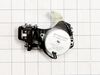
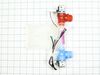
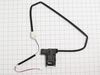
This is a genuine OEM door lock assembly for a top load washing machine. This part is also known as a door switch, and it is used to communicate whether the door to the washer is opened or closed. If ...
This 18 ml bottle of white appliance touch-up paint is used to cover scratches or marks on your appliance. The white touch-up paint can be used on refrigerators, microwaves, ranges, clothes dryers, an...
This washing machine cleaner includes three time-release tablets designed to remove odor-causing residues, grime, and buildup from high-efficiency and top-load washing machines. The tablets work by cl...
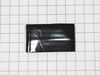
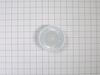
This gray and white washer lid bumper contains a rubber bottom and is sold individually.
In Stock
Order now and your part arrives by Jul 23
Questions and Answers
Ask our experts a question about this part and we'll get back to you as soon as possible!
6 questions answered by our experts.
< Prev
1
2
Next >
Sort by:
Search filter:
Clear Filter
Your search term must have 3 or more characters.
Keep searches simple. Use keywords, e.g. "leaking", "pump", "broken" or "fit".
Sorry, we couldn't find any existing answers that matched. Try using some different or simpler keywords, or submit your new question by using the "Ask a Question" button above!
Sherry
February 3, 2023
A sheet is caught under the agitator. How can i remove the agitator?
For model number MVWC565FW0
Hello Sherry, thank you for your question! To take the agitator off, you will need a 7/16-inch socket with an extension and a ratchet. Now the first step in this repair will be to remove the fabric softener cup from the top of the agitator. You can pull it off and set that aside. That will expose the 7/16" bolt that you will need to remove. Hold the base of the agitator to keep it from turning. Loosen the bolt completely, reach in and grasp the base of the agitator, and pop it out. You are going to reuse that bolt, so we need to drop out the bolt. After removing the sheet caught under the agitator, reinstall the agitator. You line it up with the agitator shaft and press it firmly all the way down. Next, you are going to reinstall the retainer bolt. Make sure it's level on both sides. Next, you will replace the fabric softener cup. Let us know if you have further questions!
1 person found this helpful.
Was this helpful?
Thank you for voting!
NM
July 31, 2023
Timer is not advancing, but I have been manually advancing and works. Today, final spin would not finish
For model number MVWC565FW0
Hi Nm, thank you for reaching out to Fix. We recommend replacing the control board, part number PS12114300, to resolve your issue. We hope this information is useful!
Timer is not advancing, but I have been manually advancing and works. Today, final spin would not finish
For model number MVWC565FW0
Hi Nmcreatrix, thank you for getting in touch. We have concluded that the issue is with the electronic control board, part number FIX12114300, as it is most likely faulty and may need to be replaced. We hope this solves your problem!
Hi Daylon,
Glad to hear from you. If your washer makes a whining noise when filling with water, it may be the result of too much water pressure. Adjusting the water valves may help resolve this issue. If it does not, check the water inlet valve to verify if it is working correctly. We hope this helps!
Why doesn't sensor advance from wash to rinse. I turn off the wash and set it to rinse and spin manually
For model number MVWC565FW0
Hello Sayoko, thank you for your question. This is an issue with the Electronic Control FIX12114300. The board manages the washer's functions such as filling, washing, draining and spinning. We hope this is helpful.
Well, first investigated and found loose nut on drive clutch. First take off the two screws with nut drive then cover off using a screwdriver blade to snap off the cover. Then socket ratchet to take off the nut on drive clutch. take off belt by slowly rotating the drive gear. two screws that hold the electronics to the upper drive clutch
... Read moreand put aside, so you can snap off the cover for drive clutch on upper part with screwdriver and off the parts come and install whole unit back as took it apart. Line up the new upper clutch so that is position as was before. (Using parts diagram helps a lot as www. partsselect.com has for you or Maytag.com.) Then put the electronic part board back on and the gear and nut. Make sure it is tight by several attempts to make sure it's snugged up good and then slowly roll belt back on the pulley and motor drive. Put your cover guard back on with two screws and done.
ordered hub and it shipped quickly. I was able to put the hub in place and screw the screws in. you want to tighten them down slowly and go around to each screw tightening a little at a time so you don't break the hub. as you tighten the screws down the hub slides down flush. its impossible to just push the hub on with your hand. Buttoned
... Read more it back up and got caught up on laundry. good day when the washer is fixed.


 Diagram and Parts List for Maytag Washer")