


Models
>
MAT10PDEGW
MAT10PDEGW Maytag Washer
Jump to:
Find Part by Name
Keep searches simple, eg. "belt" or "pump".
Diagrams for MAT10PDEGW
Viewing 8 of 8


Keep searches simple, eg. "belt" or "pump".

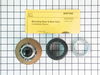
This kit comes with hub assembly, agitator seal and spanner nut. If your washer leaks once full (with or without clothes in it) or leaks during agitation, then you should replace the seal.
No Longer Available

$21.82
This is a screw and it is made for multiple appliances in your home. This model is called a sheet metal screw because it has sharp points, and the threads are closer together. This screw is designed t...
In Stock
Order now and your part arrives by Jul 23

$7.60
This is a multi-use screw and can be used on a variety of appliances. The measurements of the screw are: 8/18 x 3/8. *Please note: the screw is sold individually. Refer to the manual provided by the m...
In Stock
Order now and your part arrives by Jul 23

$7.60
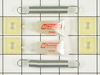
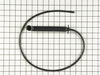
This hose clamp extends from half an inch to an inch in diameter. It is made entirely of metal and is intended for use with Maytag brand washing machines.
In Stock
Order now and your part arrives by Jul 23

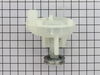
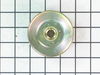
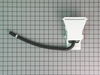
This washing machine drain pump is intended for use with automatic washers that have been manufactured since 1958. The pump itself is made of plastic, though it does come with a metallic belt pulley.
No Longer Available

$72.17
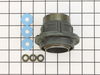
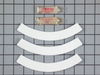
This kit is used on 2-belt washers. It is recommended to change the seal kit at the same time.
In Stock
Order now and your part arrives by Jul 23

$11.98
This foot pad is just over an inch in diameter. It is made entirely of rubber and is gray in color. This pad is intended for use with washers and some dryers.
In Stock
Order now and your part arrives by Jul 23

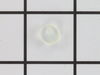
This washing machine lid hinge ball is well under an inch in diameter. These hinge balls are sold separately, though two are required per lid. This lid hinge ball is made of plastic and is used for Ma...
In Stock
Order now and your part arrives by Jul 23

$17.44
Sold Individually. This adjustable leveling leg comes with a stop nut.
In Stock
Order now and your part arrives by Jul 23

$9.79
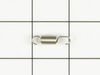
This front cover spring retaining clip is not quite an inch long. It is made entirely of metal and is used for some washing machines.
Special Order

$17.44
This push button is just over three inches long. It is all black in color and is made of plastic.
In Stock
Order now and your part arrives by Jul 23

In Stock
Order now and your part arrives by Jul 23
Common Problems and Symptoms for MAT10PDEGW
Viewing 12 of 12Leaking
Fixed by these parts
How to fix it
Will not drain
Fixed by these parts
How to fix it
Burning smell
Fixed by these parts
How to fix it
Will not agitate
Fixed by these parts

How to fix it
Noisy
Fixed by these parts

How to fix it
Shaking and Moving
Fixed by these parts
How to fix it
Lid or door won’t close
Fixed by these parts
How to fix it
Will Not Start
Fixed by these parts
How to fix it
Water Filling Issues
Fixed by these parts
How to fix it
Spins slowly
Fixed by these parts
How to fix it
Touchpad does not respond
Fixed by these parts
How to fix it
Spinning Issues
Fixed by these parts
How to fix it


Keep searches simple. Use keywords, e.g. "leaking", "pump", "broken" or "fit".
- Customer:
- douglas from bonita springs, FL
- Parts Used:
- 6-2095720
- Difficulty Level:
- A Bit Difficult
- Total Repair Time:
- 1- 2 hours
- Tools:
- Nutdriver, Pliers, Socket set
water leaking from around center shaft below fixed tub
My washer is 5 years old and water began to leak on the floor. I took off the front panel and filled the tub. Water did not leak immediately, but after the tub filled with about 3-4 inches of water, the water began to leak from a rubber washer between the fixed tub and the drive shaft. I looked online for exploded diagrams of Maytag wa
... Read more
shers, when I came across your site. By looking at your diagrams, I determined what parts I needed and ordered them. The parts arrived in 2 days, and I installed them. There were no leaks and it cost me under $70 (a repairman would have cost at least $250). The only thing I would recommend to those in similar situations, is to purchase a spanner wrench (your site does not sell, but others do). The stem seal and hub assembly is reverse threaded (clockwise to loosen) and is difficult to remove due to tight quarters in the tub.
Read less
Was this instruction helpful to you?
Thank you for voting!
- Customer:
- John from Spring Valley, CA
- Parts Used:
- WP22003441, WP6-2011900, WP200835
- Difficulty Level:
- A Bit Difficult
- Total Repair Time:
- More than 2 hours
- Tools:
- Nutdriver, Pliers, Screw drivers, Socket set, Wrench (Adjustable), Wrench set
No spin. Pump working. Smell of burning rubber.
I determined that the spin bearing was bad and decided to replace the brake too. Placed the machine on its side and then removed the rubber cap, v-belt, screw, drive lug and pulley. Then used a chain-vise grip to turn the brake off with the aid of a 3 foot long pipe extender for leverage. Blocked up the tub to align the transmission and i
... Read more
nstalled the new spin bearing, brake, pulley and drive lug. Adjusted the drive lug position to contact the ccw motion of the pulley at the point when I could just feel the brake pressure. Installed the screw and rubber cap. Replaced the drive belts. Tested and all works. Halleluah!
Read less
Was this instruction helpful to you?
Thank you for voting!
- Customer:
- dominic from weirton, WV
- Parts Used:
- 205000
- Difficulty Level:
- A Bit Difficult
- Total Repair Time:
- 30 - 60 mins
- Tools:
- Nutdriver, Screw drivers
The belts were not staying tight enough to agitate properly.
Firstly, remove ac power from washer!
After removing the front panel of the washer (two philips screws), I loosened and removed the plastic motor cover and removed three hex head screws holding the motor. Have someone help you tilt the washer so you can remove the belts by "rolling" them off of the pullies (pump pully and motor pully ... Read more ). What I did was use a chemical degreaser to clean the motor base metal channel where the nylon sliders reside. After doing that and letting it dry, I removed the two old
springs. I ended up reinstalling the old springs because they were not stretched and I installed a new spring (total three) on the right side of the mount. A stiff metal rod with a hook on the end will help you install the springs. Squirt some of the included silicone lubricant on both sides of the motor mount channel and exercise the lube. Reinstall the motor and plastic cover over top of motor. Clean hands and clean belts while you have them out, reinstall belts and front cover and you're finished. My wife said it never ran better!
Read less
Was this instruction helpful to you?
Thank you for voting!