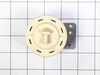
This is a drain pump motor assembly for washers. This OEM part is responsible for removing water from the washer during the drain part of the cycle. When this part is clogged, damaged or defective it ...
The hot water valve is found at the back of your washer and controls the flow of hot water into the machine. If the valve is defective, the washer may leak, overfill, fill slowly, or not fill with wat...
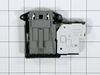
This magnetic door plunger is a genuine replacement component designed to keep the washing machine door slightly ajar when not in use. By allowing air circulation, it helps the inner door and tub seal...
If your washing machine is leaking, slow to fill, will not stop filling with water, or is not filling at all, the cold-water inlet valve may be defective. The purpose of the valve is to open to allow ...
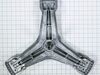
The motor rotor position sensor monitors the direction and speed of the spinning rotor and communicates this information to the electronic control board. If your washer is displaying an LE error code ...
This rubber tub seal fits between the front and rear halves of the washing machine’s outer tub to prevent water leaks. It helps maintain proper washing performance and may need replacement if you noti...
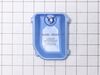
If your washer isn’t dispensing detergent or fabric softener properly, this replacement container assembly may be the fix you need. Designed to hold liquid cleaning agents and release them at the righ...
This water inlet valve controls cold water flow for the bleach dispenser and prewash cycles. It has one standard hose inlet and three angled outlets—two to the right, one to the left. Designed for sel...
This washer hose with bellows, also known as a dispenser hose, is a genuine OEM replacement part for your washer. Replacing this part can be helpful if your washer is leaking. The dispenser hose conne...
In Stock
Order now and your part arrives by Jul 12
Questions and Answers
Ask our experts a question about this part and we'll get back to you as soon as possible!
2 questions answered by our experts.
< Prev
1
Next >
Sort by:
Search filter:
Clear Filter
Your search term must have 3 or more characters.
Keep searches simple. Use keywords, e.g. "leaking", "pump", "broken" or "fit".
Sorry, we couldn't find any existing answers that matched. Try using some different or simpler keywords, or submit your new question by using the "Ask a Question" button above!
Cindy
July 26, 2022
After trying to disable control lock about 1000 times, the control lock will not go off. Could it b stuck and how to unstick it. Thanks
For model number WM3050CW
Hello Cindy, Thank you for your inquiry. Often the most common cause of this issue is either water left in the machine or it's not draining correctly, a faulty door lock or an issue with the control board. First try unplugging the washer for about 10 minutes to see if that resets the locking mechanism. Try running a spin/drain cycle or select the no spin cycle to activate the drain only function on your washer to see if it fully drains the water and allows the door to unlock. You can also try manually unplugging the drain hoses from the back or lower front behind the panel while the machine is unplugged and use a large pan to allow any excess water to drain away. If that does not resolve the issue, we would recommend checking the following parts with a multimeter to resolve your issue: the door switch, the pressure switch, the drain pump, the drain hoses, and the control board. We hope this helps and if you need help placing an order, customer service is open 7 days a week. Please feel free to give us a call. We look forward to hearing from you!
The child lock will not go off, tried replacing ebr85194701 and still does not turn off
For model number WM3050CW
Hi Cindy,
Thank you for your question. To remove the child lock from the washer, press and hold the child lock button for 3-5 seconds. This will disable the child lock function. If you have any questions, please let us know. We are open 7 days a week. We look forward to hearing from you!
Was this helpful?
Thank you for voting!
Ask a Question
Ask our experts a question on this part and we'll respond as soon as we can.
Removed the top of the washer by removing the 4 back screws and 2 small brackets. Then I removed the front panel, this was actually the hardest part, 2 screws and 8 tabs that you pop out carefully from the top of the panel. I only disconnected the power button and was able to rest the panel on top of the washer. The rest of the washer cam
... Read moree apart quickly just moving down the front of the washer and removing the door, latch, tub gasket, drain cover. Removing the pump was just a mater of disconnecting the drain hoses, and one clip under the drain assembly. 3 screws attach the drain to assembly to the pump and only 2 wires that are clearly marked. Reassembly is just going back through in reverse order of disassenbly. The best thing about this is that it all comes apart with a standard phillips screwdriver.
I first tested the motor per the service manual. I checked the resistance between the terminals of the 3 pin connector. It's supposed to be 5-15 ohms. The motor checked out so I replaced the main electrical board. It turns out that wasn't the problem. After a brief web search I found out that the hall sensor (which is attached to the
... Read more motor stator) was the likely cause of the failure. I replaced that and everything works great now. And now I have a spare main board in case that ever fails. I also want to mention that I took the time to remove the dispenser box (where the water comes in and is directed to the different cleaning products) and cleaned it with a very strong bleach solution. It got rid of the mildew and funky smell. It seems that the fabric softener caused a lot of mildew to form inside the dispenser directly above the fabric softener tray. The bleach took care of that. This is probably something that should be done routinely to keep the mildew from forming.
There is a magnet at the bottom of the door which allows the door to be held ajar when the washer is not in use to allow the tub and gaskets to dry. A tab on the plastic housing which retains the magnet broke which allowed the housing to pull free of the door and stick itself to the machine preventing the door to close. Easy fix to replac
... Read moree the magnet was $18. Instructions were included in the box. Part number on the drawing was A165. PS3618292 Magnetic Door Plunger