


Models
>
W3P7CVU2WVS
W3P7CVU2WVS (ABWEUUS) LG Washer
Jump to:
Find Part by Name
Keep searches simple, eg. "belt" or "pump".
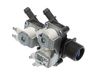
Diagrams for W3P7CVU2WVS
Viewing 6 of 6


Keep searches simple, eg. "belt" or "pump".

$18.85
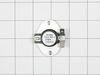
If your dryer is not turning on, or not heating up, there could be an issue with your thermal fuse. This OEM fuse is designed to act as a high-limit thermostat, and will turn off the heating element i...
In Stock
Order now and your part arrives by Mar 21

$20.95
This genuine OEM sensor is also known as a moisture sensor or a humidity sensor. It is found underneath the lint filter in your dryer, and is used to detect the amount of moisture present in the drum....
In Stock
Order now and your part arrives by Mar 21

$34.97
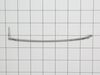
If the drum in your dryer will not tumble, or it is noisy while operating, there may be an issue with the drum belt. The belt is found looped around the dryer drum, a tension pulley, and a motor pulle...
In Stock
Order now and your part arrives by Mar 21

In Stock
Order now and your part arrives by Mar 21

$41.15
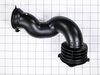
This washer hose with bellows, also known as a dispenser hose, is a genuine OEM replacement part for your washer. Replacing this part can be helpful if your washer is leaking. The dispenser hose conne...
In Stock
Order now and your part arrives by Mar 21

In Stock
Order now and your part arrives by Mar 21

$20.95
The locking pin is used to hold the shock absorber on the washer. There is a pin used at the bottom and top of the shock absorber. Sold individually.
Special Order

In Stock
Order now and your part arrives by Mar 21

In Stock
Order now and your part arrives by Mar 21

$46.30
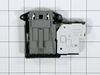
Take a look at this essential LG Dryer Safety Switch Assembly?a don't-miss fixture for your LG Dryer. This is more than just a part, it's a safeguard for you. If your dryer's door springs open, this s...
In Stock
Order now and your part arrives by Mar 21

In Stock
Order now and your part arrives by Mar 21

$245.95
They are all strung with a coiled wire made of a nickel and a chrome alloy. This wire receives, but resists, a controlled electric current and as a result, the wire heats up. The heat produced is used...
In Stock
Order now and your part arrives by Mar 21
Questions and Answers
We're sorry, but our Q&A experts are temporarily unavailable.
Please check back later if you still haven't found the answer you need.
Common Problems and Symptoms for W3P7CVU2WVS
Viewing 13 of 13Noisy
Fixed by these parts


How to fix it
Leaking
Fixed by these parts


How to fix it
Not Heating
Fixed by these parts

How to fix it
Drum Not Spinning
Fixed by these parts
How to fix it
Locking Issues
Fixed by these parts
How to fix it
Door won’t close
Fixed by these parts

How to fix it
Won’t Start
Fixed by these parts

How to fix it
Lid or door won’t close
Fixed by these parts
How to fix it
Spinning Issues
Fixed by these parts

How to fix it
Marks left on clothes
Fixed by these parts
How to fix it
Water Filling Issues
Fixed by these parts

How to fix it
Will Not Start
Fixed by these parts
How to fix it
Door Pops Open
Fixed by these parts
How to fix it


Keep searches simple. Use keywords, e.g. "leaking", "pump", "broken" or "fit".
- Customer:
- Richard from ORMOND BEACH, FL
- Parts Used:
- 6931EL3003D
- Difficulty Level:
- Easy
- Total Repair Time:
- 30 - 60 mins
- Tools:
- Screw drivers
Dryer would run with no heat
I actually went to mr fix it on u tube. Great instruction on how to take dryer apart. First I unplugged the dryer. I found I could reach the heating system by removing the lint tube in the back of the dryer. I put my I phone with the light on inside the back of the dryer and tested the connections to see if all were working. The thermal f
... Read more
use was not working. I removed the two wires , red on top and white on the bottom. Then used a small Phillips screwdriver to remove the two mounting screws and removed the fuse. I then used a vacuum to clear any lint from the back of the dryer and inside the dryer. This took me about an hour and a half. I did it this way because I did not want to disassemble the entire dryer to get to the components. I received the fuse in 3 days and tested it. It was fine. I then put it in the dryer screwed it in place, connected the wires. Replaced the lint tube. This took about 10 minutes. Dryer is running great.
Read less
Was this instruction helpful to you?
Thank you for voting!
- Customer:
- Catherine from COVINGTON, WA
- Parts Used:
- 6931EL3003D
- Difficulty Level:
- Really Easy
- Total Repair Time:
- 30 - 60 mins
- Tools:
- Screw drivers
The dryer worked fine except the dryer did not heat up
I unplugged the dryer and disconnected the vent.
I pulled the dryer away from the wall so I had room to work on it.
Pulled the top cover off (slides back).
Took the door off
Took the front adjustable feet on the bottom off
Unscrewed all of the face screws on the front of the dryer
Took the two screws off of t ... Read more he back of the control panel holding the control panel to the metal frame.
Gently pulled on the control panel to reveal 4 screws under the control panel to be able to take the front cover off.
Pulled the front cover off (the dryer door front cover).
Pulled the dryer vent cover off (two screws).
I could now see the heating element with sensor/fuse (right side).
Did a continuity test (beep) on all visable sensors/fuses on the heating element. No beep on the thermal fuse (used website diagram to locate parts to test and replacement part numbers).
Got the part after about a week, tested the parted (it beeped), replaced with new part and put dryer back together, plugged in and the dryer heated. Problem solved.
Read less
Was this instruction helpful to you?
Thank you for voting!
- Customer:
- James from ELLENVILLE, NY
- Parts Used:
- 6931EL3003D
- Difficulty Level:
- Easy
- Total Repair Time:
- 1- 2 hours
- Tools:
- Screw drivers
No Heat to my Dryer
1. Had to find out what was causing the problem by eliminating each part one by one using a multimeter. I got a video link from parts select on how to do this.
2. Then got another video link sent to me by parts select on how to take my dryer a part and replace the part.
3. Followed it step by step and it worked reall ... Read more y well.
4. The process was great except shipping was excessively high for such a small part.
2. Then got another video link sent to me by parts select on how to take my dryer a part and replace the part.
3. Followed it step by step and it worked reall ... Read more y well.
4. The process was great except shipping was excessively high for such a small part.
Read less
Was this instruction helpful to you?
Thank you for voting!