


Models
>
WM3700HVA
WM3700HVA (01) LG Washer
Jump to:
Find Part by Name
Keep searches simple, eg. "belt" or "pump".
Keep searches simple, eg. "belt" or "pump".

$42.85
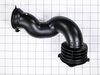
This washer hose with bellows, also known as a dispenser hose, is a genuine OEM replacement part for your washer. Replacing this part can be helpful if your washer is leaking. The dispenser hose conne...
In Stock
Order now and your part arrives by Apr 2

$55.18
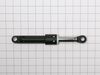
Keep your washer steady and quiet with this replacement friction damper assembly. It helps absorb vibrations and stabilize the drum, especially during fast spin cycles. If your machine is shaking or m...
Special Order

$21.82
The locking pin is used to hold the shock absorber on the washer. There is a pin used at the bottom and top of the shock absorber. Sold individually.
Special Order

In Stock
Order now and your part arrives by Apr 2

In Stock
Order now and your part arrives by Apr 2

Special Order

In Stock
Order now and your part arrives by Apr 2

$134.28
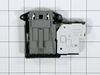
If your washer isn’t locking or starting like it should, this replacement door lock switch could be the fix you need. It helps your machine know when the door is closed so it can lock and begin the cy...
In Stock
Order now and your part arrives by Apr 2

In Stock
Order now and your part arrives by Apr 2

$142.61
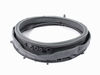
This rubber gasket seals the door on your LG front-load washer to keep water from leaking out during cycles. If you’re noticing puddles, mildew smells, or moisture around the door, replacing the gaske...
On Order

In Stock
Order now and your part arrives by Apr 2

In Stock
Order now and your part arrives by Apr 2
Questions and Answers
We're sorry, but our Q&A experts are temporarily unavailable.
Please check back later if you still haven't found the answer you need.
Common Problems and Symptoms for WM3700HVA
Viewing 7 of 7Leaking
Fixed by these parts

How to fix it
Locking Issues
Fixed by these parts
How to fix it
Lid or door won’t close
Fixed by these parts
How to fix it
Shaking and Moving
Fixed by these parts
How to fix it
Water Filling Issues
Fixed by these parts

How to fix it
Spinning Issues
Fixed by these parts
How to fix it
Will Not Start
Fixed by these parts
How to fix it


Keep searches simple. Use keywords, e.g. "leaking", "pump", "broken" or "fit".
- Customer:
- mark from AUBURN, CA
- Parts Used:
- 4738ER1004B
- Difficulty Level:
- A Bit Difficult
- Total Repair Time:
- 30 - 60 mins
- Tools:
- Pliers, Screw drivers
LG washing machine flooded the Landry room.
Wife called me and said the washing machine just flooded the Landry room. I looked at it and didn't see anything wrong. Took the top off and the back off and started looking for a leak, did not see anything. Took the front part of the washer apart thinking the drain hole was plugged up where the rubber boot is. It was ok after taking the
... Read more
big rubber boot off or whatever that is called i was not getting anywhere. I put it back together left the top and the back off. I turned the water on and started the washer on a quick cycle looking for a leak. I found the bellows at the inlet had a small leak fixed that and started the washer again. So what i found out was the clean out drain plug was not in tight letting water out as it was washing after i tightened it all was ok. So i did find a leak that was small that we never saw. The hardest part was putting that wire clamp on the rubber boot it took two people to do that.
Read less
Was this instruction helpful to you?
Thank you for voting!
- Customer:
- CURTIS from OLIVE BRANCH, MS
- Parts Used:
- EBF61315802
- Difficulty Level:
- Really Easy
- Total Repair Time:
- 15 - 30 mins
- Tools:
- Nutdriver, Screw drivers
Washer did not recognize the door was shut
I removed the Wire and spring from the tub seal and then removed the seal on the side of the washer that contains the Door switch. I removed the two screws that held the door switch in place while holding the switch with my other hand. Once the screws where out I pulled the switch assembly out thru the gap and removed the wires from old
... Read more
assembly. I then plugged the wires into the new assembly aligned the holes up and put the screws back in the new door switch assembly. I then put the door seal and tub seal holder back on. This took about 15 minutes. I do recomend that you unplug the washer before starting this process.
Read less
Was this instruction helpful to you?
Thank you for voting!
- Customer:
- David from SAINT CHARLES, IL
- Parts Used:
- 4738ER1004B
- Difficulty Level:
- Very Easy
- Total Repair Time:
- 15 - 30 mins
- Tools:
- Screw drivers
Leaking hose
2 hose clamps and a hose, easy! This would be a very common cause of leaks in washers due to all the movement inside.
Was this instruction helpful to you?
Thank you for voting!