


Models
>
WM3499HVA
WM3499HVA (ASSEPUS) LG Washer
Jump to:
Find Part by Name
Keep searches simple, eg. "belt" or "pump".
Diagrams for WM3499HVA
Viewing 4 of 4


Keep searches simple, eg. "belt" or "pump".

$34.97
The hot water valve is found at the back of your washer and controls the flow of hot water into the machine. If the valve is defective, the washer may leak, overfill, fill slowly, or not fill with wat...
In Stock
Order now and your part arrives by Mar 20

In Stock
Order now and your part arrives by Mar 20

$128.95
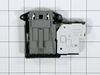
If your washer isn’t locking or starting like it should, this replacement door lock switch could be the fix you need. It helps your machine know when the door is closed so it can lock and begin the cy...
In Stock
Order now and your part arrives by Mar 20

In Stock
Order now and your part arrives by Mar 20

$17.80
The locking pin is used to hold the shock absorber on the washer. There is a pin used at the bottom and top of the shock absorber. Sold individually.
In Stock
Order now and your part arrives by Mar 20

$33.94
This is a replacement shock absorber for your washer. The shock absorber is approximately 10 inches long and a little more than one inch wide. It is black and silver in color, and is sold individually...
In Stock
Order now and your part arrives by Mar 20

$17.80
This levelling leg is a genuine replacement part. It is used to help keep your washing machine stable and balanced. It helps support your appliance. It screws into the base of your washer, and you can...
Special Order

Special Order

On Order

In Stock
Order now and your part arrives by Mar 20

In Stock
Order now and your part arrives by Mar 20

Special Order
Questions and Answers
We're sorry, but our Q&A experts are temporarily unavailable.
Please check back later if you still haven't found the answer you need.
Common Problems and Symptoms for WM3499HVA
Viewing 7 of 7Leaking
Fixed by these parts


How to fix it
Lid or door won’t close
Fixed by these parts

How to fix it
Locking Issues
Fixed by these parts
How to fix it
Water Filling Issues
Fixed by these parts
How to fix it
No hot or cold water
Fixed by these parts
How to fix it
Will Not Start
Fixed by these parts
How to fix it
Will not drain
Fixed by these parts
How to fix it


Keep searches simple. Use keywords, e.g. "leaking", "pump", "broken" or "fit".
- Customer:
- Sanjay from HOLTSVILLE, NY
- Parts Used:
- 5220FR2006H
- Difficulty Level:
- Really Easy
- Total Repair Time:
- Less than 15 mins
- Tools:
- Pliers, Screw drivers, Wrench (Adjustable)
Water was filling continues even the machine was unplugged
I did repaired while looking at video at your site .thanks to your team ..
Was this instruction helpful to you?
Thank you for voting!
- Customer:
- Danny from OAK HILLS, CA
- Parts Used:
- 5220FR2006H
- Difficulty Level:
- Really Easy
- Total Repair Time:
- 30 - 60 mins
- Tools:
- Pliers, Screw drivers
Water leaking on the floor under the washer.
Unplug the washer! Turn off the HOT water valve. Remove the hot water hose at the connection on the back of the washer. Remove the two Phillips head screws holding the top of the washer. Slide the lid toward the rear until you feel it disengage, then lift it off, setting it aside.
Unplug the electrical connector on top of the hot wat ... Read more er valve (just pulls off).using pliers compress the hose clamp, slide it away from the hot water valve and pull the hose off the valve fitting(it will have some water remaining so lift it up and secure it to the brace above the hoses).
Remove the two phillips head screws that hold the valve in place. Pull the valve toward the front of the washer to remove it and compare it to the new valve.
To install the new valve, reverse all steps insuring tight water hose clamp and electrical connection. Install hot water hose, plug it in and turn on water. Test run and check for leaks. Unplug it and reinstall top.
Read less
Was this instruction helpful to you?
Thank you for voting!
- Customer:
- CURTIS from OLIVE BRANCH, MS
- Parts Used:
- EBF61315802
- Difficulty Level:
- Really Easy
- Total Repair Time:
- 15 - 30 mins
- Tools:
- Nutdriver, Screw drivers
Washer did not recognize the door was shut
I removed the Wire and spring from the tub seal and then removed the seal on the side of the washer that contains the Door switch. I removed the two screws that held the door switch in place while holding the switch with my other hand. Once the screws where out I pulled the switch assembly out thru the gap and removed the wires from old
... Read more
assembly. I then plugged the wires into the new assembly aligned the holes up and put the screws back in the new door switch assembly. I then put the door seal and tub seal holder back on. This took about 15 minutes. I do recomend that you unplug the washer before starting this process.
Read less
Was this instruction helpful to you?
Thank you for voting!