


Models
>
40021
40021 LG Washer
Jump to:
Find Part by Name
Keep searches simple, eg. "belt" or "pump".
Keep searches simple, eg. "belt" or "pump".

$36.42
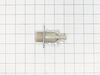
The hot water valve is found at the back of your washer and controls the flow of hot water into the machine. If the valve is defective, the washer may leak, overfill, fill slowly, or not fill with wat...
In Stock
Order now and your part arrives by Aug 2

In Stock
Order now and your part arrives by Aug 2

$25.10
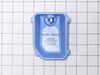
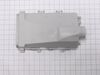
If your washer isn’t dispensing detergent or fabric softener properly, this replacement container assembly may be the fix you need. Designed to hold liquid cleaning agents and release them at the righ...
In Stock
Order now and your part arrives by Aug 2

$25.10
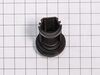
This replacement pump filter, also known as a filter assembly, is a genuine OEM part for your washer or washer/dryer combo. Before beginning this repair, turn off the power and water supply to your wa...
In Stock
Order now and your part arrives by Aug 2

$21.82
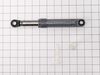
The locking pin is used to hold the shock absorber on the washer. There is a pin used at the bottom and top of the shock absorber. Sold individually.
Special Order

$37.49
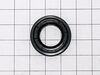
This genuine OEM drum seal gasket prevents water from leaking between the outer tub and spin basket of your washer. It is made of black rubber and measures 2.5 inches in diameter. If your washer is le...
In Stock
Order now and your part arrives by Aug 2


$251.10
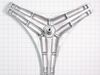
The spider, or rear tub support, is located behind the outer tub of your washer, and provides support to the outer tub. It has 3 legs and each measures approximately 10 inches long. If your washer mov...
Special Order

Special Order

In Stock
Order now and your part arrives by Aug 2

$57.30
This dispenser assembly holds and dispenses detergent and fabric softener during the wash cycle. Replace it if your current part is clogged, leaking, or damaged. Verify your washer model for proper fit before installing.
In Stock
Order now and your part arrives by Aug 2

$29.98
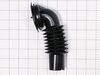
This clamp assembly secures hoses, boots, or fittings in place to prevent leaks and maintain proper connections. Designed for a tight, reliable hold, it is replaced when clamps loosen, corrode, or fail.
In Stock
Order now and your part arrives by Aug 2
Common Problems and Symptoms for 40021
Viewing 8 of 8Leaking
Fixed by these parts
How to fix it
Does not dispense fabric softener or detergent
Fixed by these parts
How to fix it
Water Filling Issues
Fixed by these parts
How to fix it
Shaking and Moving
Fixed by these parts
How to fix it
Will not drain
Fixed by these parts
How to fix it
No hot or cold water
Fixed by these parts
How to fix it
Burning smell
Fixed by these parts
How to fix it
Spinning Issues
Fixed by these parts
How to fix it


Keep searches simple. Use keywords, e.g. "leaking", "pump", "broken" or "fit".
- Customer:
- Sanjay from HOLTSVILLE, NY
- Parts Used:
- 5220FR2006H
- Difficulty Level:
- Really Easy
- Total Repair Time:
- Less than 15 mins
- Tools:
- Pliers, Screw drivers, Wrench (Adjustable)
Water was filling continues even the machine was unplugged
I did repaired while looking at video at your site .thanks to your team ..
Was this instruction helpful to you?
Thank you for voting!
- Customer:
- Danny from OAK HILLS, CA
- Parts Used:
- 5220FR2006H
- Difficulty Level:
- Really Easy
- Total Repair Time:
- 30 - 60 mins
- Tools:
- Pliers, Screw drivers
Water leaking on the floor under the washer.
Unplug the washer! Turn off the HOT water valve. Remove the hot water hose at the connection on the back of the washer. Remove the two Phillips head screws holding the top of the washer. Slide the lid toward the rear until you feel it disengage, then lift it off, setting it aside.
Unplug the electrical connector on top of the hot wat ... Read more er valve (just pulls off).using pliers compress the hose clamp, slide it away from the hot water valve and pull the hose off the valve fitting(it will have some water remaining so lift it up and secure it to the brace above the hoses).
Remove the two phillips head screws that hold the valve in place. Pull the valve toward the front of the washer to remove it and compare it to the new valve.
To install the new valve, reverse all steps insuring tight water hose clamp and electrical connection. Install hot water hose, plug it in and turn on water. Test run and check for leaks. Unplug it and reinstall top.
Read less
Was this instruction helpful to you?
Thank you for voting!
- Customer:
- Terry G from FORT WORTH, TX
- Parts Used:
- 383EER3001J
- Difficulty Level:
- Easy
- Total Repair Time:
- 30 - 60 mins
- Tools:
- Pliers, Screw drivers, Socket set
Excessive vibration
I followed the video -- to take apart and reversed the steps to re-install. It was fairly straight forward and corrected the issue.
Was this instruction helpful to you?
Thank you for voting!