


Models
>
11020102312
11020102312 Kenmore Washer
Jump to:
Find Part by Name
Keep searches simple, eg. "belt" or "pump".
Diagrams for 11020102312
Viewing 6 of 6


 Diagram and Parts List for Kenmore Washer")

Keep searches simple, eg. "belt" or "pump".

$51.43
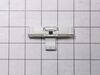
The lid latch is a safety feature found in your washer. Its purpose is to stop the machine from spinning when the lid is opened. You may need to replace the lid latch assembly if your washer will not ...
In Stock
Order now and your part arrives by Jul 25

$32.12
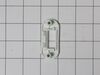
This part is the replacement lid latch or latch assembly for your top-load washer. The lid latch holds your washer door closed, and allows the washer to run its cycle. If the lid latch is damaged, you...
In Stock
Order now and your part arrives by Jul 25

$7.60
Sold individually. NOTE: The color on the screw may not be the same as the image, but will still function the same.
In Stock
Order now and your part arrives by Jul 25

$7.60
This gray and white washer lid bumper contains a rubber bottom and is sold individually.
In Stock
Order now and your part arrives by Jul 25

In Stock
Order now and your part arrives by Jul 25

In Stock
Order now and your part arrives by Jul 25

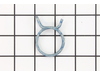
$9.79
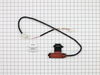
This clamp helps to prevent leaking by holding the end of water hose in place.
In Stock
Order now and your part arrives by Jul 25

Sold individually. The size of this screw is 1/4" hex head and 10-12 x 1/2".
In Stock
Order now and your part arrives by Jul 25

In Stock
Order now and your part arrives by Jul 25

In Stock
Order now and your part arrives by Jul 25

In Stock
Order now and your part arrives by Jul 25

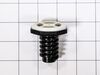
$20.72
The leveling leg WPW10687506 supports the washing machine. Adjust the height of the leveling leg to make the washer level.
In Stock
Order now and your part arrives by Jul 25
Common Problems and Symptoms for 11020102312
Viewing 11 of 11Will Not Start
Fixed by these parts
How to fix it
Lid or door won’t close
Fixed by these parts

How to fix it
Leaking
Fixed by these parts
How to fix it
Locking Issues
Fixed by these parts
How to fix it
Will not drain
Fixed by these parts
How to fix it
Will not agitate
Fixed by these parts
How to fix it
Draining Issues
Fixed by these parts
How to fix it
Spinning Issues
Fixed by these parts
How to fix it
Cycle Not Advancing
Fixed by these parts
How to fix it
Shaking and Moving
Fixed by these parts
How to fix it
Spins slowly
Fixed by these parts
How to fix it


Keep searches simple. Use keywords, e.g. "leaking", "pump", "broken" or "fit".
- Customer:
- William from Wakefield, RI
- Parts Used:
- W10404050
- Difficulty Level:
- Very Easy
- Total Repair Time:
- 15 - 30 mins
- Tools:
- Nutdriver, Screw drivers
Defective lid latch - Cabrio Washer
The instructions that came with the part were worthless. Essentially, unplug, put in new part, plug it back in. I spent a considerable amount of time on the internet and finally found a video showing how to open the top. Unlike other models, it is held down by clamps in the back rather than clips in the front. Once finding this inform
... Read more
ation the installation was simple. Remove the clamps and the back of the console, slide the top forward and lift, remove and replace the lock and reassemble. You don't even have to remove the hoses.
Read less
Was this instruction helpful to you?
Thank you for voting!
- Customer:
- william from HOLLEY, NY
- Parts Used:
- W10404050
- Difficulty Level:
- Really Easy
- Total Repair Time:
- 30 - 60 mins
- Tools:
- Pliers, Screw drivers
Lid would not register closed washer would not spin
Remove top of washer 5min R&R cable 20 min total time 25 min.
Was this instruction helpful to you?
Thank you for voting!
- Customer:
- Garry from CANON CITY, CO
- Parts Used:
- W10404050
- Difficulty Level:
- Easy
- Total Repair Time:
- 30 - 60 mins
- Tools:
- Screw drivers, Socket set
Lid safety switch defective . Lid would not lock allowing washer operation.
Remove small screws on back of top on both sides, slide top forward. No need to remove water hoses. Lift top up to expose switch safety mechanism (black plastic) on front underside of top. Undo screws holding switch mechanism. remove plate cover from back of top and unplug wiring harness. Thread new wireing harness and plug through hole
... Read more
in top and plug in to plug receptor.
Read less
Was this instruction helpful to you?
Thank you for voting!