


Models
>
11022102310
11022102310 Kenmore Washer
Jump to:
Find Part by Name
Keep searches simple, eg. "belt" or "pump".
Diagrams for 11022102310
Viewing 6 of 6


 Diagram and Parts List for Kenmore Washer")

Keep searches simple, eg. "belt" or "pump".

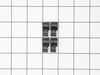
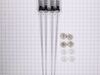
Commonly referred to as dog ears, these agitator directional cogs are manufacturer approved replacement parts that come in a package of 4 and are usually used with direct drive washing machines. We re...
In Stock
Order now and your part arrives by Jul 23

$9.79
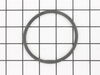
Also known as an O-Ring. This black o-ring seal is three inches in diameter.
In Stock
Order now and your part arrives by Jul 23

$51.43
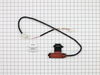
The lid latch is a safety feature found in your washer. Its purpose is to stop the machine from spinning when the lid is opened. You may need to replace the lid latch assembly if your washer will not ...
In Stock
Order now and your part arrives by Jul 23

The O-Ring is included with this cap. It can be purchased separately as Part #WPW10072840.
In Stock
Order now and your part arrives by Jul 23

$7.60
This is a multi-use screw and can be used on a variety of appliances. The measurements of the screw are: 8/18 x 3/8. *Please note: the screw is sold individually. Refer to the manual provided by the m...
In Stock
Order now and your part arrives by Jul 23

$77.48
If your washer shakes or makes loud noises during a cycle, this suspension rod kit could help. It comes with four rods that keep the tub steady and reduce movement. Easy to install and compatible with...
In Stock
Order now and your part arrives by Jul 23

In Stock
Order now and your part arrives by Jul 23

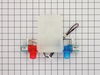
This water inlet valve attaches the water lines to the back of your appliance. The attaching solenoids on the valve open and close according to the desired temperature, or amount of water needed.
In Stock
Order now and your part arrives by Jul 23

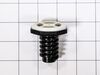
This insert is sold individually. Knob not included. Knob is sold separately.
In Stock
Order now and your part arrives by Jul 23

$32.12
This part is the replacement lid latch or latch assembly for your top-load washer. The lid latch holds your washer door closed, and allows the washer to run its cycle. If the lid latch is damaged, you...
In Stock
Order now and your part arrives by Jul 23

$7.60
Sold individually. NOTE: The color on the screw may not be the same as the image, but will still function the same.
In Stock
Order now and your part arrives by Jul 23

$7.60
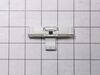
This gray and white washer lid bumper contains a rubber bottom and is sold individually.
In Stock
Order now and your part arrives by Jul 23
Common Problems and Symptoms for 11022102310
Viewing 18 of 18Will not agitate
Fixed by these parts

How to fix it
Leaking
Fixed by these parts
How to fix it
Shaking and Moving
Fixed by these parts
How to fix it
Will Not Start
Fixed by these parts
How to fix it
Lid or door won’t close
Fixed by these parts

How to fix it
Spinning Issues
Fixed by these parts
How to fix it
Spins slowly
Fixed by these parts
How to fix it
Does not dispense fabric softener or detergent
Fixed by these parts
How to fix it
Locking Issues
Fixed by these parts
How to fix it
Will not drain
Fixed by these parts
How to fix it
Marks left on clothes
Fixed by these parts
How to fix it
No hot or cold water
Fixed by these parts
How to fix it
Water Filling Issues
Fixed by these parts
How to fix it
Not cleaning dishes properly
Fixed by these parts
How to fix it
Draining Issues
Fixed by these parts
How to fix it
Cycle Not Advancing
Fixed by these parts
How to fix it
Noisy and Marks Left on Clothes
Fixed by these parts
How to fix it
Timer Not Working
Fixed by these parts
How to fix it


Keep searches simple. Use keywords, e.g. "leaking", "pump", "broken" or "fit".
- Customer:
- mike from Kent, WA
- Parts Used:
- 80040
- Difficulty Level:
- Easy
- Total Repair Time:
- 15 - 30 mins
- Tools:
- Screw drivers, Socket set
washer wouldn't agitate
First pry off the cap of the agitator. Then using a socket remove the bolt that holds the plastic cup in place. Remove this cup by prying it loose from the two tabs that hold it in place. Once this cup is removed you can get to the broken cogs.
Slip the new cogs into the underside of the cup, and slide the cup back down in the a ... Read more gitator housing using the slots on the side for a guide. (You may want to remove the entire agitator and assemble everything upside down, then flip it all back over to mount, so the cogs don't fall out).
Tighten the bolt, snap the cap back in place on top of the agitator and your'e done. Easy repair.
Read less
Was this instruction helpful to you?
Thank you for voting!
- Customer:
- dennis from new stanton, PA
- Parts Used:
- 80040
- Difficulty Level:
- Really Easy
- Total Repair Time:
- Less than 15 mins
- Tools:
- Socket set
top half of agitator did not move during wash cycle
pull off softner dispenser, pop off agitator cap by inserting straight screw driver into small slot, remove bolt inside agitator with socket wrench and long extension, pull agitator straight up off shaft, place agitator on floor, with feet holding bottom half pull top half apart from bottom half by pulling straight up, note direction of o
... Read more
ld cogs remove and replace with new, reassemble
Read less
Was this instruction helpful to you?
Thank you for voting!
- Customer:
- William from Wakefield, RI
- Parts Used:
- W10404050
- Difficulty Level:
- Very Easy
- Total Repair Time:
- 15 - 30 mins
- Tools:
- Nutdriver, Screw drivers
Defective lid latch - Cabrio Washer
The instructions that came with the part were worthless. Essentially, unplug, put in new part, plug it back in. I spent a considerable amount of time on the internet and finally found a video showing how to open the top. Unlike other models, it is held down by clamps in the back rather than clips in the front. Once finding this inform
... Read more
ation the installation was simple. Remove the clamps and the back of the console, slide the top forward and lift, remove and replace the lock and reassemble. You don't even have to remove the hoses.
Read less
Was this instruction helpful to you?
Thank you for voting!