


Models
>
11020642991
11020642991 Kenmore Washer
Jump to:
Find Part by Name
Keep searches simple, eg. "belt" or "pump".
Manuals & Guides for 11020642991
Click to downloadKeep searches simple, eg. "belt" or "pump".

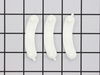
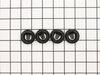
Commonly referred to as dog ears, these agitator directional cogs are manufacturer approved replacement parts that come in a package of 4 and are usually used with direct drive washing machines. We re...
In Stock
Order now and your part arrives by Aug 2

$9.79
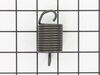
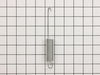
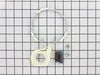
This suspension spring is a genuine OEM replacement part for a variety of washers and washer-dryer combos. The primary purpose of the suspension spring is to support the outer tub and keep the tub ste...
In Stock
Order now and your part arrives by Aug 2

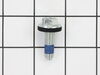
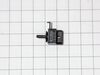
There are many symptoms that may indicate an issue with your water inlet valve. These can include your washer not filling with water, it will not stop filling, the washer is leaking, or it is both fil...
In Stock
Order now and your part arrives by Aug 2

$46.07
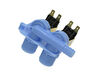
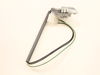
When the lid switch on your washer is activated, it sends a signal that the lid is shut and that the machine can operate through the wash cycles. If your washer will not start, drain, agitate, or spin...
In Stock
Order now and your part arrives by Aug 2

$6.51
This bolt is a genuine OEM replacement part, used to secure the agitator in your washing machine. Overtime the bolt can become worn out due to the vibrations of the washer, and will need to be replace...
In Stock
Order now and your part arrives by Aug 2

$6.51
This tub spring is a genuine OEM replacement part for your washing machine and is sold individually. There are other names that the tub spring goes by, such as the suspension spring, balance spring, o...
In Stock
Order now and your part arrives by Aug 2

$7.65
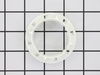
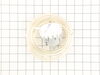
The thrust spacer is a genuine OEM part that is more commonly known as a retainer ring. The spacer is made of white plastic and measures approximately 2.5 inches in diameter. This part is found in bet...
In Stock
Order now and your part arrives by Aug 2

In Stock
Order now and your part arrives by Aug 2

$7.60
This is a multi-use screw and can be used on a variety of appliances. The measurements of the screw are: 8/18 x 3/8. *Please note: the screw is sold individually. Refer to the manual provided by the m...
In Stock
Order now and your part arrives by Aug 2

$7.60
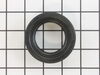
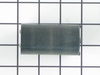
Stop leaks before they start with this outer tub seal. It fits between the tub and base to keep water inside where it belongs. At about 2 inches across, this sturdy black gasket is built to last. Inst...
In Stock
Order now and your part arrives by Aug 2

In Stock
Order now and your part arrives by Aug 2

$7.60
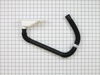
This hose clamp extends from half an inch to an inch in diameter. It is made entirely of metal and is intended for use with Maytag brand washing machines.
In Stock
Order now and your part arrives by Aug 2
Common Problems and Symptoms for 11020642991
Viewing 16 of 16Will not agitate
Fixed by these parts

How to fix it
Leaking
Fixed by these parts
How to fix it
Will not drain
Fixed by these parts

How to fix it
No hot or cold water
Fixed by these parts
How to fix it
Shaking and Moving
Fixed by these parts
How to fix it
Will Not Start
Fixed by these parts
How to fix it
Spins slowly
Fixed by these parts
How to fix it
Spinning Issues
Fixed by these parts
How to fix it
Does not dispense fabric softener or detergent
Fixed by these parts

How to fix it
Water Filling Issues
Fixed by these parts
How to fix it
Marks left on clothes
Fixed by these parts
How to fix it
Burning smell
Fixed by these parts

How to fix it
Lid or door won’t close
Fixed by these parts

How to fix it
Cycle Not Advancing
Fixed by these parts
How to fix it
Not cleaning dishes properly
Fixed by these parts
How to fix it
Noisy and Marks Left on Clothes
Fixed by these parts
How to fix it


Keep searches simple. Use keywords, e.g. "leaking", "pump", "broken" or "fit".
- Customer:
- mike from Kent, WA
- Parts Used:
- 80040
- Difficulty Level:
- Easy
- Total Repair Time:
- 15 - 30 mins
- Tools:
- Screw drivers, Socket set
washer wouldn't agitate
First pry off the cap of the agitator. Then using a socket remove the bolt that holds the plastic cup in place. Remove this cup by prying it loose from the two tabs that hold it in place. Once this cup is removed you can get to the broken cogs.
Slip the new cogs into the underside of the cup, and slide the cup back down in the a ... Read more gitator housing using the slots on the side for a guide. (You may want to remove the entire agitator and assemble everything upside down, then flip it all back over to mount, so the cogs don't fall out).
Tighten the bolt, snap the cap back in place on top of the agitator and your'e done. Easy repair.
Read less
Was this instruction helpful to you?
Thank you for voting!
Washer would not run, lid switch broken
Repair was easy. Removed two side panels on the control plate. Removed two phillips screws that hold the control panel to the body of the washer. Disconnected the electic connection to the wires leading to the lid switch. Three sided of the lower cover lift over and removed from the washer frame. Access to the lid switch and wire ret
... Read more
ainers was easy. Removed two screws holding the remaining parts of the switch and replaced with new. Re-routed the wires through the retainers. Set the sides back on making sure the set all the way back in the frame and fit properly into the plastic strips on the back of the washer. Reconnected wires, screws and end caps.
Read less
Was this instruction helpful to you?
Thank you for voting!
Washer not agitating
On top of the agitator is a flat cap that is held in place by the friction of an o-ring, there are no fasteners. I would imagine one could get under the lip with a small screwdriver or butter knife to pop it off but I chose simply using my fingernails so as to not disfigure the cap. Under the cap you will find the head of the only bolt
... Read more
that holds the assembly together it is a 7/16 head and because it is in a 4" deep well your will need a 6" extension for your ratchet. Once the bolt is out the top of the agitator, the assembly with the cogs removes by hand. Set the assembly upside down on the counter, slide the black plastic ring off, pull the cogs out with your fingertips, install the new cogs put a new black ring on and set the assembly back in the agitator. Reinstall bolt. As the bolt is down in a tube, you cannot set it in place with your fingers and it will fall out of the socket. To hold the bolt in the socket during positioning you can either put a gob of Vaseline on the bolt head to hold it in the socket or form a small piece of paper over the bolt head and set it into the socket, the friction of the paper will hold the bolt into the socket. Took me less then 10 minutes, good luck
Read less
Was this instruction helpful to you?
Thank you for voting!