


Models
>
41729042991
41729042991 Kenmore Washer
Jump to:
Find Part by Name
Keep searches simple, eg. "belt" or "pump".
Manuals & Guides for 41729042991
Click to downloadKeep searches simple, eg. "belt" or "pump".

$53.85
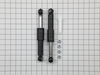
The shock absorber kit is used for front load washers and includes 2 dual-stage shock absorbers, 1 spare shock mounting pin, and 4 locking nuts. These shock absorbers keep the washer from vigorous sha...
In Stock
Order now and your part arrives by Jul 26

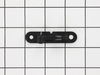
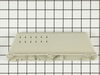
This washer door catch is a replacement from the original. This is only available in black.
No Longer Available

$149.14
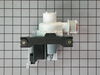
Designed for front-loading washers, this drain pump assembly removes water during the drain cycle to keep your machine running smoothly. It’s compatible with a variety of models from brands like Frigi...
In Stock
Order now and your part arrives by Jul 26

$122.86
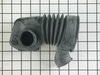
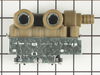
This water inlet valve assembly is designed for use in washing machines and regulates the flow of both hot and cold water into the appliance during wash cycles. It ensures the correct amount of water ...
In Stock
Order now and your part arrives by Jul 26

In Stock
Order now and your part arrives by Jul 26

$25.25
This screw is designed to fit washers and dryers. Refer to the diagram provided by the manufacturer for further installation instructions and accurate application of screw in your tool.
In Stock
Order now and your part arrives by Jul 26

$29.63
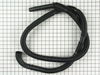
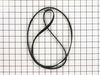
This is a drive belt for your washing machine. This part spins the basket in your appliance by connecting the drive motor to the drive system. You will need to replace the drive belt if your pumps are...
In Stock
Order now and your part arrives by Jul 26


$26.35
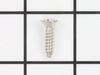
This is a screw and it is used with a variety of home appliances. It is less than 1/2 an inch long, and is #8-18 x 3/8. This part is a pan head, sheet metal, screw. It is made of metal.
In Stock
Order now and your part arrives by Jul 26

$82.83
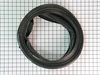
This washer tub-to-pump hose is designed to carry wastewater from the tub to the drain pump during wash and spin cycles, helping ensure efficient draining. It also includes a built-in trap that catche...
In Stock
Order now and your part arrives by Jul 26

In Stock
Order now and your part arrives by Jul 26

$24.15
This washer shock absorber mounting pin is a small but essential fastener that secures the shock absorber to the outer tub of a front-load washing machine. By holding the shock absorber firmly in plac...
In Stock
Order now and your part arrives by Jul 26
Common Problems and Symptoms for 41729042991
Viewing 14 of 14Leaking
Fixed by these parts
How to fix it
Will not drain
Fixed by these parts

How to fix it
Lid or door won’t close
Fixed by these parts
How to fix it
Shaking and Moving
Fixed by these parts
How to fix it
Will Not Start
Fixed by these parts
How to fix it
No hot or cold water
Fixed by these parts
How to fix it
Will not agitate
Fixed by these parts
How to fix it
Spins slowly
Fixed by these parts
How to fix it
Spinning Issues
Fixed by these parts
How to fix it
Marks left on clothes
Fixed by these parts
How to fix it
Noisy
Fixed by these parts
How to fix it
Burning smell
Fixed by these parts
How to fix it
Not draining
Fixed by these parts
How to fix it
Door latch failure
Fixed by these parts
How to fix it


Keep searches simple. Use keywords, e.g. "leaking", "pump", "broken" or "fit".
- Customer:
- Maryann from Sandy Hook, CT
- Parts Used:
- 131279001
- Difficulty Level:
- Really Easy
- Total Repair Time:
- Less than 15 mins
- Tools:
- Screw drivers
The door catch broke and the door would not close.
First, I had to remove 2 screws to take off the 2 broken pieces of the door catch. Then I put the new one on using the same 2 screws. The door is now able to close, but does not lock properly. In order to make it work, I put a thin piece of rubber into the place where the door meets the machine. This causes the lock to engage and the
... Read more
machine to work. I don't know how much longer it will work since the repairman claims that the main bearing is going, but hopefully it will last a bit longer.
Part Select got the part to me in one day using the standard shipping, which was impressive. I just wish that I hadn't wasted money on calling a repairman only to have him tell me that he didn't have the part. He charged for the visit anyway even though I told him ahead of time the problem and the model of my machine.
Part Select got the part to me in one day using the standard shipping, which was impressive. I just wish that I hadn't wasted money on calling a repairman only to have him tell me that he didn't have the part. He charged for the visit anyway even though I told him ahead of time the problem and the model of my machine.
Read less
Was this instruction helpful to you?
Thank you for voting!
- Customer:
- Douglas from Medical Lake, WA
- Parts Used:
- 5304485917
- Difficulty Level:
- Easy
- Total Repair Time:
- 30 - 60 mins
- Tools:
- Screw drivers, Socket set
Both vibration shock absorbers broken
removed 2 screws and removed top access cover. removed 2 screws and removed front access cover. removed 4 retaining pins (one with nammer and punch because it was stuck) connected lower ends of new shocks with plastic pins, extended each shock to slip fit and connected upper ends to wash tub mounts. Reinstalled panels. I wish I could sa
... Read more
y that it all went well from there but......when the shocks broke, apparently the hit the motor took was enough to cause an electronic failure of the speed cycle control chip. Now Im waiting for that part.
Read less
Was this instruction helpful to you?
Thank you for voting!
Drum making loud noise
Turned out drum brackets were corroded, so drum and shell-rear/brg and gasket needed replacing
1. Disconnect power and water lines
2. Remove rear and top panels
3. Remove control knobs, Assembly, soap dispenser, and Assembly cons frame/trim
4. Remove all screws from control panel mounting bracket (panel-cont ... Read more mtg wing bend), disconnect easy wires to get to so you can flip it on it's edge when the time comes - no need to remove completely
5. Disconnect hoses running to shell-rear/brg
6. Remove the motor (motor-Sole) and belt
7. Place foam pad and/or jack with pad on it underneath shell (it's gonna be very heavy when you remove it - two men or a jack required)
8. Lift and remove the two spring/sleeves that support the shell.
9. Remove two level-shocks below shell or at a minimum remove one of the pins on each
10. Remove Spring boot from bellow
11. Lower and remove entire shell
12. Remove the weight, upper back from the rear shell and the counterweights from the front shell (can leave front weights if you want to, but probably easier to work with without them on. Note: be careful, these all crack/chip very easily)
13. Remove the screws that hold the rear shell to the front shell
14. Remove the pulley screw and pulley (may take a little wiggling or tapping with rubber mallet to loosen)
15. Separate the rear shell from front shell.
16. Remove the drum from the rear shell (may also require some wiggkling/tapping with rubber mallet)
Note: I did this from memory, so probably missed some steps - just use your parts manual to ensure you know what you're looking at and it will help you through the process.
Good luck. I figure I saved about $700 to $1200 since the estimated repair costs were so high, I would have simply had to buy a new washer.
Read less
Was this instruction helpful to you?
Thank you for voting!