


Models
>
1019666500
1019666500 Kenmore Washer
Jump to:
Find Part by Name
Keep searches simple, eg. "belt" or "pump".
Keep searches simple, eg. "belt" or "pump".

$63.68
This brake pad kit contains three brake pads and six installation screws. Helps to bring a rotating cycle to a stop.
Special Order

In Stock
Order now and your part arrives by Jul 31

Common Problems and Symptoms for 1019666500
Viewing 1 of 1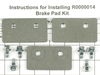
Keep searches simple. Use keywords, e.g. "leaking", "pump", "broken" or "fit".
- Customer:
- daniel from angola, NY
- Parts Used:
- R0000014
- Difficulty Level:
- A Bit Difficult
- Total Repair Time:
- 1- 2 hours
- Tools:
- Nutdriver, Pliers, Screw drivers, Socket set
2 problems caused by bad brake discs
I first unplugged the washer. I removed the 2 screws that hold the front panel and removed the front panel, they are located at the very bottom outer edges of the front panel.
I then removed 4 of the large springs that are attached to the drum, this washer has six but I only removed the front 4. Removed the two hoses going to the wat ... Read more er pump and drain hose, removed 4 bolts that attach the motor to its mounting bracket. Unplugged the wiring harnesses going to motor and what looks like a capacitor mounted to the side of the motor.Then I removed the drive belt. ( when the machine would first start to spin it would make a clacking noise which ended up being a chunk out the the drive belt causing the belt tenshioner to slap causing that noise and letting the drum spin during the wash cycle. So far very easy. I then removed the motor and when it is disconnected you can then remove the water pump. Three hex head bolts need to be removed and it pulls right off. I then removed the six bolts that hold the brake pads in place. I applied silicone grease to the new brake pads and installed them. The pad at the back of the drum was very hard to line up with the holes. I used a very small screwdriver to line up the disc brake mounting holes to get the bolts started and it worked fine. I then put it all back together and it works great. I have to add that I have been an auto mechanic for 28 years and not to brag but this is not your average repair job.
I then removed 4 of the large springs that are attached to the drum, this washer has six but I only removed the front 4. Removed the two hoses going to the wat ... Read more er pump and drain hose, removed 4 bolts that attach the motor to its mounting bracket. Unplugged the wiring harnesses going to motor and what looks like a capacitor mounted to the side of the motor.Then I removed the drive belt. ( when the machine would first start to spin it would make a clacking noise which ended up being a chunk out the the drive belt causing the belt tenshioner to slap causing that noise and letting the drum spin during the wash cycle. So far very easy. I then removed the motor and when it is disconnected you can then remove the water pump. Three hex head bolts need to be removed and it pulls right off. I then removed the six bolts that hold the brake pads in place. I applied silicone grease to the new brake pads and installed them. The pad at the back of the drum was very hard to line up with the holes. I used a very small screwdriver to line up the disc brake mounting holes to get the bolts started and it worked fine. I then put it all back together and it works great. I have to add that I have been an auto mechanic for 28 years and not to brag but this is not your average repair job.
Read less
Was this instruction helpful to you?
Thank you for voting!
- Customer:
- Peter from Littleton, CO
- Parts Used:
- R0000014
- Difficulty Level:
- A Bit Difficult
- Total Repair Time:
- 1- 2 hours
- Tools:
- Socket set, Wrench set
Washing machine made squeaking noise
Brake pad kit does not come with installation instructions even though it says it does. Remove bottom front panel from washer. There are three brake pads. One of mine (the right one) broke into three pieces and was found on the bottom of the washer. This is how I identified what was wrong. Run the washing machine on the handwash extr
... Read more
a light cycle (you could use another cycle, I used this one because I believe it is the shortest), there is a point in the cycle where the disk clamping the brake pads separates from the brake pads and allows you to remove and replace the pads. During other parts of the cycle, the disk is clamped onto the brakes and you could not remove or install a brake pad. I removed the two black hose on the bottom right to get to the right brake pad. Have a 2 gallon bucket ready to collect the water if you did run the washer as above. With difficulty, I was also able to reach around the back side of the right brake pad. I used a socket wrench set. I then removed and replaced the left brake pad. I left the rear brake pad in place. I was not able to get to it.
Read less
Was this instruction helpful to you?
Thank you for voting!
- Customer:
- GARY from VILLA RIDGE, MO
- Parts Used:
- R0000014
- Difficulty Level:
- Really Easy
- Total Repair Time:
- 30 - 60 mins
- Tools:
- Pliers, Socket set, Wrench (Adjustable)
tub would not stop spinning--brakes broke from bolts
Unpluged electric, diconnected dicharge hose from wall drain, disconnected water lines from rear of washer and at wall hose connection, removed lower front panel, removed large front panel, disconnected hoses at motor(put towels at hoses to catch water leakage)THEN-took washer to the garage and tuned up side down. Removed front two tub sp
... Read more
rings, removed (4) motor bolts, removed electrical harness from motor, remove and replaced new brake pads. NOTE:brake pads need to be somewhat driven(pushed hard) into brake pad slots. Also it was easier to install the rear pad by removing the 4" knock-out at the side of the washer. Somehow reinstall the knock-out to keep mice and animals from entering the interior of the washer. THEN- reinstall all items in reverse order. Any one mechaniclly minded can replace the brake pad. My wife and I saved lots by doing the replacement myself. THE END. Good job Gary Final note:besure to intall the drive "v" belt around the 2" pulley wheel.Very important.
Read less
Was this instruction helpful to you?
Thank you for voting!