


Models
>
WDSR2080GC
WDSR2080GC General Electric Washer
Jump to:
Find Part by Name
Keep searches simple, eg. "belt" or "pump".
Keep searches simple, eg. "belt" or "pump".

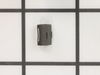
This clip fits inside the control knobs for your laundry machines, and helps to securely fasten the knob to the shaft, which allows you to easily turn the knob to select the correct settings. This is ...
No Longer Available

$33.95
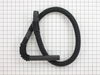
This is a genuine OEM drain hose for your top-load washing machine. It is made with a flexible and corrugated black material, and measures 57-inches in length. The purpose of the drain hose is to move...
In Stock
Order now and your part arrives by Jul 24

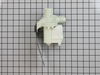
This pump helps expel water from the washing machine and is activated after the spin speed is maintained for a specific period of time.
In Stock
Order now and your part arrives by Jul 24

$20.72
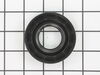
If your washer is leaking when it is filling or agitating, you may need to replace the tub seal. The tub seal is found between the transmission and the outer tub in your washing machine. This genuine ...
In Stock
Order now and your part arrives by Jul 24

$28.91
Bolt not included. This part connects the transmission drive shaft to the agitator base.
In Stock
Order now and your part arrives by Jul 24

In Stock
Order now and your part arrives by Jul 24

$56.24
This switch keeps your washer from overflowing. It is responsible for shutting off the power to the fill valve and redirects the power to the timer to start the washing machine running once the corre...
On Order

$15.26
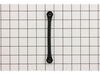
This part is a replacement socket rod support for your washer. The socket rod support is found at the top of the washer frame in the front part of the washer. It supports the suspension rod, so the ro...
In Stock
Order now and your part arrives by Jul 24

$85.40
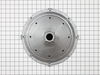
This part is the replacement inner tub base hub for your washer. It is made of metal and is approximately 15 inches in diameter. The inner tub base hub fits between the wash tub and the spin basket, a...
In Stock
Order now and your part arrives by Jul 24

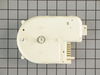
The timer controls most of the operations of the washer: water level, tub filling and emptying, length of cycles, and cycle setting sequences.
No Longer Available

Special Order

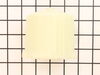
This is a replacement screw for your washer. The screw has a hex head and is approximately 1 inch in length. The washer portion of this screw is approximately 1 inch in diameter. This part is sold ind...
In Stock
Order now and your part arrives by Jul 24
Common Problems and Symptoms for WDSR2080GC
Viewing 11 of 11Leaking
Fixed by these parts
How to fix it
Will not drain
Fixed by these parts
How to fix it
Will not agitate
Fixed by these parts

How to fix it
Will Not Start
Fixed by these parts

How to fix it
Shaking and Moving
Fixed by these parts
How to fix it
Burning smell
Fixed by these parts
How to fix it
Marks left on clothes
Fixed by these parts
How to fix it
No hot or cold water
Fixed by these parts

How to fix it
Draining Issues
Fixed by these parts
How to fix it
Spinning Issues
Fixed by these parts
How to fix it
Noisy
Fixed by these parts
How to fix it


Keep searches simple. Use keywords, e.g. "leaking", "pump", "broken" or "fit".
- Customer:
- douglas from danby, VT
- Parts Used:
- WH23X10030
- Difficulty Level:
- Easy
- Total Repair Time:
- 30 - 60 mins
- Tools:
- Socket set
machine would not drain all other functions seemed o.k
Aside from getting the wet clothes and most of the water out,the toughest part of the job for me was to figure out how to get inside the machine. I nearly wrecked the thing trying to lift the top panel. After some frustration I removed the star-type screws on back of the control panel and found, tucked away neatly, the documentation/parts
... Read more
list complete with instructions on how to remove the FRONT panel. Once I got inside it was easy to locate the pump. I ran the drain cycle for a moment to see if the pump turned at all. The original had an exposed fan so it was easy to see that indeed the motor was not turning. I inspected all the hose and electrical connections to make sure I had the tools I'd need and the savvy to replace the part(s) if I could locate them. I'm not much of a web-head, so I was a little surprised when I typed G.E. appliances and the search took me to partselect.com where I was pretty much coached through the procedure before I even ordered the part. The box arrived ahead of schedule (yay) and when I looked at the pump it didn't look much like the one I was replacing. But then I realized it was the same thing just ten years more advanced. I used a small pair of vise grips to pinch and lock the pipe clamps open. I know there is a plier made for this, but... Anyways, after loosening the clamps and sliding them away from the pump I pulled the hoses off and let the last of the rinse water still in them run down my shirt sleeve to my elbow. (optional, not recommended) Thus refreshed I then rummaged through my socket set and found what I needed to remove the 2 sheet metal mounting screws and disconnected the 2 power leads. I removed the faulty pump and proudly showed it to my wife. Unimpressed, she asked how much longer. I quickly reversed the procedure to install the new unit and confidently piled in a load of laundry. The cycle completed just fine and has done so since. I will and have recommmended partselect.com to friends and will use it again for sure.
Read less
Was this instruction helpful to you?
Thank you for voting!
- Customer:
- Victor from League City, TX
- Parts Used:
- WH38X10002
- Difficulty Level:
- Difficult
- Total Repair Time:
- More than 2 hours
- Tools:
- Nutdriver, Pliers, Screw drivers, Socket set, Wrench (Adjustable), Wrench set
Bearing on the transmission to tub wore out (mostly due to the washer not being level)
The back of the control panel had an instruction pamplet that was very useful. 2 parts did not go as written tho. To "pop" the spinner out, required short 1x4s and a shake/shingle bar to pry it up and the wedging of the 1x4s under it, until enough strain was put on it to "pop" it off. Then the large 1&11/16 nut was a bear. It require
... Read more
d a short pipe wrench (so it fit in the tub) and a hammer to brake it loose.
Read less
Was this instruction helpful to you?
Thank you for voting!
- Customer:
- Scott from Bloomington, IN
- Parts Used:
- WH38X10002
- Difficulty Level:
- Easy
- Total Repair Time:
- More than 2 hours
- Tools:
- Nutdriver, Pliers, Screw drivers, Socket set, Wrench (Adjustable), Wrench set
Leaking oil into the washer (in tub and on clothes)
Had never repaired a washer before, but have several tools and enjoy working with my hands. Knew it would be cost prohibitive to call a repairman, and didn't have anything to lose. Quick delivery from partselect -- reasonable price, too. This was as easy as simply taking the whole washer apart (NOTE -- there are instructions behind the kn
... Read more
obs inside the unit that are very helpful!) replacing the transmission and putting it all back together. Hardest part was getting the hub nut off of the transmission axle. To get it off (REVERSE THREADED, so 'tighten' to 'loosen') I used a 1 11/16 socket and impact wrench. Use the same tool to tighten (but go EASY...don't overtighten). This was not difficult, but just took some time. A couple of evenings later, we were washing again like NEW. Part cost around $160, labor was 'free' and much less than a new $500 top loader or $800 front loader. If you enjoy taking things apart and have some tools, then go for it!
Read less
Was this instruction helpful to you?
Thank you for voting!