


Models
>
56021A0WW
56021A0WW General Electric Washer
Jump to:
Find Part by Name
Keep searches simple, eg. "belt" or "pump".
Diagrams for 56021A0WW
Viewing 4 of 4


Keep searches simple, eg. "belt" or "pump".

This clip fits inside the control knobs for your laundry machines, and helps to securely fasten the knob to the shaft, which allows you to easily turn the knob to select the correct settings. This is ...
No Longer Available

$45.00
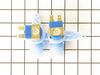
This genuine OEM part is an agitator coupling kit for your washing machine. Also known as an agitator drive belt, this part is used to connect the transmission drive shaft to the base of the agitator....
In Stock
Order now and your part arrives by Jul 25

$33.95
This is a genuine OEM drain hose for your top-load washing machine. It is made with a flexible and corrugated black material, and measures 57-inches in length. The purpose of the drain hose is to move...
In Stock
Order now and your part arrives by Jul 25

$15.26
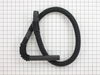
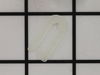
This plastic clip is a genuine OEM part, used to help connect the timer knob to the shaft on your washer. If the clip has become damaged it will need to be replaced. The clip is found on the backside ...
In Stock
Order now and your part arrives by Jul 25

This pump helps expel water from the washing machine and is activated after the spin speed is maintained for a specific period of time.
In Stock
Order now and your part arrives by Jul 25

$20.72
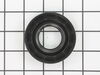
If your washer is leaking when it is filling or agitating, you may need to replace the tub seal. The tub seal is found between the transmission and the outer tub in your washing machine. This genuine ...
In Stock
Order now and your part arrives by Jul 25

In Stock
Order now and your part arrives by Jul 25

In Stock
Order now and your part arrives by Jul 25

$96.81
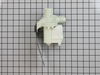
This water inlet valve attaches the water lines to the back of your appliance. The attaching solenoids on the valve open and close according to the desired temperature, or amount of water needed.
Special Order


In Stock
Order now and your part arrives by Jul 25

$25.10
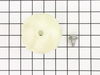
This part is the hub nut, or lock down nut for your washing machine. It is designed to hold the inner tub on to the transmission. If your hub nut is stripped or damaged, it may need to be replaced. T...
In Stock
Order now and your part arrives by Jul 25
Common Problems and Symptoms for 56021A0WW
Viewing 14 of 14Leaking
Fixed by these parts

How to fix it
Will not agitate
Fixed by these parts


How to fix it
Will not drain
Fixed by these parts
How to fix it
No hot or cold water
Fixed by these parts
How to fix it
Burning smell
Fixed by these parts
How to fix it
Will Not Start
Fixed by these parts


How to fix it
Spins slowly
Fixed by these parts
How to fix it
Marks left on clothes
Fixed by these parts
How to fix it
Noisy
Fixed by these parts
How to fix it
Draining Issues
Fixed by these parts
How to fix it
Water Filling Issues
Fixed by these parts
How to fix it
Spinning Issues
Fixed by these parts
How to fix it
Touchpad does not respond
Fixed by these parts
How to fix it
Noisy and Marks Left on Clothes
Fixed by these parts

How to fix it


Keep searches simple. Use keywords, e.g. "leaking", "pump", "broken" or "fit".
- Customer:
- Gerald from Midlothian, VA
- Parts Used:
- WH41X22935, WH23X10030
- Difficulty Level:
- Easy
- Total Repair Time:
- 30 - 60 mins
- Tools:
- Nutdriver, Pliers
Washing Machine was not draining water from tub.
1. Drained the wash tub by taking the drain hose from the back of the washing machine and dropping it below the tub - water flowed out of hose a lot easier than trying to suck water out of tub using a pump (tried this on the first time I tried to fix washer). (Washing machine on 2nd floor of house and didn't want water running on floor)<
... Read more
br />2. Removed the 2 bolts holding the Pump/Motor assembly to the machine.
3. Removed both hose clamps on the Pump/Motor assembly and removed Pump.
4. Attached the new drain inlet hose to the pump and then to the tub with the original hose clamps.
5. Attached the drain hose to the pump and then plugged in the 2 wires for the pump.
6. Plugged in the washing machine and everything worked.
NOTES:
1. Hardest part was working with hose clamps (spring type clamps) in the tight space under the machine.
2. Easier to fix since I pulled machine apart a few days before - removing the clog in the pump/motor assembly only to get everything back together to find out that the motor was dead. Still well worth the time and effort due to not having to go out and buy a new Machine...
Read less
Was this instruction helpful to you?
Thank you for voting!
- Customer:
- Mark from Lexington, KY
- Parts Used:
- WH49X10042
- Difficulty Level:
- Easy
- Total Repair Time:
- Less than 15 mins
- Tools:
- Socket set
Agitator would not move during wash cycle
I placed both hands under the agitator 180 degrees apart, gave a quick jerk, and seperated the agitator from the coupling. With the agitator removed, use a socket and ratchet to remove the bolt holding the coupling to the spline. Remove the old coupling and slide the new one over the spline. Lightly tap on the coupling if necessary. I
... Read more
nsert the bolt with the ratchet and slide the agitator back over the coupling and you are done.
Read less
Was this instruction helpful to you?
Thank you for voting!
- Customer:
- Wayne from Saint Augustine, FL
- Parts Used:
- WH02X10265, WH49X10042, WH38X10002, WH2X1199, WH2X1197, WH2X1193, WH02X10383
- Difficulty Level:
- A Bit Difficult
- Total Repair Time:
- More than 2 hours
- Tools:
- Nutdriver, Pliers, Screw drivers, Socket set
Tub seal leaked, rusted the transmission bearing which locked up
I followed the instructions in the GE Consumer Service Training Technician Manual Pub. No. 31-10008.
I also power washed the basket and tub before reassembly.
The tub seal comes with the transmission and brake assembly so it's not necessary to order another seal.
The agitator coupling kit contai ... Read more ns a redesigned coupler and longer screw with new o-ring.
I bought the hub nut, split ring, tub bearing, agitator coupling kit and washer hub because these are all the parts that go on the transmission shaft. I felt it was best to spend a few dollars more to replace every part involved with the spin and agitation of the washer.
I used the channel lock and a hammer with a shortened handle to remove and replace the hub nut. Use caution as the nut is aluminum.
The entire job took 5 hours.
Read less
Was this instruction helpful to you?
Thank you for voting!