


Models
>
GTW460AMJ5WW
GTW460AMJ5WW General Electric Washer
Jump to:
Find Part by Name
Keep searches simple, eg. "belt" or "pump".
Diagrams for GTW460AMJ5WW
Viewing 5 of 5


Keep searches simple, eg. "belt" or "pump".

$76.45
This replacement lid lock keeps your washing machine door securely closed during the wash cycle. If the washer won’t run or the lid won’t stay locked, this part may need replacing. Installation is sim...
In Stock
Order now and your part arrives by Mar 26

$47.33
This replacement water inlet valve ensures accurate control of hot and cold water entering your washing machine. It plays a key role in maintaining proper water levels for each cycle. If your washer w...
In Stock
Order now and your part arrives by Mar 26

If your washer is shaking or making loud noises during the spin cycle, this left-side suspension rod and spring assembly might be the fix you need. It helps keep the drum stable and reduces vibration ...
In Stock
Order now and your part arrives by Mar 26

In Stock
Order now and your part arrives by Mar 26

In Stock
Order now and your part arrives by Mar 26

$14.65
This part helps prevent the backflow of water from the tub to main water line.
In Stock
Order now and your part arrives by Mar 26

In Stock
Order now and your part arrives by Mar 26

In Stock
Order now and your part arrives by Mar 26

$75.43
This large white washer lid is a genuine OEM replacement for top-load washing machines, designed to cover the drum securely, prevent water splashing, and ensure safe operation during wash cycles. Buil...
In Stock
Order now and your part arrives by Mar 26

In Stock
Order now and your part arrives by Mar 26

In Stock
Order now and your part arrives by Mar 26

In Stock
Order now and your part arrives by Mar 26
Questions and Answers
We're sorry, but our Q&A experts are temporarily unavailable.
Please check back later if you still haven't found the answer you need.
Common Problems and Symptoms for GTW460AMJ5WW
Viewing 13 of 13Leaking
Fixed by these parts


How to fix it
Will Not Start
Fixed by these parts
How to fix it
Lid or door won’t close
Fixed by these parts
How to fix it
Will not drain
Fixed by these parts
How to fix it
Shaking and Moving
Fixed by these parts
How to fix it
Will not agitate
Fixed by these parts
How to fix it
Locking Issues
Fixed by these parts
How to fix it
Water Filling Issues
Fixed by these parts
How to fix it
Spinning Issues
Fixed by these parts
How to fix it
No hot or cold water
Fixed by these parts
How to fix it
Cycle Not Advancing
Fixed by these parts
How to fix it
Does not dispense fabric softener or detergent
Fixed by these parts

How to fix it
Marks left on clothes
Fixed by these parts

How to fix it

Keep searches simple. Use keywords, e.g. "leaking", "pump", "broken" or "fit".
- Customer:
- George from CLARKSVILLE, TN
- Parts Used:
- WH13X26535
- Difficulty Level:
- Easy
- Total Repair Time:
- 30 - 60 mins
- Tools:
- Nutdriver, Screw drivers
Cold water dripping inside of washer from inlet valve
Turn off hot and cold water supply valves feeding washer.
Disconnect both water hoses from washing machine.
Remove two screws (one on each side) from upper silver colored metal plate on back of washer to allow access to (blue) water inlet valve.
Slightly lift the bottom portion of metal plate and slide to release hooks for ... Read more easy removal.
Pull back and tilt forward plastic control panel to get it out of your way.
Disconnect two electrical connections (one on each side) of water inlet valve. One of these came off easily but the other one was stubborn and I had to force it off with a screw driver. If there is an easier way I don't know what it is.
Remove two screws from water inlet valve. (one on each side)
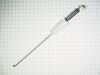
Gently pull up on stainless steel water temperature sensor located in the middle of the water inlet control valve. It has a black wire connected to it so be careful.
Once you have disconnect the sensor you can remove the water inlet valve.
If you look closely you will see a small blue O-ring in the hole where you removed the water temp sensor from the water inlet valve.
The new valve DOES NOT come with a replacement O-ring so you
will have to re-use the old one. I used a small jeweler's screwdriver to get the old out of the hole.
Don't forget to install the O-ring or your washer WILL leak!
Put everything back together in reverse order.
Check hose connections for leaks.
Hope this helps somebody. Wish I had known about the O-ring. It would have saved me a headache.
Disconnect both water hoses from washing machine.
Remove two screws (one on each side) from upper silver colored metal plate on back of washer to allow access to (blue) water inlet valve.
Slightly lift the bottom portion of metal plate and slide to release hooks for ... Read more easy removal.
Pull back and tilt forward plastic control panel to get it out of your way.
Disconnect two electrical connections (one on each side) of water inlet valve. One of these came off easily but the other one was stubborn and I had to force it off with a screw driver. If there is an easier way I don't know what it is.
Remove two screws from water inlet valve. (one on each side)
Gently pull up on stainless steel water temperature sensor located in the middle of the water inlet control valve. It has a black wire connected to it so be careful.
Once you have disconnect the sensor you can remove the water inlet valve.
If you look closely you will see a small blue O-ring in the hole where you removed the water temp sensor from the water inlet valve.
The new valve DOES NOT come with a replacement O-ring so you
will have to re-use the old one. I used a small jeweler's screwdriver to get the old out of the hole.
Don't forget to install the O-ring or your washer WILL leak!
Put everything back together in reverse order.
Check hose connections for leaks.
Hope this helps somebody. Wish I had known about the O-ring. It would have saved me a headache.
Read less
Was this instruction helpful to you?
Thank you for voting!
- Customer:
- Timmothy from EAGLEVILLE, PA
- Parts Used:
- WH08X37938
- Difficulty Level:
- Very Difficult
- Total Repair Time:
- More than 2 hours
- Tools:
- Pliers, Screw drivers, Wrench (Adjustable)
The lid switch which signals that the washer door is closed malfunctioned. Even with the lid closed the washer would not spin because the washer was detecting the lid as open because of the faulty switch
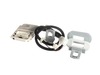
The replacement part looked absolutely nothing like the defective part. The old part was easily accessible and was easily unplugged from the wiring harness. I assume when the new part came, I would just plug it into the wiring harness, snap some of the trim pieces in place and be done. 5 minutes. But no. The replacement part was c
... Read more
ompletely different and came with its own wiring harness and length
of wire which had to be installed. The installation of the wiring harness was extremely complicated which involved popping off the control panel of the washer, prying up the top and disconnecting some other pieces to complete the install. There should have been a clear warning on the replacement part, that it was completely different and likely too difficult for a non-professional repair man.
of wire which had to be installed. The installation of the wiring harness was extremely complicated which involved popping off the control panel of the washer, prying up the top and disconnecting some other pieces to complete the install. There should have been a clear warning on the replacement part, that it was completely different and likely too difficult for a non-professional repair man.
Read less
Was this instruction helpful to you?
Thank you for voting!
- Customer:
- ronnie from BALTIMORE, MD
- Parts Used:
- WH08X37938, WH08X37938
- Difficulty Level:
- Really Easy
- Total Repair Time:
- Less than 15 mins
- Tools:
- Nutdriver, Socket set
washer would not complete full wash cycle without shutting off
part select help
Was this instruction helpful to you?
Thank you for voting!